Chat now with support
Chat with Support

vRanger 7.6.3 - User Guide

Introduction Configuring vRanger
Configuring vRanger through the Startup Wizard Configuring vRanger manually Supplemental instructions: additional repository types
Using vRanger Backup Restore
Restoring a physical server Performing a full restore for VMware VMs Performing a full restore for Hyper-V® VMs Performing a full restore for VMware vApps Performing a full restore of a physical machine Performing an FLR on Windows Performing an FLR on Linux Restoring from manifest
Replicate VMs Reports Integrating and monitoring vRanger Using the vRanger Console vAPI Cmdlet details
Add-BackupJobTemplate Add-CIFSRepository Add-DdbReplicationRepository Add-DdbRepository Add-EsxHost Add-HypervCluster Add-HypervHost Add-HypervRestoreJobTemplate Add-NFSRepository Add-NVSDRepository Add-PhysicalMachine Add-RdaRepository Add-ReplicationJobTemplate Add-RestoreFromManifestJobTemplate Add-RestoreJobTemplate Add-VirtualAppforLinuxFLR Add-VirtualAppforLinuxFLRVA Add-VirtualCenter Disable-Job Dismount-LinuxVolume Enable-Job Get-AddressBook Get-BackupGroupEntity Get-CatalogSearchData Get-CatalogStatus Get-ConfigOption Get-Connection Get-CurrentTemplateVersionID Get-Datastore Get-GlobalTransportFailover Get-InventoryEntities Get-IsInventoryRefreshing Get-Job Get-JobTemplate Get-MonitorLog Get-Network Get-PhysicalMachineDiskMap Get-Repository Get-RepositoryJob Get-RepositorySavePoint Get-RestoreDiskMap Get-SavepointDisk Get-SavepointManifest Get-Savepoints Get-TransportFailover Get-VirtualApplianceConfig Get-VirtualApplianceDeploymentStatus Get-VirtualApplianceReconfigStatus Get-VirtualMachinesUnderInventory Get-VmDisk Get-VMDKVolume Install-VirtualAppliance Mount-LinuxVolume New-BackupFlag New-BackupGroupMember New-Daily Schedule New-EmailAddress New-IntervalSchedule New-MonthlySchedule New-ReplicationFlag New-RestoreFlag New-SMTPServer New-TransportConfiguration New-VirtualAppliance New-WeeklySchedule New-YearlySchedule Remove-AllMount Remove-BackupGroupEntity Remove-BackupGroupMember Remove-Catalog Remove-DdbStorageUnit Remove-JobTemplate Remove-LinuxVolume Remove-Repository Remove-SavePoint Remove-VirtualAppliance Remove-VirtualApplianceConfiguration Run-JobsNow Run-ReplicationFailover Run-ResumeReplicationFailover Run-TestReplicationFailover Set-Cataloging Set-CBTonVM Set-LinuxVolume Set-MountPath Set-Resources Stop-vRangerJob Update-BackupJobTemplate Update-GlobalTransportFailover Update-HypervRestoreJobTemplate Update-Inventory Update-ReplicationJobTemplate Update-RestoreJobTemplate Update-VirtualAppliance Update-VirtualApplianceConfiguration
About us

Configuring DNS

Previous Next


Configuring DNS

Depending on your environment, you might have to configure the VA with DNS nameserver information. The steps to change an existing configuration are the same.

To configure DNS:
search <domain1> <domain2> <domain3>
nameserver <IP address>
5
Restart the VA by typing reboot at the prompt.

Disabling Distributed Resource Scheduler (DRS) for the vRanger VA

Previous Next


Configuring vRanger > Supplemental instructions: additional repository types > Disabling Distributed Resource Scheduler (DRS) for the vRanger VA

Disabling Distributed Resource Scheduler (DRS) for the vRanger VA

If the vRanger appliance is configured on hosts that are part of a DRS-enabled cluster, the VAs might be migrated to a different host due to DRS and high-availability (HA) activity. This change causes replication failures as the VA is no longer in the expected location — as configured in vRanger. To prevent this disruption, it is important to disable DRS for the vRanger VAs.

To disable DRS for the vRanger VA:
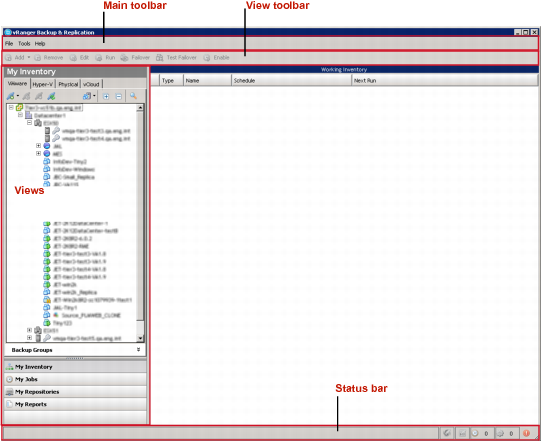
3
In the Cluster Settings dialog box, select Virtual Machine Options.

Using vRanger

Previous Next


Using vRanger

vRanger user interface (UI) overview

The vRanger UI consists of four views: My Inventory, My Repositories, My Jobs, and My Reports. Each view features the Main toolbar and each pane’s toolbar.

In the left pane within these views, data appears nested in a tree structure. In general, the information that appears in the right pane depends on the node that you select in the left pane. Each node has a distinct icon, making navigation easy and hierarchy clear.

For instructions on using the Startup Wizard to configure the software for your environment, see Configuring vRanger through the Startup Wizard.

Main toolbar

Previous Next


Using vRanger

vRanger user interface (UI) overview

The vRanger UI consists of four views: My Inventory, My Repositories, My Jobs, and My Reports. Each view features the Main toolbar and each pane’s toolbar.

In the left pane within these views, data appears nested in a tree structure. In general, the information that appears in the right pane depends on the node that you select in the left pane. Each node has a distinct icon, making navigation easy and hierarchy clear.

For instructions on using the Startup Wizard to configure the software for your environment, see Configuring vRanger through the Startup Wizard.

Related Documents

The document was helpful.

Select Rating

I easily found the information I needed.

Select Rating