This type of deployment supports SAN and LAN (network block device [NBD] or NBDSSL [encrypted]) transport modes. For more information about transport modes, see Supported transport modes.
This type of deployment supports HotAdd and LAN (network block device [NBD] or NBDSSL) transport modes. For more information about transport modes, see Supported transport modes.
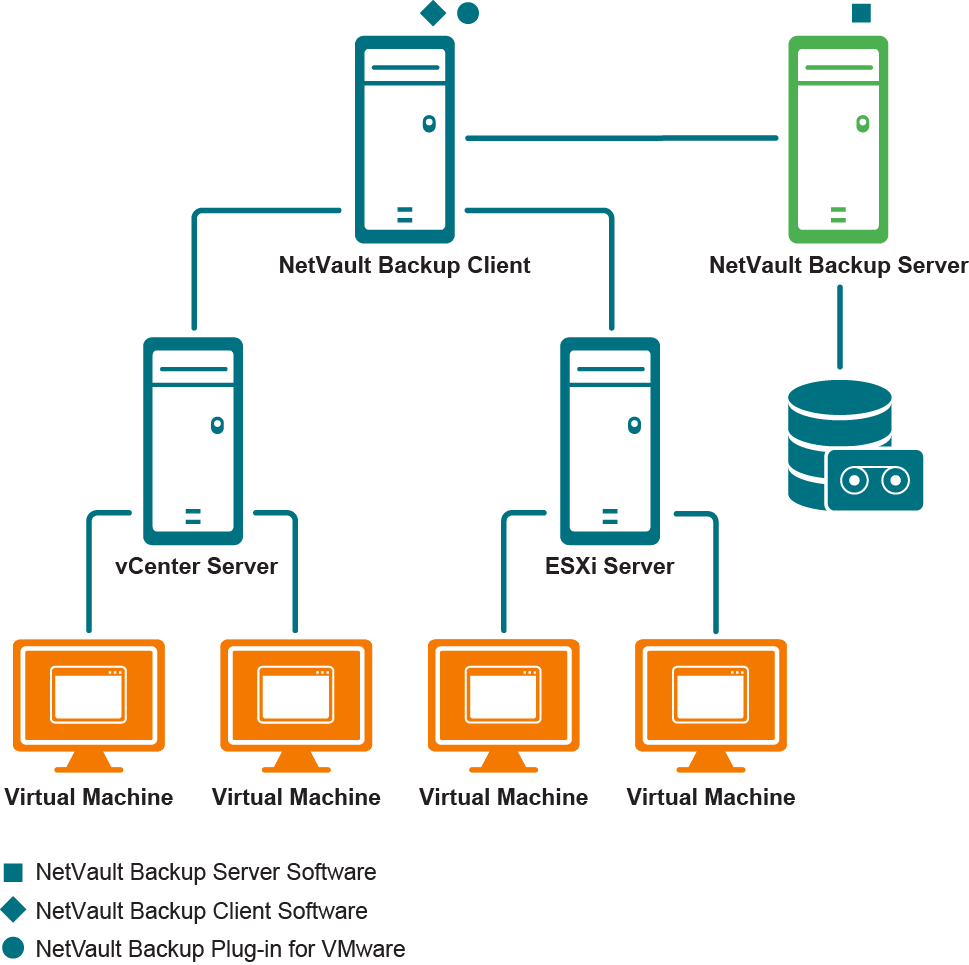
Before installing the plug-in, verify that the following requirements are met:
|
• |
Install NetVault Backup Client: Install the NetVault Backup Client software on the physical or virtual machine on which you want to install the Plug‑in for VMware. For LAN-free backups, you must obtain a NetVault Backup SmartClient license. For more information about installing the NetVault Backup Client, see the Quest NetVault Backup Installation Guide. |
|
• |
Install applicable libraries on Linux-based clients: On Linux-based clients, the Plug‑in for VMware and Virtual Disk Development Kit (VDDK) require the following libraries: |
|
• |
Plug‑in for VMware requirements: On Linux-based systems, the Plug‑in for VMware requires the following libraries: |
|
• |
VDDK requirements: On Linux-based systems, VDDK requires the following libraries: |
|
• |
libexpat.so.1.5.2: To use advanced transport modes, install the XML library libexpat 1.95.8 on the client. Without the correct version of this library, the jobs that use advanced transport modes may fail. |
|
• |
C++ Library Package: Verify that the C++ Library is available on the Linux client. Some old Linux distributions might not include this package in a base installation. On such systems, install the C++ Library Package from the distribution ISO. |
|
• |
Additional library requirements: VDDK also requires the following libraries: |
|
• |
Add the NetVault Backup Client: Add the designated client to the NetVault Backup Server. For more information about adding clients, see the Quest NetVault Backup Administrator’s Guide. |
You can install the plug-in simultaneously on multiple machines by using the configuration wizard. Alternatively, you can install a plug-in on a single client from the Manage Clients page.
The following sections describe the different procedures that you can use to install the plug-in:
Before you start the push installation procedure, verify that the following requirements are met:
|
• |
Copy the packages to a shared location: Copy the plug-in packages to a shared location. Only CIFS shares are currently supported as package stores. The path must be accessible to the NetVault Backup Server and all target machines where you want to install the packages. |
|
• |
Configure a package store in NetVault Backup: After copying the installation packages, configure the shared location details in NetVault Backup. For more information, see the Quest NetVault Backup Administrator’s Guide. |
|
1 |
In the Navigation pane, click Guided Configuration, and then on the NetVault Configuration Wizard page, click Install Software/Add Clients. |
|
2 |
|
3 |
In the Package Store list, select the repository that contains the installation packages that you want to deploy. |
|
4 |
To add plug-in packages, click Add NetVault plug-in package, and then complete the following steps: |
|
a |
In the Select Packages for Deployment dialog box, select the check boxes corresponding to the “.npk” binary files that you want to use, and click OK. |
|
b |
Click Next. |
|
5 |
On the Machines to Have NetVault Software Installed page, click Choose Machines, and select From available machines. |
|
6 |
|
8 |
To submit the task, click Install Software/Add Clients. |
|
1 |
In the Navigation pane, click Guided Configuration, and then on the NetVault Configuration Wizard page, click Install Plugins. |
|
2 |
In the NetVault Backup Clients table, select the clients on which you want to install the plug-in. |
|
3 |
Click Choose Plug-in File, navigate to the location of the “.npk” installation file for the plug-in, for example, on the installation CD or the directory to which the file was downloaded from the website. |
|
4 |
Select the file entitled “vmw-w.x.y.z-<platform>.npk,” where w.x represents the version number, y represents the patch level, and z represents the build number, and click Next. |
From the Manage Clients page, you can install a plug-in on a single client.
|
1 |
In the Navigation pane, click Manage Clients. |
|
2 |
|
3 |
|
4 |
Click Choose Plug-in File, navigate to the location of the “.npk” installation file for the plug-in, for example, on the installation CD or the directory to which the file was downloaded from the website. |
|
5 |
Select the file entitled “vmw-w.x.y.z-<platform>.npk,” where w.x represents the version number, y represents the patch level, and z represents the build number, and click Install Plugin. |
|
1 |
In the Navigation pane, click Manage Clients. |
|
2 |
|
3 |
|
4 |