Chat now with support
Chat with Support

Benchmark Factory for Database 8.3 - User Guide

Getting Started Licensing Overview of Benchmark Factory Benchmark Factory Components Agents Create and Edit Connections Create and Edit Tests and Jobs Test Results and Run Reports Troubleshooting The Benchmark Factory REST API

Custom Tests

Custom tests allow you to create workloads from user provided SQL. These tests provide flexibility for your load testing requirements. The following customs load scenarios are provided:

  • Mix Test—Runs a transaction mix based upon weights for a specified time at each predetermined user load level.
  • Replay Test—Runs multiple transactions with each one running independently on a specified number of users.
  • Goal Test—Used to find maximum throughput or response time values. A transaction mix is executed at a range of user load levels.
  • Scalability Test—Compares the performance of SQL Statement variations under a workload. Each transaction will execute individually for each user load and timing period.   

Create Mix Test

A Mixed Workload test runs for a specified time at each predetermined user load level.  Each user will run a transaction mix based upon the weights defined on the transactions tab.  For example, if a test has two transactions, A and B, with A having a weight of one and B having a weight of four, on average B will run four times for every time A is run once. The run order will be randomly generated for each user so they are not all running the same transaction simultaneously. That run order is used for that user each time the test is performed to ensure reproducible results.

To Create a Custom Mix Test

  1. In the New Job or Edit Job Wizard, click Workload in the left pane.
  2. On the workload page, select Custom Test from the drop-down list.
  3. Select the Mix test executes ... option.
  4. Click the Add Test button.The test is added to the workload and the test Summary page displays.
  5. On the Summary page, click the link beside Custom Mix Load Scenario to add transactions. See Transactions Tab for more information.
  6. Then specify the weight for each transaction.
  7. Or you can select the Test Options tab to modify all test options. Review the following for additional information:

    Tab Description
    Transactions tab

    Modify the transactions and the transaction mix for the test.

    See Transactions Tab for more information.

    User Load tab Modify the number of users per test iteration. See Specify User Load for more information.
    Timing tab Specify sampling, pre-sampling, and user start-up times for the test. See Timing Tab for more information.
    Advanced tab

    Specify Repository options, error handling, and database checkpoints for the test.

    You can also specify a file to execute at the beginning or end of each iteration. See Advanced Tab for more information.

  8. After specifying options for this test, you can add another test to the job, configure job setup options, save and close the job, run the job, or schedule the job. For more information about each of these steps, see Quickstart: Create a New Job.

Create Replay Test

A Replay Test runs multiple transactions with each one running independently on a specified number of users. The test will run until the defined number of executions for each transaction or a specified time limit is reached.  

To create a Custom Replay Test

  1. In the New Job or Edit Job Wizard, click Workload in the left pane.
  2. On the workload page, select Custom Test from the drop-down list.
  3. Select the Replay test executes ... option.
  4. Click the Add Test button. The test is added to the workload and the test Summary page displays.
  5. On the Summary page, click the link beside Custom Replay Load Scenario to add transactions or a user scenario. See Transactions Tab for more information.
  6. Then select the number of users and/or number of executions for each transaction or user scenario.
  7. To jump to the Test Options tab, click Test Options at the bottom of the Summary page. Review the following for more information:

    Tab Description
    Transactions tab

    Modify the transactions and the transaction mix for the test.

    For a custom test, add transactions.

    See Transactions Tab for more information.

    Options tab Enable scaling for the user scenario. See Options Tab (Capture/Replay) for more information.
    Timing tab

    User Startup—Select one of the following options:

    • Start all users as quickly as possible—Starts all users immediately after a test begins.
    • Start all users at even intervals for—Sets the amount of time in which to start all users at even intervals. The interval duration is equal to this value divided by the number of users.
    • Start a new user every [n] seconds—Starts a new user, then waits the [n] number of seconds before starting the next user.
    Advanced tab

    Specify Repository options, error handling, and connect/disconnect options for the test. See Advanced Tab for more information.

  8. After specifying options for this test, you can add another test to the job, configure job setup options, save and close the job, run the job, or schedule the job. For more information about each of these steps, see Quickstart: Create a New Job.

Create Goal Test

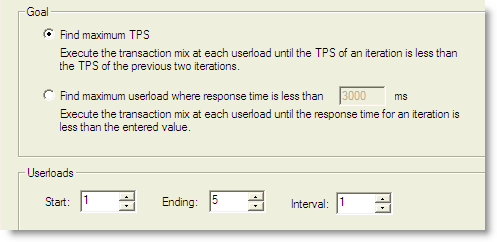
A Goal Test uses a transaction mix based on userload intervals. The userloads are determined by setting a beginning, ending, and interval value. This value specifies an interval to increase the number of users tested for each iteration of the Goal Test. When run, the specified goal criterion is evaluated at the end of each iteration and the test ends once the goal or maxim user load has been reached.

To create a goal test

  1. In the New Job or Edit Job Wizard, click Workload in the left pane.
  2. On the workload page, select Custom Test from the drop-down list.
  3. Select the Goal test is used ... option.
  4. Click the Add Test button.The test is added to the workload and the test Summary page displays.
  5. On the Summary page, click the link beside Max TPS ... to add transactions. See Transactions Tab for more information.
  6. To change the goal, select the Options tab (under Test Options tab).

  7. Select one of the following:
    • Find maximum TPS—Selecting this option will show how the maximum TPS can be reached during a load test.
    • Find maximum userload where response time is less than <n> ms—Selecting this option shows how a maximum userload can be reached when response time is less than the specified value.
  8. To modify the userload range and interval, select the Options tab (under Test Options tab). Specify a range and then an interval at which to increase users after each iteration.
    • For this test, the default values are: a range of 1-5 and an interval of 1. When run, User Loads of 1, 2, 3, 4, 5 are run until the TPS of one run is less than the TPS of the previous run.
  9. Specify more options for this test by reviewing the Timing and Advanced tabs. Review the following for additional information:
  10. After specifying options for this test, you can add another test to the job, configure job setup options, save and close the job, run the job, or schedule the job. For more information about each of these steps, see Quickstart: Create a New Job.

Related Documents

The document was helpful.

Select Rating

I easily found the information I needed.

Select Rating