From the Job List, you can export a job to an xml file. This functionality allows you to:
·Copy a job from one instance of Content Matrix to another (as long they are for the same Edition).
·Manually modify a job, then re-import it.
To export a job to an xml file:
1.In the Job List, select the job(s) you want to export.
NOTE: If you select multiple jobs, they will be saved to a single xml file.
2.Right-click, and choose Export selected job to xml.
The xml file will automatically open in whatever program is set as the default application for xml files, and it can be saved to any desired location.
To import an xml file to the Job List:
1.Make sure the file you want to import uses a different Job ID than any existing jobs (this should only be an issue if the xml file was previously exported from the same Content Matrix Console).
NOTE: If you import an xml file via the Console and the file being imported contains the same Job ID as an existing Job, then the import will fail. However, you can create a duplicate job with a different Job ID if you import the xml file using PowerShell.
2.From the Job List menu, choose File > Import Jobs From Xml.
3.Select the xml file to import.
If the import is successful, the job will be listed in the Job List section. If unsuccessful, an error message will be displayed.
NOTE: The refresh is applied to whichever job list Content Matrix is currently connected to.
To refresh the Job List:
1.From the Manage Queue dialog, select a job in the Job List. The row selector icon and the highlighted row indicates the selected row.
2.From the Job List menu bar, choose File > Refresh.
If the status of the job has changed, the Status value will indicate the new status of the job.
In order to create a PowerShell (PS) script for Content Matrix, a job list (or batch file) must first exist in the Job List section of the Content Matrix Console. Once created, it can be run from the PowerShell console or scheduled to run as a Windows Scheduled task.
NOTES:
· It is recommended that the connections to the source and target environments have the Remember my password check-box selected. This is to ensure that the PowerShell scripts will be able to establish a connection to both the source and target environments when they are being run. If a password is required and this check-box is not set, the migration will fail. However, users can manually enter this value into the PowerShell script itself if the option was not checked when the script was first generated.
·Web Browser Authentication, O365 Web Browser Authentication, and Forms-based Authentication are not supported for running a job using a PowerShell script.
Refer to the Quest Support Knowledge Base article Connections that will work with PowerShell and Connections that doesn't work with PowerShell for complete details.
To create a PowerShell script:
1.In Job List, and select the job (or jobs) that you want to run in PowerShell.
2.Click the Generate PowerShell Script button in the Job List tool bar, or right-click on one of the items and select Generate PowerShell Script from the context menu.
3.From the drop-down, choose the appropriate option. Use the information in the following table for guidance.
|
If you want to generate a PowerShell script for scheduling |
Choose |
|---|---|
|
that can be used only by the currently logged in User Account on the machine it is generated on |
For Current User and Machine. NOTE: Any PowerShell scripts that are generated for scheduling through this option can only be run by the logged in user on the machine they were generated on. |
|
that can be used by any User account on the machine it is generated on |
For Local Machine. |
|
that can be used by any User account on any machine that has the certificate that is specified when the script is created |
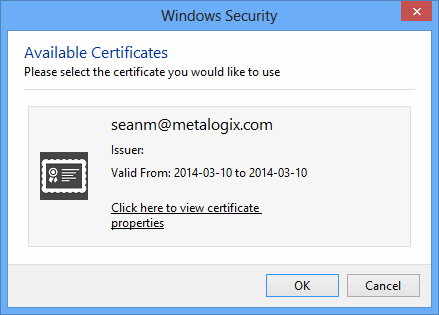
For Certificate. When you save the PowerShell script using this method you will be prompted to select a security certificate that exist on that machine. The selected certificate will be required on any system that attempts to run the script at a later date.
|
Once the PS script generation type is selected, Content Matrix Console will generate a PS script for the select Job, which will be written to a Microsoft Notepad file. If multiple jobs are selected they will all be written to the same file.
4.Choose File > Save As... and select any desired save location for the PowerShell script. Give the file any name you want, but change the file type to .PS1.
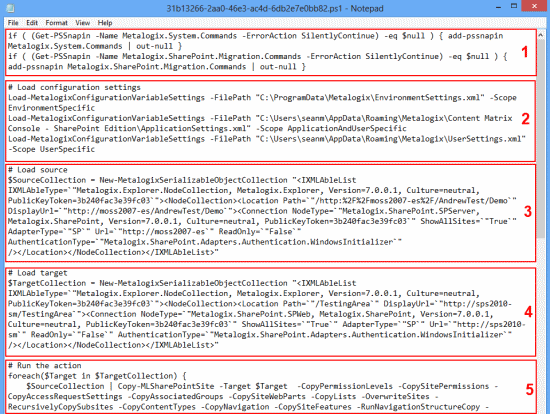
The PowerShell (PS) script itself contains five sections. They are:
·Section 1 - This first section at the top (starting with an "if" statement) runs a check in the PowerShell console to make sure that the Metalogix snap-ins have been added. If they are not found then it will add them to that instance of the PS console.
·Section 2 - Load Configuration settings - This section will find and load all of the Content Matrix client application configuration settings into the PowerShell script. These are the client application's environmental settings and not the migration/action settings.
·Section 3 - Load source - This section will load all of the data for the source environment connection.
·Section 4 - Load target - Similar to the previous section, this will load target environment's connection information.
·Section 5 - Run the action - Last is the "Run the action" section. This last section will contain all of the other data for the migration, such as the type of migration (i.e. a site migration, list migration, item migration, etc.) and all of the settings and configurations for the migration/action that is being run. This includes things like settings for versions, content types, permissions, etc.
Now you can run or schedule the PowerShell script.
Once a PowerShell script has been created, you can run it from the PowerShell console.
To run the PowerShell script:
NOTES:
· If you have more than one edition of Content Matrix, only one edition can be run per PowerShell session.
·If Content Matrix settings is changed, in order to apply new settings all PowerShell sessions must be restarted.
To add the PowerShell cmdlets for the application framework:
1.Open a Powershell ISE or PowerShell console session.
2.Run the Add-PSSnapin command and by pasting in the following text:
if( $PsVersionTable.PSVersion.Major -lt 3 ) { Write-Host "Windows PowerShell Version 3.0 or later needs to be installed in order to run Content Matrix PowerShell scripts."; exit; }if ( (Get-PSSnapin -Name Metalogix.System.Commands -ErrorAction SilentlyContinue) -eq $null ) { add-pssnapin Metalogix.System.Commands | out-null }if ( (Get-PSSnapin -Name Metalogix.File.Commands -ErrorAction SilentlyContinue) -eq $null ) { add-pssnapin Metalogix.File.Commands | out-null }if (Get-Command Set-MetalogixJobPrerequisites -ErrorAction SilentlyContinue){ Set-MetalogixJobPrerequisites -Value "Content Matrix Console - File Share Edition" }
2.Set the directory to the location where the PowerShell script is located.
3.Enter the name and extension of the PowerShell Script (at its specified location), and the script will run.
In the case that you are running a script from the same directory you would use the format: .\[ScriptName].ps1. So if your PowerShell scrip was named "ResourceScript.ps1" then you would enter: .\ResourceScript.ps1 into the window, and the script would run.
If the script is in a different directory, you would enter the location of that directory relative to your current location, followed by the script name. For example, if your prompt is at the "C:\" drive and your PowerShell script, named "ResourceScript.ps1" is on the desktop you would enter: C:\Users\[User]\Desktop\ResourceScript.ps1, and the script would run.
NOTE: In some cases the Execution Policy may prevent you from running a PowerShell script. In this case you will likely see the message: [Script].ps1 cannot be loaded because the execution of scripts is disabled on this system. Please see "get-help about_signing" for more details. In this case, running the command: set-executionpolicy RemoteSigned should change the existing script policy to allow you to run these scripts for your location. It is advised that you check with your System Administrators before doing this to ensure that no Company Policies are being broken by this action. If this is an action you need to take, you should only need to run this command once.
The migration will begin, and any warnings and/or errors that are encountered in running the script will be displayed in the PowerShell window.