The SharePoint Migration Using CSV feature allows you to perform bulk migrations from a SharePoint source to a corresponding SharePoint target using a single CSV file. This feature allows data to be migrated as a paste of all site contents, streamlining the migration process.
This feature supports both SharePoint Online and SharePoint on premises targets.
Key Features:
·Facilitates bulk migration in SharePoint Edition using a single CSV file.
·Allows migration of a site as all site content to a SharePoint target.
·Supports hierarchical SharePoint nodes.
·Since Content Matrix supports connecting the same SharePoint URL using different users, adapters, authentication types, and access modes (read-only or write), it does not prevent connections for already connected URLs. During bulk migration using CSV, the application validates and determines the appropriate SharePoint connection for each URL based on the connection scopesuch as Tenant, Farm, Web Application, Site Collection, or Subsite.
Notes:
·If one migration record uses a site as the source and another record uses a subsite of that same site as the source, the bulk migration will be blocked. This is because the first migration locks the entire root source, preventing the second migration record from accessing its subsite source.
·If the same source is specified in multiple migration records, the application considers it invalid.
·Metadata entries are directly stored and cleared from the current job source.
Prerequisites:
·Connections in Content Matrix
oValid SharePoint source and target connections exist in Content Matrix. Any missing connections or connections that are in an error state will invalidate the migration scenario for that CSV entry.
oThis feature supports validating sites and subsites in the CSV using different connection types, including Tenant, Farm, Web Application, Site Collection, and Subsite connections.
·CSV Validations
oIf duplicate source entries in the imported CSV file will invalidate the associated connection combination.
oMultiple CSV entries with same source and target will be consolidated into a single entry.
oClear messages will be displayed if there are missing details in the CSV.
oSeparate CSV files need to be created for on premise targets and SharePoint Online targets. Both connection types cannot be used simultaneously in a single CSV.
Preparing the CSV File
Before starting the migration, prepare a CSV file in the following format. Enter the URL of the SharePoint source in the Source field and the URL of the SharePoint target site in the Target field.
Source,Target
http://Source:4000/website/teams/Sub1,http://target:5000/website/teams/Sub1
http://Source:4000/website/teams/Sub1,http://target:5000/website/teams/Sub2
http://Source:4000/website/teams/Sub1,http://target:5000/website/teams/Sub3
To perform a migration using CSV:
1.In the Content Matrix ribbon toolbar, select Connection > Migrate from CSV.
2.In the Migrate Content from CSV dialog, click the browse button to select the CSV file. Once selected, all rows from the CSV file will be displayed, along with a Status column that indicates whether each CSV row is valid for migration.
NoteS:
·If the source and target specified in a CSV row are connected in Content Matrix, or their corresponding Tenant, Farm, or Web Application connections are established, the status will be marked Valid. If any required connections are missing or have an error status, the status will be marked Invalid.
·If the target in the first row is a SharePoint Online site, all connected SharePoint Online site connections related to the migration will be marked Valid.
·Similarly, if the target in the first row is an on-premises site, all connected on-premises site connections will be marked Valid.
3.Select Continue.
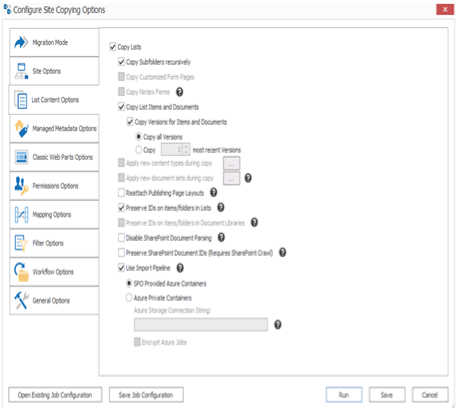
4.In the Configure Site Copying Options dialog, select the appropriate site copying options as needed.
5.Once all the settings are configured, you can proceed with one of the following options:
a)To start the migration job now, select Run. All migration combinations with a valid status will be initiated. Once successfully finished, their status will change to Completed.
a)To save the configuration and run the migration later, select Save. For example, you may want to export the PowerShell script and run the migration later from the PowerShell console.
Note: As with other migration jobs, you can run the job from the Content Matrix Console or using PowerShell. The only difference is how the migration is logged:
·Running the migration from the UI creates a single migration job in the job source, which will contain logs for all migrations combinations included in the CSV file.
·Running the migration via PowerShell creates separate migration jobs in the job source, each corresponding to a different target location.
The Paste [Object] dialog provides a tabbed interface that enables you to configure a migration according to your specifications. Available tabs will vary based on the type of migration that you initiated.
To configure Migration Mode:
1.Select the mode that you want to use. Use the information in the following table for guidance.
|
If |
Select |
|---|---|
|
·you are performing an initial copy or want a clean copy of the source to be migrated to the target. AND/OR ·you want to overwrite any existing data on the target that matches migrated content |
Full Copy. NOTES: ·Comparing whether an object from the source matches an object on the target is usually performed by comparing the names of the objects. The only exception to this is that items in custom lists are matched by ID number (documents in document libraries are matched by file name). ·When this option is selected, the Preserve Item IDs option for items in lists (not libraries) is enabled. This is to ensure that the target has the exact same item IDs as the source so that the copy is a mirror of the source. This is required in order to perform incremental migrations later, since item ID values are used to match corresponding items on the source and target. |
|
·you are performing an incremental migration AND/OR ·you want to preserve (not overwrite) data on the target. |
Incremental Copy. NOTES: ·Only objects that do not yet exist on the target are copied. EXCEPTION: For lists and libraries that have versioning enabled, new versions will be copied from the source, while all versions that already exist on the target will be preserved. ·When this option is selected: §the Preserve Item IDs option is enabled, and §the Workflow Copy Options is disabled .(Incremental copies cannot be run on workflows.) |
|
you want to choose which objects to preserve or overwrite on the target |
Custom Copy. |
2.If you selected Custom Copy as the migration mode, you can select the objects that you want to preserve, as well as individual settings that you want to update. (By default, all options are set to Overwrite, as with a Full Copy.)
NOTE: If you selected Full Copy or Incremental Copy, these options will be disabled.
|
If you want to |
Then |
|---|---|
|
·preserve existing sites, and ·(optionally) select specific site settings to be updated |
A.Choose Preserve Sites. B.If you want to update individual site settings, select Update Sites then, from the Update Existing Options dialog, select the settings you want to update (if newer on the source). Options are: §Update Core Metadata (such as the "web" name, time zone settings, site descriptions, display name, etc §Update Site Columns §Update Content Types §Update Site Navigation Settings §Update Features §Update Site Web Parts §Update Permissions (at the site-level) §Update Permission Levels If Update Permissions is selected, you can also choose to update any permissions levels that exist on the sites §Update Associated Group Settings - These are settings for the three basic groups that are associated with a site, the Owners, Members, and Visitors groups. |
|
·preserve existing list settings AND ·(optionally) select specific list settings to update (if newer on the source) |
A.Choose Preserve Lists. B.If you want to update individual list settings, select Update Lists box then, from the Update List Options dialog, select the elements you want to update (if it is newer on the source). Options are: §Update Core Metadata (including list description, title, etc). §Update Fields (including settings for columns/fields that are within the lists, but not the values for data within those fields) §Update Views - When selected, this option will only update the views for lists and libraries that are within the scope of the migration. This will check to see is any views have been edited or added to the lists within the migration, and adds any new or modified views that it finds. This will not migrate any "Personal" views. §Update Content Types at the list level §Update Permissions at the list level C.Check modified dates for Lists - update the list metadata if the value on the source is greater than the value on the target. When selected, this option will check the Modified Date for a SharePoint list, and will only update the list metadata if the value on the source is greater then the value on the target.
This option is available only if you have already chosen to Preserve Existing Sites. |
|
·preserve existing list item settings AND ·(optionally) select specific list item settings to update (if newer on the source) |
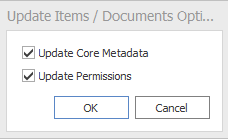
A.Choose Preserve List Items. B.If you want to update individual list item settings, select Update List Items box then, from the Update Items/Documents Options dialog, select the settings you want to update. Options are: §Update Core metadata (including the Authorship fields) §Update Permissions When selected, this option will only update the item level permissions, within the scope of the migration. This option is available only if you have already chosen to Preserve Existing Lists. |
|
·delete any items on an premises target that have since been deleted on the source |
Select Migrate Item Deletions Only. (If this option is not selected―which is the behavior for all other Migration Modes―and a file has been deleted from the source, Content Matrix will not delete those files from the target.)
NOTE: This option is available only if you chose to Preserve List Items. |
If you initiated a site collection level migration, select the Site Collection Options tab and specify the options described below.
|
|
Site Collections can only be pasted to a Web App or Farm connection type, using an Object Model (OM) level connection (through the use of a local or Extensions Web Service connection). A similar (but slightly limited) set of Site Collection options is also available for migrating to Microsoft 365 environments, when an Microsoft 365 Tenant connection is used. |
|---|
To configure Site Collection Options:
1.Use the information in the following table to determine the appropriate action to take.
|
If your target environment is . |
Then |
|---|---|
|
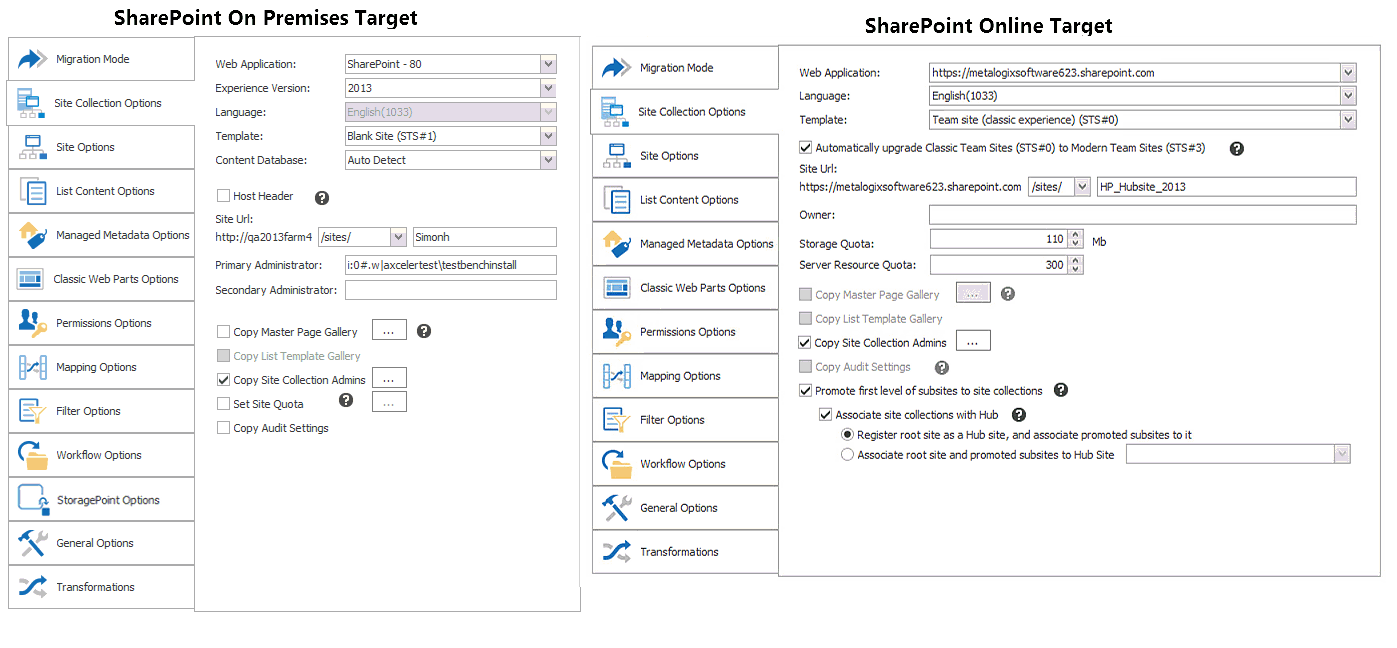
On premises |
select the Web Application into which you want to migrate the site collection from the drop-down. |
|
Microsoft 365 |
For Web Application, select the appropriate URL from the drop-down:
|
2.If different from the default, select an available Language from the drop-down.
3.If different from the default (the template used on the source), select a Site Collection Template from the drop-down.
NOTE: For SharePoint Online and SharePoint 2019 targets, you also have the option to Automatically upgrade Classic Team Sites (STS#0) to Modern Team sites (STS#3).
See Team Site to Modern Team Site Migration for a complete explanation of this option.
4.If your target is SharePoint on premises: If the Web Application into which you are migrating the Site Collection has more than one Content Database and you would like to specify the one you want to use, select it from the drop-down.
5.Use the information in the following table to determine the appropriate action to take.
|
If you want to use |
Then |
|---|---|
|
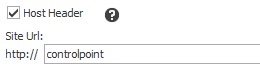
a Host Header for your Site Collection URL
(For a SharePoint on premises target only) |
·check the Host Header box, and ·enter the host name in the Site URL field. |
|
a path-based URL for your site collection |
select the appropriate managed path and enter the URL name in the Site URL field. |
6.Use the information in the following table to determine the appropriate action to take.
|
If your target environment is . |
Then |
|---|---|
|
On premises |
·If different from the default (the migrating account), enter the user account that will be the Primary Administrator for the new Site Collection. The migrating account should be set as the Primary (or Secondary) Administrator to help ensure that the account can access the new site collection after its creation, so it can migrate the remaining content. ·(Optional) Enter a user account that will be the Secondary Administrator for the Site Collection. NOTE: This field does not authenticate, so any spelling mistakes will not be automatically corrected. |
|
Microsoft 365 |
Enter the Microsoft 365 account that will be the Owner/Site Collection Administrator of the new Site Collection. |
8.For SharePoint Online tenants: If different than the default(s), adjust the values for:
§Storage Quota (the amount of storage allocated to the site collection by Microsoft), and/or
§Server Resource Quota (the amount of resources―such as CPU and RAM―allocated to the site collection by Microsoft).
9. If you want to copy Master Pages, Page Layouts, and/or Other Resource from the Master Page Gallery on the source site, select Copy Master Page Gallery.
By default, Content Matrix will copy all three components Pages, Layouts, and Resources), but you can choose components to include/exclude by clicking the [ ] button and selecting/deselecting individual components.
Depending on the source and target SharePoint version(s), there are limitations on how Master Pages are migrated. For details, see Master Page Migration.
Note that, if you choose to Copy Master Pages, you also have the option to Correct Links on Master Pages (that is, so links point to the same relative path on the target). If you leave this box unchecked, links will continue to point to the source.

For more detailed information on link correction, see Link Correction.
10.If your source and target use the same version of SharePoint and you want to Copy List Template Gallery, check this box.
NOTE: This option
§Requires an Object Model (OM) connection on both the source and target environments, and
§is not available if you are migrating to a different version of SharePoint.
For more information on this option, see List Template Gallery Migration.
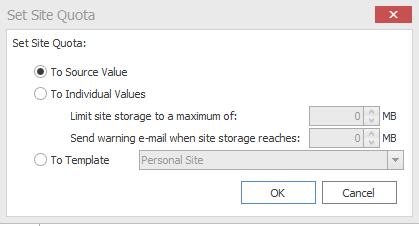
11.For a SharePoint On Premises target: If you want to set a Site Quota:
§select Set Site Quota, and
§Click the [ ] button to display the Set Site Quota dialog, and select the appropriate option:
§To Source Value (default) - the quota value from the source site will be used.
§To Individual Values:
§Limit site storage to a maximum of: "X" Mb - The maximum size of the new site collection., in megabytes (Mb)
§Send warning e-mail when site storage reaches: "X" Mb - The size at which to send a warning e-mail to the Site Collection Administrator, that the site collection is getting near it's set volume capacity.
§To Template - Match the same value for a site template on the target side.
NOTE: This drop down list will only display site templates that contain a site quota value.
12.If you want to Copy Site Collection Admins from the source site collection, make sure this option is selected. Click the [ ] button to view the Site Collection Administrator(s) on the source Site Collection.)
This option is separate from the Primary Administrator and the Secondary Administrator fields, as it will copy all of the users that are set in the Site Collection Administrators field in the SharePoint Users/Groups section and requires an Object Model connection for both source and target. If removing all of the users from this list users will not be able to add a new user value unless the account that is running the migration has permissions (on the target Site Collection) to add any new accounts. If the migrating account does not have permissions to add a new account, then it is recommended that at least one of the old user accounts that is currently set as a Site Collection Administrator is left in the dialog.*
13.If you want to preserve the source Site Collections audit settings on the target, select Copy Audit Settings.
14.If you are migrating to SharePoint Online and want to Promote first level of subsites to site collections on the target, check this box.
NOTE: This option is only enabled if the site you want to promote has at least one subsite.
For more information, including prerequisites and limitations, see Promotion of First Level Subsites to Site Collections.
15.If you have chosen to promote first level subsites to site collections on the target, and you want to Associate site collections with Hub, check this box and either:
·select Register root site as a Hub site, and associate promoted subsites to it (to create a new hub, which will use the name of the site from which subsites were promoted)
OR
·select Associate root site and promoted subsites to Hub Site and select an existing hub site from the drop-down.