A superuser account is a windows account with administrator privileges to work with Metalogix Archive Manager for Exchange administration tools, run services, manage databases, manage extensions. It also has elevated privileges to interact with the on-premise or online Microsoft Exchange servers.
In this topic:
1.Steps to create the superuser account
2.Steps to grant the superuser read permission for the Container node in the domain controller
3.Steps to add the superuser to the Administrators group in feature servers
4.Steps to add the superuser as a database user with sysadmin role
5.Steps to grant the superuser elevated permissions in the Exchange server
6.Steps to grant the superuser impersonation rights in the Exchange server (for OWA)
Steps to create a superuser account
1.Log in to the domain controller.
2.Navigate to Start > Windows Administrative Tools > Active Directory Users and Computers.
3.From the Console Tree, expand the domain node.
4.Click the Users container. The list of users opens in the right-hand pane.
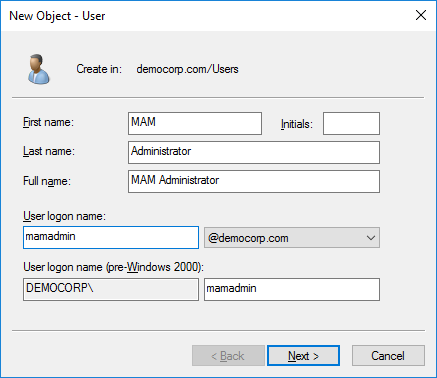
5.Click the Action menu and select New > User. The New Object - User window opens.
6.Verify that Create in title indicates the appropriate domain name and container, and then enter the details of the superuser. For example:
a.Full name: MAM Administrator
b.User logon name: mamadmin@sales.democorp.com
7.Click Next.
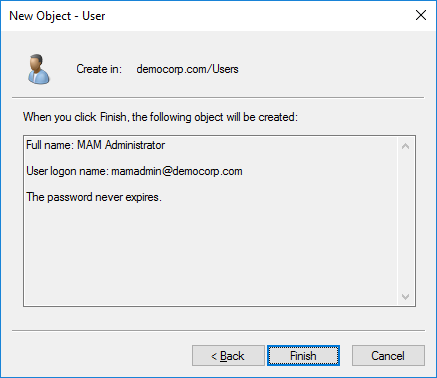
8.Enter the password and confirm it. Then select Password never expires.
9.Click Next.
10.Verify the information and click Finish.
Steps to grant the superuser read permission for the Container node in the domain controller
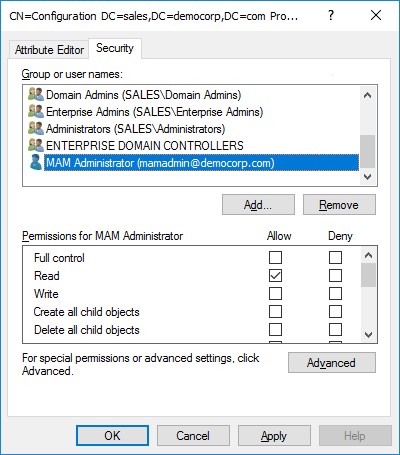
Microsoft Exchange servers and other information stores are created as child nodes under the CN=Services,CN=Configuration,DC=<root domain> node in the domain controller. The superuser needs sufficient permissions to read the list of Exchange servers and information stores of the organization. A read permission must be granted to the superuser to be able to access the object and all its descendant objects.
1.Log in to the domain controller.
2.Navigate to Start > Windows Administrative Tools > ADSI Edit.
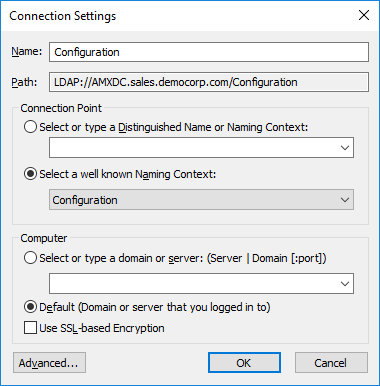
3.Click the Action menu, and then click Connect to. The Connection Settings window opens.
4.In the Connection Point frame, choose Select a well known Naming Context. From the drop down list select Configuration.
5.Click OK. The Configuration context appears in the ADSI editor.
6.Expand or select the Configuration context to display the node (begins with CN=Configuration).
7.Right-click the node and select Properties.
8.In the properties window, click the Security tab, and then click Add.
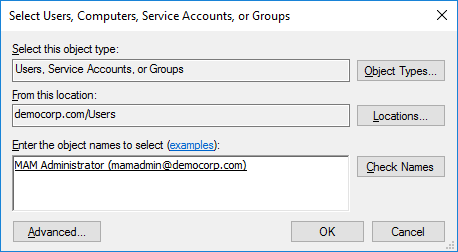
9.In the Enter the object name to select field, enter the user logon name of the super user. For example, enter sales\mamadmin.
10.Click Check Names to verify the logon name.
11.Click OK to add the superuser to the Administrator group.
12.Click Advanced. The Advanced Security Settings for Configuration window opens.
13.From the Permissions tab, select the superuser, and then click Edit. The Permission Entry for Configuration window opens.
14.In the Applies To drop down select This object and all descendant objects.
15.Click OK, and then click OK in each parent window to close all the windows.
16.Close the ADSI editor.
Steps to add the superuser to the Administrators group in feature servers
The superuser must be able to run windows services and accomplish tasks that require administrator privileges on the Metalogix Archive Manager for Exchange feature servers. Follow the steps described below to grant administrator privilege to the superuser on each feature server.
1.Log in to each server with its local administrator credentials.
2.Navigate to Start > Windows Administrative Tools > Computer Management
3.From the Console Tree, navigate to the System Tools > Local Users and Groups > Groups container.
4.From the list of groups in the right-hand pane, right-click Administrators and select Properties from the context menu. The Administrators Properties window opens.
5.Click Add.
6.In the Enter the object name to select field, enter the user logon name of the super user. For example, enter sales\mamadmin
7.Click Check Names to verify the logon name.
8.Click OK to add the superuser to the Administrator group.
9.In the Administrators Properties window, click Apply and OK to complete the process.
|
|
TIP: Log out of the server and log in again with the superuser's credentials to quickly verify that the superuser can access the server. |