Description
Use the sp-bininfo utility to verify that a new release of SharePlex includes past one-off builds of SharePlex that you received from Support between GA releases.
The output shows the following for each one-off that is installed for your current version of SharePlex:
- SharePlex module, such as Capture (sp_ocap) or Post (sp_opst or sp_xpst)
- SharePlex version and build number
- Database and platform
- Change Request (CR) number(s). This is a unique internal change tracking number that is assigned to your case at the time your one-off request enters the development process.
- The SharePlex libraries that were updated in the one-off
Figure 1: Sample sp-bininfo output
(6) sp_ocap:
       build 171 of SharePlex_Oracle (ONEOFF-CR123456-CR654321-CR789102-oracle110) 8.6.3 for rh-40-amd64 by jdoe
       SharePlex shared lib(s):
         libspwildcard.so.8.6.3.47
         libsporacle.so.8.6.3.47
         libsporalog.so.8.6.3.47
         libspshareplex.so.8.6.3.47
         libspspo.uname.so.8.6.3.47
         libspdb.so.8.6.3.47
         libspodb.so.8.6.3.47
         libspspo.typecheck.so.8.6.3.47
         libspcore.so.8.6.3.47
         libspext.so.8.6.3.47
         libspspo.memory.impl.so.8.6.3.47
         libspspo.memory.stub.so.8.6.3.47
         libspspo.shim.so.8.6.3.47
         libspspymdb.so.8.6.3.47
Supported databases
Not applicable
Supported platforms
Linux and Unix
Run sp-bininfo
Perform the follwing steps to run sp-bininfo:
-
Run the sp-bininfo utility from the util subdirectory of the product directory of your current SharePlex installation.
$ cd path_to_SharePlex_proddir/util
$ ./sp-bininfo
- Compare the CRs of each one-off shown in the sp-bininfo output with the CRs in the Resolved Issues section of the Release Notes that are included with the new SharePlexversion.
- If any CRs of your one-offs are not shown in the Resolved Issues, the new version does not include that functionality, and you should not proceed with the upgrade. Contact SharePlex support to obtain the missing fixes.
SpClient
Use the SpClient utility to monitor SharePlex processes and event logs. The utility reports if any processes fail or stop due to errors. It also sends email notifications when issues occur.
Supported operating system:
Windows
Set up configuration
Prerequisites:
-
Run ora_setup to complete environment setup.
-
Make sure the sp_cop process is running before you use the SpClient utility.
-
Start replication.
To set up configuration, open the command prompt and enter the create config command to create the replication configuration.
To monitor SharePlex processes:
-
Right-click the SpClient icon, and then select Run as administrator.
-
Sign in to the SpClient application.
-
In the navigation menu, go to Access and click Local to sign in. The system uses the sp_remote service for authentication.

After you sign in, the Sp Monitor option becomes available.
-
In the navigation menu, go to Select and click Sp Monitor.

The SharePlex Monitor screen opens.
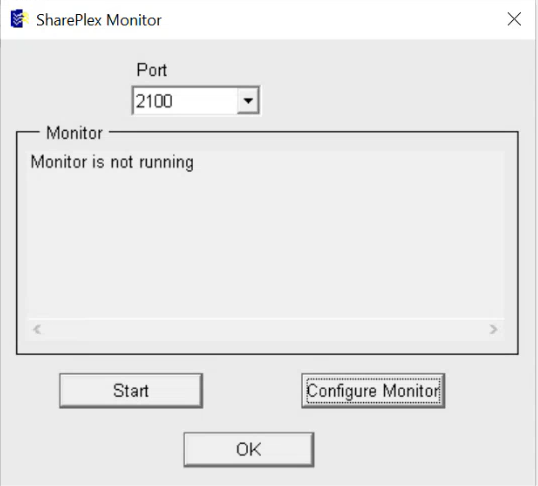
-
In the Port list, select the port for which you want to start monitoring. The monitor screen shows the current monitoring status.
-
Click Start to begin monitoring SharePlex processes.
Configure monitoring
-
Click Configure Monitor on the SharePlex Monitor screen to view monitoring configurations.
-
The system opens the sp_NT_mon text file. This file shows the default configuration values.
-
Edit the file as needed to update monitoring settings.
How monitoring works
The SpClient utility checks the status of all SharePlex processes every 60 seconds by default. You can customize this interval. If a process goes down or an error occurs, SpClient displays an alert in the application and sends an email notification if monitoring is active. Otherwise, it logs the details in the monitor.log file.
sp_hsm
Description
Use the sp_hsm utility to provide the Oracle Wallet password to SharePlex that is stored at external storage (HSM). SharePlex uses the wallet password to access the TDE primary Encryption Key. SharePlex uses the TDE primary Encryption Key to decrypt TDE protected data in the redo log that must be replicated.
Grant read permission on the Oracle Wallet file to the dba group before using sp_hsm.
Supported databases
Oracle
Run the sp_hsm Utility
Run the sp_hsm utility:
-
Open command prompt.
-
Enter the Oracle SID or TNS alias if it is an RAC configuration [ORCL1]: ORCL1
-
Ensure the HSM library is set up correctly:
HSM opm_is_hsm_library_setup entered for sid o.ORCL1
HSM opm_is_hsm_library_setup returned true
-
Enter the Slot ID for the HSM on which the Oracle database is configured.
HSM Slot ID [0]: 1
-
Enter the HSM password.
After successfully adding the HSM password to Shareplex, the utility displays the following message:
The HSM password has been successfully added to Shareplex.
Shareplex will automatically connect to HSM upon startup.
The sp_hsm utility will not need to be run again unless you want to change the HSM password.
To change the HSM password, just run sp_hsm and enter the new password.
The old HSM password will replace the existing password.
Description
Use the sp_security utility to enable, disable or view the SSL/TLS settings for SharePlex network communication.
Enable SSL/TLS
IMPORTANT! SSL/TLS must be either enabled with a common network password or disabled on all SharePlex installations.
To enable SSL/TLS:
Run sp_security --setup, select the SSL/TLS option, and then enter a network password.
$ ./sp_security --setup
Security Setup Wizard
---------------------
This wizard will walk you through setting up the SharePlex network security.
Setup configuration for '/splex/shareplex/run/var120' and Port 2105 [N]: y
Choose your network security model. Please note the following:
* Cop must be down when the security model is changed, or when the network password is changed
* The same model/protocol must be used among all SharePlex nodes replicating to each other
* For security model [1], the same network password must be set on all SharePlex nodes replicating to each other
[1] Use Basic SSL/TLS connection (TLS 1.2)
[2] Use Non-SSL/TLS connections (default)
[3] Use Advance SSL/TLS connection (TLS 1.3)
Security model [3]: 3
Please enter a network password that will be used for authentication
among the SharePlex nodes. All SharePlex nodes that replicate data to each
other must have the same network password.
Network password [**********]:
Please re-enter the network password
Network password:
Security settings:
Configuration for '/splex/shareplex/run/var120' and Port 2105:
Security model : SSL/TLS
Security Protocol : TLS_1_3
Network password : stored for unattended startup
SSL key file password : stored for unattended startup
SSL key file : key.pem
SSL cert file : cert.pem
Setup complete!
Disable SSL/TLS
IMPORTANT! SSL/TLS must be either enabled with a common network password or disabled on all SharePlex installations.
To disable SSL/TLS:
Run “sp_security --setup” and select non-SSL/TLS connections.
$ ./sp_security --setup
Security Setup Wizard
---------------------
This wizard will walk you through setting up the SharePlex network security.
Setup configuration for '/splex/shareplex/run/var120' and Port 2105 [N]: y
Choose your network security model. Please note the following:
* Cop must be down when the security model is changed, or when the network password is changed
* The same model/protocol must be used among all SharePlex nodes replicating to each other
* For security model [1], the same network password must be set on all SharePlex nodes replicating to each other
[1] Use Basic SSL/TLS connection (TLS 1.2)
[2] Use Non-SSL/TLS connections (default)
[3] Use Advance SSL/TLS connection (TLS 1.3)
Security model [3]: 2
Security settings:
Configuration for '/splex/shareplex/run/var120' and Port 2105:
Security model : Un-encrypted
Setup complete!
View current SSL/TLS configuration
To view the current SSL/TLS configuration:
When enabled:
$ ./sp_security --show
Security settings:
Configuration for '/splex/shareplex/run/var120' and Port 2105:
Security model : SSL/TLS
Security Protocol : TLS_1_3
Network password : stored for unattended startup
SSL key file password : stored for unattended startup
SSL key file : key.pem
SSL cert file : cert.pem
When disabled:
$ ./sp_security --show
Security settings:
Configuration for '/splex/aparopka/shareplex/run/var120' and Port 2105:
Security model : Un-encrypted
