PowerShell execution module
This module is responsible for executing PowerShell commands in the Stage 2 Workflow for a mapping. It is recommended to have one of these installed in the environment.
It is not necessary to associate this module with a particular link, that process is done automatically, and is controlled by the Core.
|
|
NOTE: This module requires .Net Framework 4.5.2. |
Using a proxy
Configuring the Archive Shuttle modules to use a web proxy
When using Archive Shuttle Cloud it may be necessary to configure the Archive Shuttle modules to communicate with the Archive Shuttle via a web proxy. Each of the module .exe.config files can be modified as shown below:
<startup><supportedRuntime version="v2.0.50727"/></startup>
<system.net>
<defaultProxy enabled="true" useDefaultCredentials="true">
<proxy proxyaddress="http://proxy:8080" />
</defaultProxy>
<connectionManagement>
<add address="*" maxconnection="100"/>
</connectionManagement>
</system.net>
You may need to bypass some of the addresses, and therefore it needs to add the addresses you want to bypass into the config file:
<system.net>
<defaultProxy enabled="true">
<bypasslist>
<add address="[a-z]+\.contoso\.com" />
<add address="192\.168\..*" />
</bypasslist>
<proxy bypassonlocal="True" proxyaddress="http://proxy:8080"/>
</defaultProxy>
</system.net>
|
|
NOTE: The lines highlighted are only needed if a proxy is used, but it is not configured in Microsoft Edge. Review this article for more details about bypass list. |
Installing Archive Shuttle modules with Core via proxy
Sometimes the installation of the Archive Shuttle modules may fail if the communication between the modules and the Core is via a web proxy.
It is possible to launch the MSI file with a parameter to prevent the installer from checking that it can communicate with Archive Shuttle Core. The installation of the modules will then be successful. To install the modules in this manner, execute the following:
MSIEXEC /i ProductName.msi DONT_CHECK_WEBSERVICE="1"
(Replacing ProductName with the full name of the MSI)
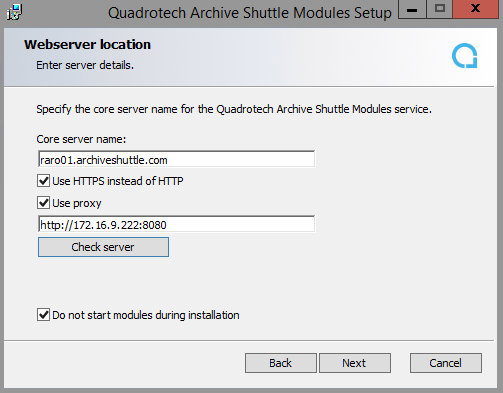
Later in the installer wizard, the below notation of proxy setting is important to pass the test:0
1.Tick Use proxy.
2.Use the following URL in the box underneath: http://yourproxyip:port
3.Hit Check server. If the syntax is correct and the proxy is reachable the test will pass like on the picture below:


