Repair Wizard
The Repair Wizard helps you restore the Active Directory® components on a domain controller, including the Active Directory® database, SYSVOL and registry. With this wizard you can select a Active Directory® backup, select Active Directory® objects for authoritative restore, and perform a primary restore of SYSVOL including registry hives.
The wizard has the following pages:
Computer and Backup Selection
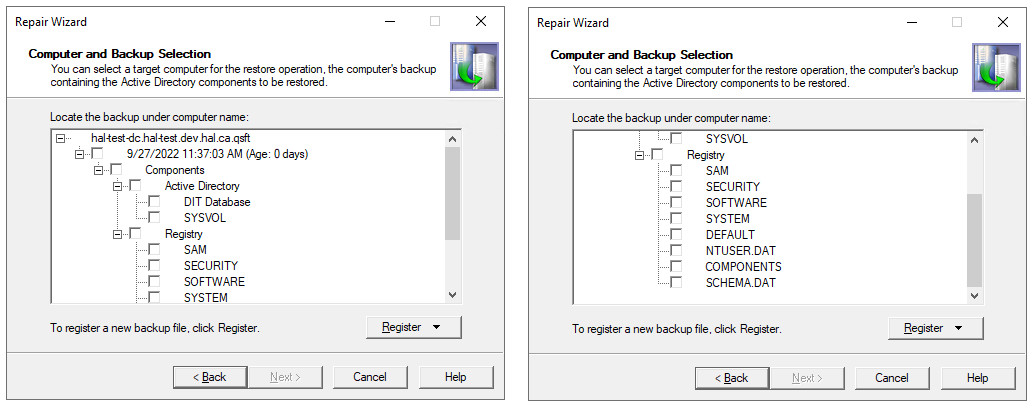
Use this page to view a list of computers for which backups are available and to select a backup to perform a restore. The list of computers in the window depends on how the wizard was started. If you select a computer and then start the wizard using the Action menu, the list includes only the selected computer. Otherwise, it includes all computers.
-
Locate the backup under computer name. Provides a list of computers for which backups are available and allows you to select a backup to perform a restore. To ensure the selected backup contains all Active Directory components needed for the restore, browse the Active Directory branch in the Computer and Backup Selection window. For the selected computer, the window lists all backups that are available in RMAD. A backup entry includes the date and time when the backup was created, and displays the backup age in days. The list only includes the backups that are registered in the RMAD configuration database.
-
Register. To register additional backups, click Register, and then click one from the following items:
-
Register Backup File. Registers a Microsoft Tape Format (MTF)-compliant backup file (.bkf).
-
Register Backups in Folder. Registers all backup files that are in the selected folder.
-
In the Repair Wizard, you can use backups created by applications that store backups in Microsoft Tape Format (MTF), such as Windows® Backup or Veritas™ Backup Exec™. However, snapshot backups are not supported by the Repair Wizard. You can restore Active Directory® data from such backups using the Online Restore Wizard and Group Policy Restore Wizard. The Extract Wizard also supports snapshot backups.
To select a backup
Click the computer whose backup you want to use, and then click the backup you want to use. Select the check box next to the backup and then click Next.
To select Active Directory components in a backup
Click the computer whose backup you want to use, and then expand the backup. Expand the Components then expand Active Directory for components such as DIT Database and SYSVOL.
To select Registry components in a backup
Click the computer whose backup you want to use, and then expand the backup. Expand the Components then expand Registry for components including all registry hives and the NTUSER.DAT file

Once your selection has been made, click Next.
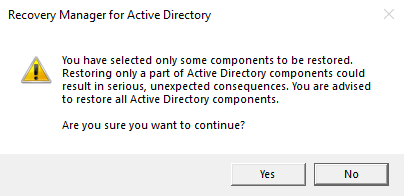
If you have only selected some components from the backup, you will get a waring message stating that your selection could result in serious unexpected consequences. If you are sure you want to continue then select Yes otherwise select No.

Target Computer
Use this page to view where the Active Directory® data will be restored.
-
Restore Active Directory data on the computer. Displays the computer name where the Active Directory® data will be restored.
-
Change. Click Change to change the target computer, and then complete the Change Target Computer dialog box. In the Computer name box, type the NetBIOS name, DNS name, or IP address of the computer where you want to perform a restore.
-
Account used to access the target computer. Specifies the account to access your target computer.
-
Change. Click Change to specify an account in the dialog box that opens. This account must have administrative rights to the target computer. If the target computer is in Directory Services Restore Mode, you must supply the user logon name and password of the Directory Services Restore Mode Administrator.
A restore on a computer different from the backup source can have serious, unexpected consequences that can prevent the system from starting and require that you reinstall the system.
-
Next. Click Next to connect to the target computer. No backup data is transferred at this stage.
Computer Restart
Use this page to specify how to restart the target computer in Directory Services Restore Mode (DSRM).
-
Manual restart. With this option, you must restart the target computer manually.
-
Automatic restart. Restarts the target computer remotely, using the startup parameters shown in the Boot option box. If you want to apply different startup parameters, use Manual restart. When performing the automatic restart, the wizard modifies the Computer Restart page, allowing you to cancel the shutdown, if necessary.
-
Boot option. When you select the Automatic restart option, displays the startup parameters used to restart the target computer remotely. If you want to apply different startup parameters, use Manual restart.
To restart the computer in Directory Services Restore Mode manually
-
Restart the computer, and press F8 when you are prompted to do so.
-
On the menu, choose Directory Services Restore Mode, and then press ENTER.
-
If you have multiple systems installed on the computer, choose the system installation you are recovering, and then press ENTER. You must choose the same installation as the one that was started when you launched the Repair Wizard.
To cancel the computer shutdown
- Click Abort Shutdown.
The Abort Shutdown button is available only during a 40-second grace period. The process of restarting the domain controller in Directory Services Restore Mode can take several minutes. The Current Status box allows you to examine the progress of the restart.
After the domain controller is started in Directory Services Restore Mode, the wizard displays the Select Account dialog box. You must specify the password of the Directory Service Restore Mode Administrator.
In the Select Account dialog box, you must supply the account name and password of the target computer local administrator (Directory Services Restore Mode Administrator). You must use the credentials of an account that is stored in the local security account (SAM) database. You cannot use the name and password of an Active Directory® administrator. This is because Active Directory® is offline, and account verification cannot occur. Rather, the SAM accounts database is used to control access to Active Directory® on the local computer while Active Directory® is offline.
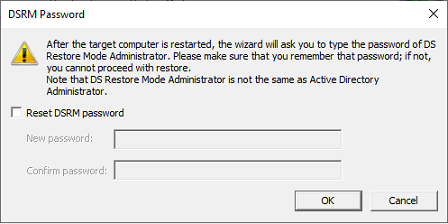
DSRM Password
When you click Next a pop-up dialog will appear to allow you to reset the Directory Services Restore Mode (DSRM) password.

