
Adding Advanced ControlPoint Menu Items
Because they serve a very specialized purpose, the following menu items are not included on any of the Axceler Menus:
·Manage Forest Access, and
·Archive Audit Logs.
It is recommended that the ControlPoint Application Administrator create a custom Tools menu that contains one or both of these items only, then limit permissions to specific ControlPoint users or groups. Remember, customized menus are merged with any other ManageCP menu(s) for which ControlPoint users have permissions.
To create a custom menu with advanced menu items:
1From the Menu Maintenance page, click Create a Menu.

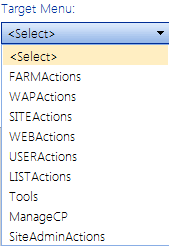
2Enter a Menu Name and Description of your choosing, then from the Target Menu drop-down, select ManageCP.
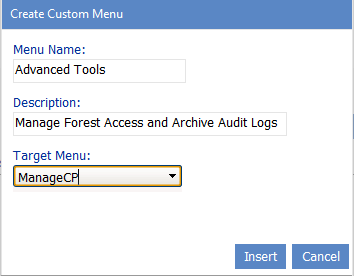
3Click [Insert].
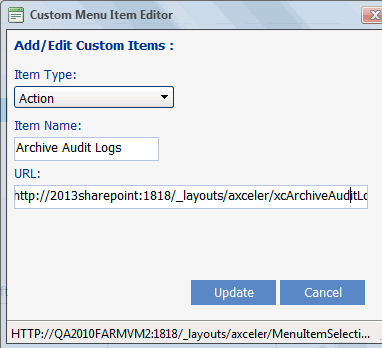
4Add either or both advanced menu items using the procedure for Adding and Editing Custom Items in a Menu. Use the information in the following table for guidance.
|
For ... |
Complete the Add/Edit Custom Items section as follows... |
|---|---|
|
Archive Audit Logs |
·For Item Name, enter Archive Audit Logs. ·For URL, enter the following string: http://<machine_name>:<portnumber>/_layouts/Axceler/xcArchiveAuditLogs.aspx |
|
Manage Forest Access |
·For Item Name, enter Manage Forest Access. ·For URL, enter the following string: http://<machine_name>:<portnumber>/_layouts/Axceler/xcForestAccess.aspx ·Click [Add Child]. |
NOTE: <machine_name> refers to the name of the machine on which ControlPoint was initially installed; it may also refer to a host header or load balancer name, if supported in your environment. <portnumber> refers to the port used by the ControlPoint application (1818 is the ControlPoint default).
5Click [Save Menu].
Now you can manage access to the menu.
Customizing Your Favorites
Each individual administrator can customize his or her own ControlPoint Favorites list to include frequently-used items, including SharePoint sites and ControlPoint actions and analyses.
When you add Web applications, site collections and sites to your Favorites list, you have access to all of the right-click menu options for which you have permissions.
Custom itemssuch as links to SharePoint pages, internal or external web sites and web-based applicationscan also be added.
NOTE: If you use ControlPoint to manage multiple farms, your Favorites will be carried over to every farm.
To access the Favorites Maintenance page:
From the Manage ControlPoint tree, choose ControlPoint Configuration > Favorites Maintenance.
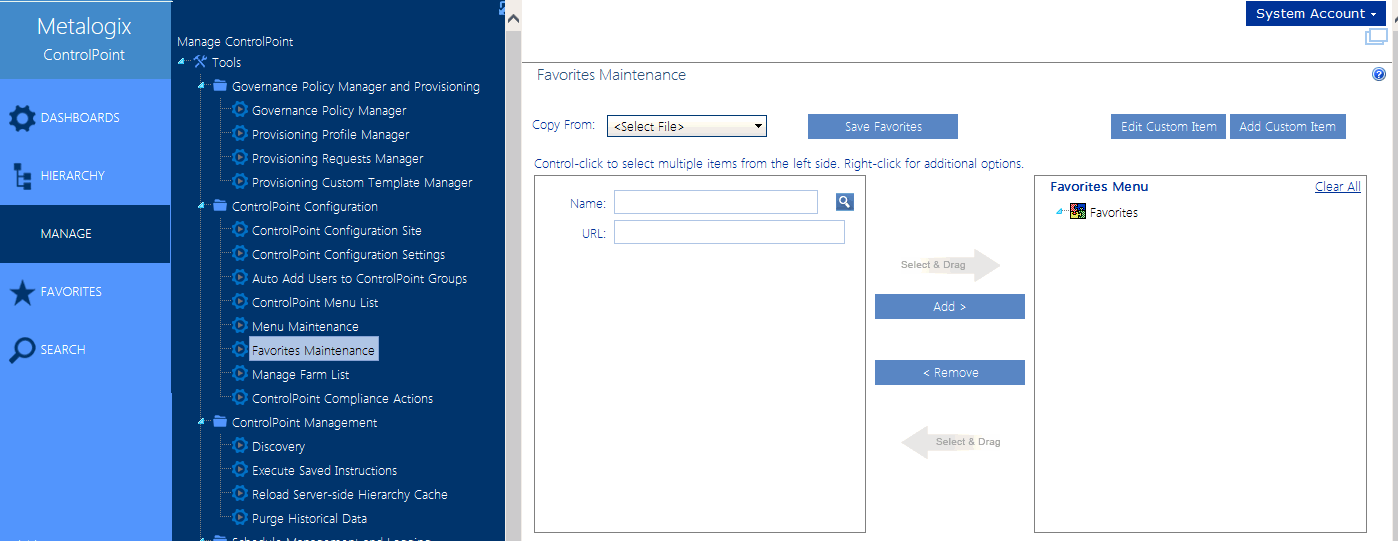
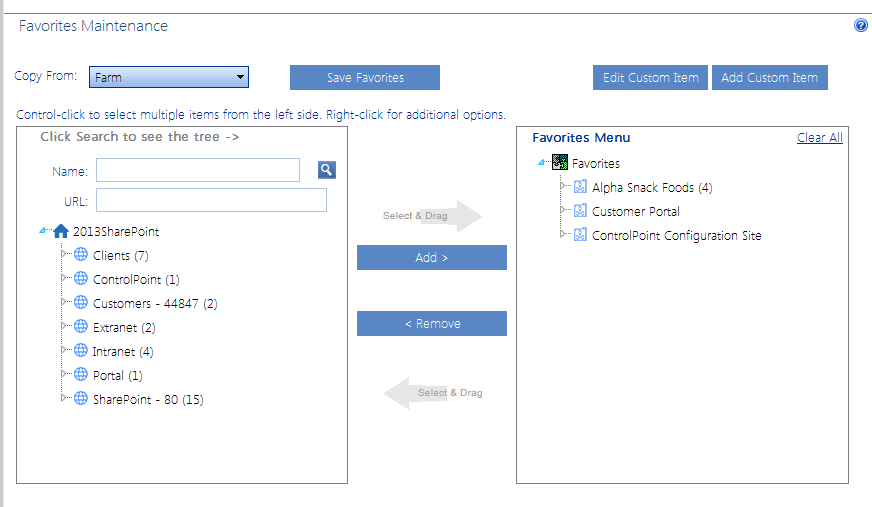
To add items to your Favorites:
1Use the information in the following table to determine the appropriate action to take.
|
If you want to ... |
Then ... |
|---|---|
|
browse the SharePoint Hierarchy for site collections and sites* |
from the Copy From drop-down, select Farm. |
|
copy ControlPoint actions and analyses |
from the Copy From drop-down, select a menu (.xml) file. Note that Tools.xml (and any customized versions of that file) contains the menu items that display only if ControlPoint is configured to display the Actions and Analysis tree as an alternative to Manage ControlPoint. |
|
search for the site collections and sites that you want to add* |
enter the site Name and/or URL and search within the SharePoint Hierarchy |
|
add a custom menu item |
follow the procedure for Adding and Updating Custom Items in a Menu. |
*NOTE: In a multi-farm environment, you can only select items from the home farm (that is, the farm whose URL you used to launch ControlPoint). You can add objects from multiple farms to your Favorites, as long as the farm you select them from is currently the home farm.
2Use the information in the following table to determine the appropriate action to take.
|
If you want to ... |
Then ... |
|---|---|
|
select multiple items individually |
hold down the [Ctrl] or [Shift] key and highlight each item you want to add. |
|
immediately add an item and all of its children to the Selected Items column |
highlight the item, then right-click and choose Add Item and All Children. |
|
select an item and its immediate children (for example, a site collection and its root site only) |
highlight the item, then right-click and choose Highlight Immediate Children. (If objects are grouped into a folder, you must first expand the folder.) TIP: You can use this option as a time-saver if you want to add most, but not all of the selected child items. After highlighting the item you can then individually de-select those that you want to exclude. |
3To add the highlighted item(s) to the selection list, either:
§drag and drop the item(s) onto the item below which you want to nest it.
OR
§highlight the item below which you want to nest the new item(s) then click the [Add] button.
To change the placement of items:
1If you want to move multiple items at once, hold down the [Ctrl] or [Shift] key and highlight each item you want to move.
2Drag and drop the item(s) onto the item below which you want to nest it.
To remove items:
1In the right pane, highlight the item(s) you want to remove. (To select multiple items, hold down the [Ctrl] or [Shift] key.
2Do one of the following:
§drag and drop the item(s) to the left pane.
OR
§click the [Remove] button.
§To remove all items in the right pane, click the Clear All link.
To save changes to your Favorites:
When you have finished adding items to your Favorites, click [Save Favorites].
IMPORTANT: If you do not click [Save Favorites] and receive a confirmation dialog, any changes you made will be lost when you navigate away from the page.
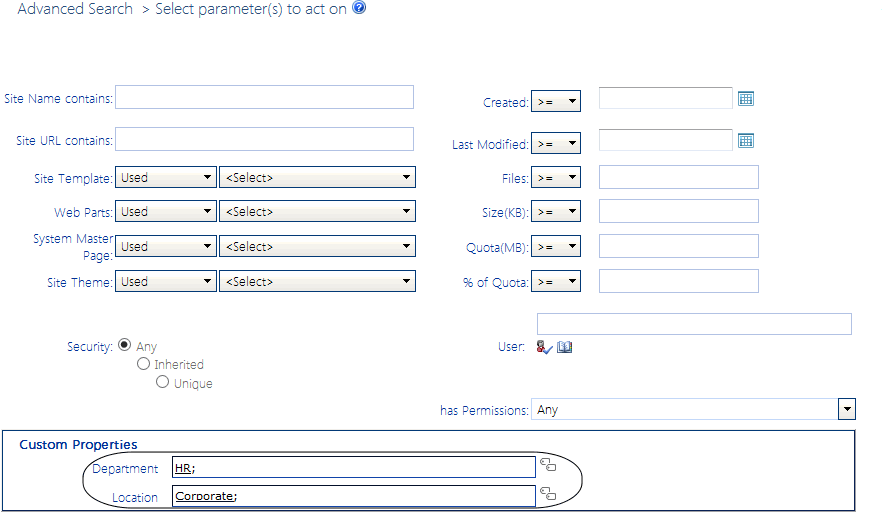
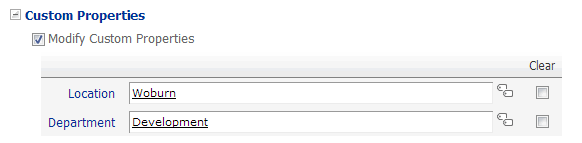
Defining Custom Properties to Apply to SharePoint Sites
For SharePoint Server farms that are subscribed to the Managed Metadata Service Application, ControlPoint Application Administrators can use Managed Metadata to define "Custom Properties" which can be applied to SharePoint sites via the ControlPoint Set Site Properties action. Unlike SharePoint, which allows Managed Metadata to be applied only to a list column, ControlPoint allows you to" tag" a site with Managed Metadata, for use as parameters in ControlPoint Advanced Searches.
NOTE: For Custom Properties to be definable, the Web application that hosts ControlPoint Configuration Site Collection must be associated with the relevant Managed Metadata Service Application(s).
To define Custom Properties:
1Open the Settings page for the ControlPoint Configuration Site's Custom Properties list.
2Under Columns, click Create column.

3Enter a Column name (that is, the name you want to assign to the Custom Property), and for column type, select Managed Metadata.

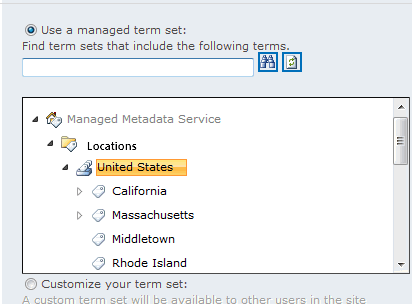
4For Term Set Settings, either:
§select Use a managed term set, then select the term set you want to use.
OR
§select Customize your term set, then create the term set you want to use.
NOTE: Although list-specific term sets are not available to other lists in the farm when used within SharePoint, term sets created within this list can be used as ControlPoint Custom Properties by all sites throughout the farm.
NOTE: Additional settings, such as Allow multiple values, Allow Fill-in, and Default value are not valid for Custom Properties
5To save the custom property, click [OK].
Custom Properties defined within this list will be available for selection in the Set Site Properties user interface.
NOTE: If you delete a Managed Metadata column from the Custom Properties list, it will no longer be selectable as a Custom Property, and any existing site associations will be lost.
Accessing Members of Active Directory Groups in Different Domains or Forests
If you want to be able to view members of Active Directory groups in another domain or forest when analyzing users and permissions, one of the following trust relationships must exist:
·a two-way trust (that is, users from both domains or forests can access each other's resources without additional authentication)
OR
·a one-way outgoing trust relationship (that is, resources in the domain in which ControlPoint is installed are accessible to users in the user domain or forest. In this case, ControlPoint needs to be configured to access certain resourcessuch as Active Directory group members in the other forest).
The Manage Forest Access feature lets you specify the account credentials that ControlPoint will use for authentication whenever it needs to retrieve Active Directory group members in a forest with which it has a one-way outgoing trust relationship. The account ControlPoint uses for authentication must have a minimum of Read access to the other forest. As an added security measure, ControlPoint encrypts these credentials using the Advanced Encryption Standard (AES) algorithm before they are stored.
Note that, if your environment uses a one-way trust relationship and you do not configure ControlPoint to manage forest access:
·ControlPoint will still be able to report on permissions granted to users and groups in other domains, but you will not be able to expand Active Directory groups and view membership in those domains.
AND
·If an Active Directory group is placed into the Business Administrators group, members of that Active Directory group will not be recognized as Business Administrators.
To access the Manage Forest Access feature:
·If the menu item has been added to ControlPoint and you have permissions for it, from the Manage ControlPoint panel, choose Manage Forest Access
OR
·Replace the xcMain.aspx portion of the ControlPoint url with xcForestAccess.aspx.

To manage access to domains and forests with one-way outgoing trusts:
Use the information in the following table to determine the appropriate action to take.
|
If you want to ... |
Then ... |
|---|---|
|
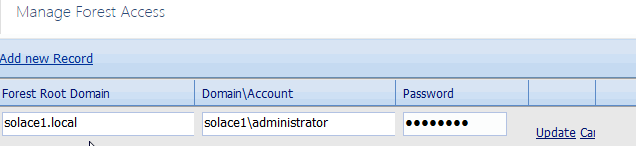
add a forest to the list |
§Click the Add new Record link. §For Forest Root Domain, enter the fully qualified domain name. §Enter the Domain\Account you want ControlPoint to use for authentication, and the account Password. §Click the Update link. |
|
update account credentials for a forest in the list |
·Click the Edit link for the applicable record. ·Update the appropriate field(s). CAUTION: The Password field will always be cleared when you open a record for editing and must be re-entered before a record can be updated, regardless of whether it has changed. ·Click the Update link. |
|
delete a forest from the list |
Click the Delete link for the applicable record. (A confirmation dialog will display asking you if you want continue with the delete action.) |