|
• |
Server Name: Displays the name of the monitored CA sever. |
|
• |
|
• |
|
• |
Effective Date: Indicates the date upon which the “Issued Common Name” is considered to take effect. |
|
• |
Days in Expire: Indicates the period from now to the “Issued Common Name” expiration date. A minus indicates the “Issued Common Name” has been expired. |
For more information about how to create a CA agent to be monitored, refer to Add and configure a new Certificate Authority agent .
|
NOTE: Foglight for Active Directory only supports the monitoring of the environment installed with the Certificate Authority Enterprise Edition. Before creating a CA agent, click the Script for configuring the Active Directory settings link on the Administration > Tasks list to download and run a script that automatically configures the DCOM and WinRM. For more information, see the readme.txt file included in the script ZIP file. |
|
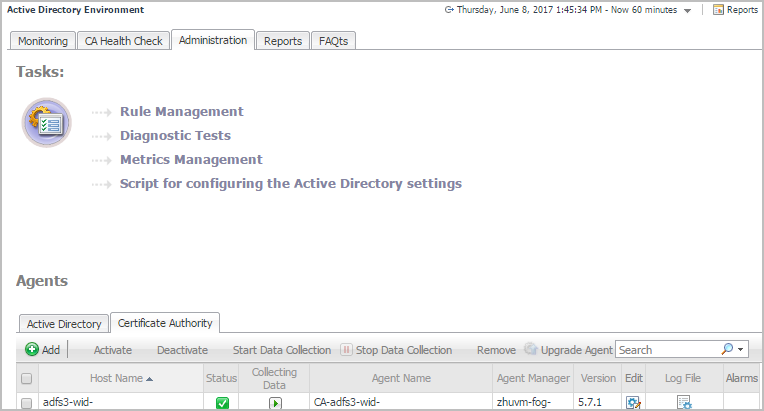
• |
Rule Management: View and manage rules that exist in your environment. For more information, see Foglight for Active Directory rules. |
|
• |
Diagnostic Tests: View a list of diagnostic tests that are available, as well as run a test immediately or define a schedule for when a test is to be run. For more information, see Running diagnostic tests. |
|
• |
Metrics Management: View, edit, and enable/ disable the optional metric collections that are configurable for Active Directory agents. For more information, see Managing Active Directory metrics. |
|
• |
Script for configuring the Active Directory settings: Download and run a script that automatically configures the Domain Controllers. |
|
• |
Certificate Authority: Add and configure Certificate Authority agents on one or more servers. Once added, the Agent Management view displays all of the Certificate Authority agents configured to monitor CA metrics. For more information on using the Agent Setup wizard, see Add and configure a new Certificate Authority agent. |
|
• |
Active Directory: Add and configure Active Directory agents on one or more DCs. Once added, the Agent Management view displays all of the Active Directory agents configured to monitor Active Directory metrics. For more information on using the Agent Setup wizard and the Agent Management view to manage your Active Directory agents, see Managing Active Directory agents. |
|
• |
|
• |
|
• |
|
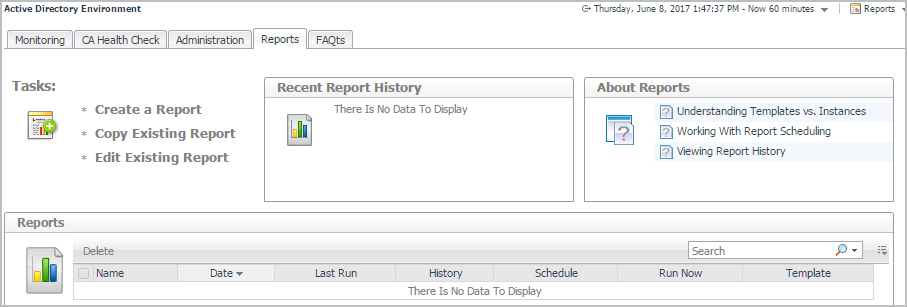
1 |
Start the Create a Report wizard. |
|
2 |
|
• |
Scheduled Report Name: Type a valid name for the report. |
|
• |
Report Templates: Select the template on which you want to base your report. The Report Inputs section is populated with the template’s report parameters. Use the default parameters to quickly create a report, or optionally change the report parameters to customize the report to better meet your requirements. For more details about Active Directory template reports, see Foglight for Active Directory reports. |
|
3 |
|
• |
Schedule: Select the report schedule from the list of available options. |
|
• |
Retained Results: Type the number of results retained for the report. |
|
• |
Enabled: Select the check box if you want to enable the report. Clear the check box if you want to disable the report. |
|
• |
Report Format: Select the report format from the list of available options. |
|
• |
Email Recipients: Type the email addresses of the recipients to be notified when the report is generated. |
|
1 |
Start the Copy Existing Report wizard. |
|
2 |
|
3 |
|
• |
Scheduled Report Name: Type a valid name for the new report. |
|
• |
Report Templates: The report template can not be modified, only the report parameters in the Report Inputs section at the bottom of the page. |
|
• |
Schedule: Select the report schedule from the list of available options. |
|
• |
Retained Results: Type the number of results retained for the report. |
|
• |
Enabled: Select the check box if you want to enable the report. Clear the check box if you want to disable the report. |
|
• |
Report Format: Select the report format from the list of available options. |
|
• |
Email Recipients: Type the email addresses of the recipients to be notified when the report is generated. |
|
1 |
Start the Edit Existing Report wizard. |
|
2 |
|
3 |
|
• |
Scheduled Report Name: Change the report name, as necessary. |
|
• |
Report Templates: The report template and its parameters can not be modified. |
|
• |
Schedule: Select the report schedule from the list of available options. |
|
• |
Retained Results: Type the number of results retained for the report. |
|
• |
Enabled: Select the check box if you want to enable the report. Clear the check box if you want to disable the report. |
|
• |
Report Format: Select the report format from the list of available options. |
|
• |
Email Recipients: Type the email addresses of the recipients to be notified when the report is generated. |
The view contains the following information for each configured report instance.
|
|
Use the selection check boxes to select report instances for running or removal. |
To delete one or several reports from the list, select the report(s) and click the Delete button at the top left corner of the view.
To search for a particular report, type the report name on the Search box at the top right corner of the view, then click Enter.
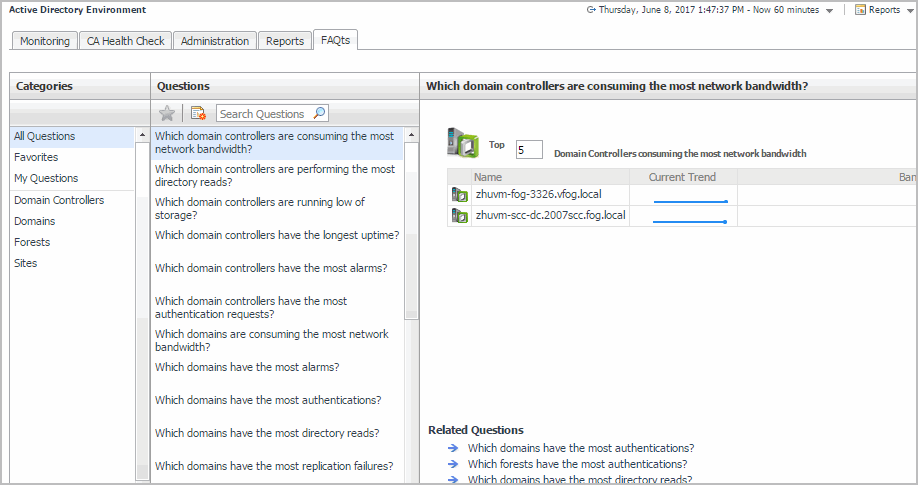
The FAQts navigation tab is made up of the following embedded views:
The Categories view lists the categories (that is, forests, domains, sites or domain controllers) for which questions can be answered by Foglight. It also contains a Favorites and My Questions category which allows you to customize the list of questions displayed.
By default, All Questions is selected. Click a category to view a list of questions relating to a type of Active Directory® object or click Favorites or My Questions to view your customized list of questions.
The Questions view lists the questions available for the category selected in the Categories view.
Click a question from the list to have Foglight gather and report an answer.
Use the buttons at the top of the Questions view as follows.
Top x <objects of category> ...
where x is the number of objects of the category selected in the Categories view.