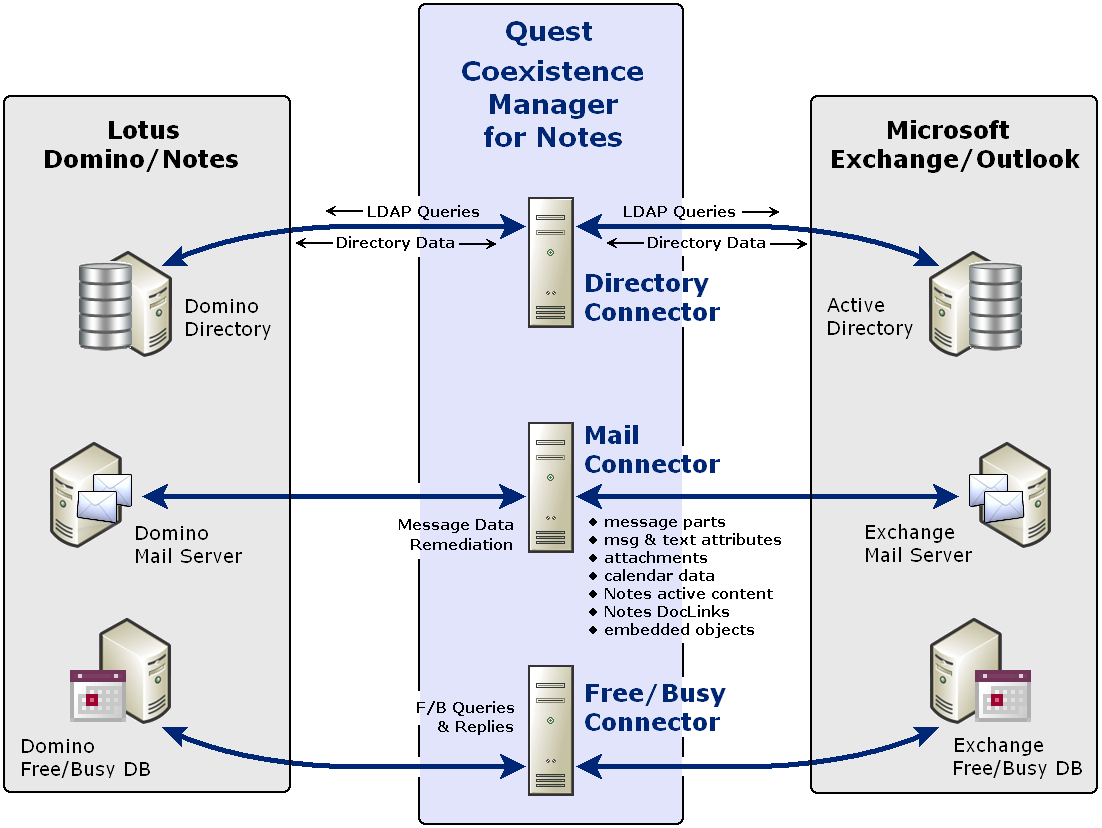
CMN's three primary components
|
• |
Directory Connector: Updates directory data between the Domino Directory and Active Directory, configurable for any number of servers. |
|
• |
Mail Connector: Provides email remediation to permit intact delivery of most message parts, message and text attributes, attachments, Notes DocLinks, and embedded objects, as well as messages carrying calendar and resource-booking data, and Notes "active content" messages. |
|
• |
Free/Busy Connector: Facilitates the exchange of calendar free/busy data between users in the two different environments. |
These three CMN components are separate but designed to work together in any combination to suit a broad range of coexistence needs. The components are described separately in greater detail in the next three chapters of this User Guide—what they do, how to install and configure them, and what you can do with them once they are up and running.
Deployment considerations
Before installing CMN, it is important to document a deployment plan. The plan should specify the components you will install, where they will be installed, and how many instances of each will be required. Remember to accommodate all system requirements (as documented in the most recent RTM Release Notes) when planning component deployments. You can install and configure any number of CMN components, in any order you like, but consider that the Directory Connector provides directory updates that the Free/Busy Connector will need to function.
For technical reasons, the QCalCon subcomponent of the Free/Busy Connector must be installed on a Domino server. But if the Domino environment contains more than one Domino server, QCalCon is installed on only one server. (Other Domino servers must be configured to find and use the single QCalCon instance on the "bridgehead" server.) The other four Free/Busy Connector subcomponents can be installed on a single computer, although deployment to two separate computers (as illustrated in chapter 4 below) will improve performance in environments with higher volumes of F/B queries and replies.
Installation instructions for CMN components appear in the Getting Started sections of the Release Notes and the CMN Quick-Start Guide. After installation, CMN components must be configured before they can be used. Deployment and configuration options for the three primary CMN components vary to accommodate local environments and needs. These considerations are more fully explained in chapters 2, 3 and 4 of this User Guide and, for the Free/Busy Connector, in the FBC Scenarios Guide.
About Quest license keys
You can obtain license keys by contacting your Quest sales representative. When you obtain a license key, you must install it to enable the product. A license key is an .asc-type file that Quest sends to you with an email. You must save the file to your hard disk, and then install it in the CMN Management Console, on the Common | Licenses screen. The installation of a valid license key authorizes and enables the use of all CMN components.
The CMN Management Console
CMN components are configured within CMN’s Management Console application, where you specify the names and locations of mail servers and directories, locations of web services, comm port numbers, scope of operations, operational preferences, scheduled runs, and so forth. The Management Console is an "umbrella" application used to configure all three CMN components. Different components’ settings are managed on different screens.
The CMN Management Console is a friendly interface between you and a set of configuration files that CMN components read every time they are started. Configuration settings for CMN’s different components are saved in separate configuration files: a Configuration.xml file for each of the Directory Connector and Mail Connector (two files saved in the different CMN component subfolders), and another set of configuration files for the Free/Busy Connector. The Management Console provides GUI screens with labeled fields to simplify entering and editing the configuration settings in those files.
To start the CMN Management Console:
|
• |
Select the Management Console start-up shortcut from your Windows Start menu: Start | Programs | Quest Quest Coexistence Manager for Notes | .... The CMN installer copies this shortcut to the submenu of every installed CMN component (use these shortcuts): |
The list of the Console’s screens in the sidebar lets you select which screen you want to display. Console screens are grouped by component, and you may view them and work on them in any order. The screens in the Common group (bottom of the sidebar list) contain features that pertain to all three components.

