-
제목
How to publish Evolve Sites to Multiple Servers -
설명
How to publish Evolve Sites to Multiple Servers -
해결 방안

Introduction
This document describes the process of deploying a site from one master server to multiple identical servers for the purposes of load-balancing across them.
This process is designed and will work as intended regardless of whether the site is a dynamic or a static one – the only difference is that the process will need to be executed infinitely more frequently in the case of a static site, as it would propagate the content of the site – as opposed to the case for a dynamic deployment, where the process must only be executed whenever a site design change is made.
Prerequisites
Server Setup
In order for load-balancing when using Evolve to work effectively, all servers must be setup and configured in exactly the same way (hardware and software configuration). Evolve must be installed on all servers (regardless of licences available).
Evolve must not be configured on any of the secondary servers in any way.
Access rights
All servers must have exactly the same connectivity to the Casewise database, with the same access rights to the various Active Directory groups etc.as the primary server. Any discrepancy can lead to abnormal behavior, both during publication of the site and subsequent access by the users.
Customization contents
The following elements must be present in all servers:
- Any folders containing a custom site (the entire folder)
- Any custom theme files
- Any site logos
These should be copied across before any publication and must be placed in exactly the same locations as in the primary server.
For assistance as to which folders contain customization, how they are structured and where they are located, please refer to the Evolve online help by clicking hereProcess
Evolve Designer Preparation - Setting up additional deployments
Ensure you have a list of all the server names (computer names) as they appear on your network. This list will be critical in adding the necessary deployment nodes in Evolve Designer.
Launch Evolve Designer on the primary server:

(At the Deployments node, ensure there are no other deployments than the one from your primary server. NOTE: if you’re accessing Evolve Designer from the primary server, this should be in bold)
Expand the primary server Deployment and make a note of ALL the settings on the options panel (panel on the right):

Ensure that you note which Custom Site is deployed and all the information for the various Active Directory (AD) groups.
Add a new Deployment by right-clicking on the Deployments node:

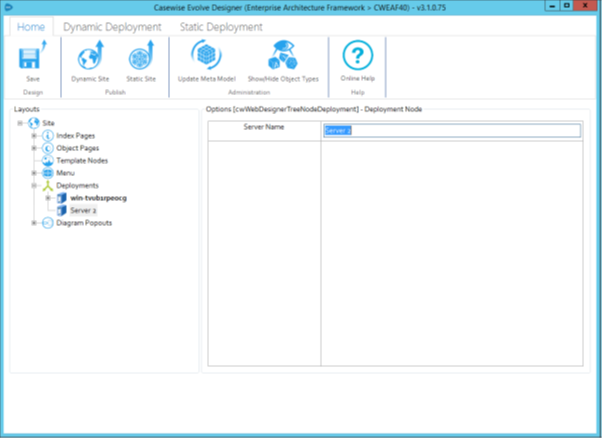
Enter the (computer) name of the second server in the name of the Deployment:

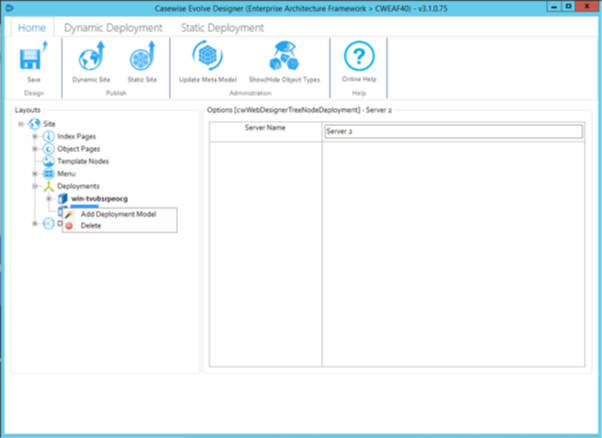
Add a new Deployment Model under your newly created deployment:

Once the new Deployment Model has been added, you will notice that some properties are already identical to the ones from your primary Deployment Model (such as Site URL Name and Site Display Name). However, please check them as you might have altered something in the main Deployment Model:

In the properties of the new Deployment Model, please add all the information from the main Deployment Model exactly as they appear there. This includes the Custom Site and all AD Groups information.
Once you are done, save the information (Save button at the top left-hand corner).
Repeat the process for all additional servers, ensuring all information is copied accurately and completely across all Deployment Models.
IIS Setup
Once all Deployments and Deployment Models have been added, setup the IIS in the primary server.
First publication
At the primary server (the server from which all settings and design will be copied from), publish your site as normally (using the Publish Dynamic Site and not the Save & Deploy options). Navigate to the site and ensure all aspects are working as intended.
Location of setup files
At the master server, locate the following files:
Filename Location evolve.config.json This file is located at the Casewise Suite installation path (by default: C:\Program Files (x86)\Casewise\CM10\bin\) ModelFilename.site.config.json This file is located at the Evolve installation folder (by default: C:\Casewise\Evolve\Site\bin\Sites\) Creation of Configuration folder
Copy both files into a new folder, ideally placed in a safe location on the primary server. You can give the folder any name you want, but ensure that you make a note of the folder name and location. For example, Desktop\Config. This folder must be located in the same location on all other servers.
Running the Command Line
Run the Command Line (CMD) as an Administrator from within the Evolve installation folder (by default: C:\Casewise\Evolve\Site\bin\) on any server which is required to copy the Evolve site from the master server and execute the following command:
CwWebDesignerConfigurator.exe -ServerDefinitionPath "D:\Config\evolve.config.json" –SiteConfigFilePath "D:\Config\ModelFilename.site.config.json"
Please make sure that you replace any element displayed above with the custom values of your environment and the Configuration folder created in the aforementioned steps. The script is case-sensitive and therefore must be copied across perfectly.
You should see the progress of the publication on the command line window – it should reflect perfectly the running log at the bottom of Evolve Designer when you publish a site. Any potential errors will appear here as well.
You can save the above command as a batch file for future reuse.
Reset the IIS
Perform an IIS reset on every server this script is run on.
