サポートと今すぐチャット
サポートとのチャット

Toad Data Point 5.5 - User Guide

Tutorial: Automate Excel Reports

Summary

This tutorial walks you through the process of automating the task of exporting query results to simple Excel reports. You will create three different, and very useful, simple Excel reports.

In this tutorial you will learn:

  • How to use Automation to export query results to Excel
  • How to use the Select to File activity in Automation
  • How to automate an Excel report that appends a new worksheet with each execution
  • How to automate an Excel report that uses multiple queries to produce multiple worksheets

Watch a video version of this tutorial: Automate Exporting Data to Excel.

Introduction

After creating a result set in Toad, you may need to send the results to your end users. The easiest way to create a report containing query results is to export the data to an Excel file by right-clicking the data grid and selecting Quick Export | File | Excel File. This action creates a basic Excel spreadsheet containing the result set from the data grid.

If you want to create more than a basic spreadsheet and automate the process, Toad Automation helps you build a variety of Excel reports, from simple worksheets to complex and attractive Excel reports.

In this introduction to automating Excel reports, you will learn how to automate the process of exporting data to a variety of simple Excel reports.

Note: To learn how to get started with Automation, see Getting Started with Automation.

Create a Simple Excel Report

  1. Select Tools | Automation.
  2. Click the Select to File activity in the Database Activities pane of the Toolbox, or drag the activity from the Toolbox to the Automation design window.

  3. When the Select to File activity is selected in the design window, the Activity Input tab displays. Select a database connection in the first text box or use the default (the default is the currently-active open connection).
  4. Then select a SQL file or enter a SQL statement using one of the following methods:
    • Manually enter a SQL statement in the editor (deselect the Link SQL file option).
    • Click to browse to and select a SQL file.
    • Select Link SQL file, then click to browse to and select a SQL file.
    • Click to open the SQL file (you previously selected) in an editor where you can modify the SQL.
    • Select Link SQL file, then click the drop-down list to select a file from the currently open project in the Project Manager.
  5. Select Excel in the Type field in the Export to File section.
  6. Click in the Name field to select a location and enter a name for your new Excel file, or you can select an existing file.

    Note: To specify more-detailed options for the Excel file, click the Export options button. See Specify Excel Export Options.

  7. (Optional) You can choose to create a unique file by adding a suffix. In the suffix field, click the drop-down to select a datetime stamp, or click to build an expression.
  8. Select Overwrite if you want to overwrite the file.

    Note: If you did not add a suffix, you can deselect Overwrite to append a new worksheet to the Excel file with each script execution.

  9. To save your Automation script, click Save in the Wizard bar. Then select a location and file name for your script.
  10. To test your script, click Run in the Wizard bar.
  11. After the script executes, the Log tab displays. Click the hyperlink in the Log to view the Excel file.
  12. To learn how to schedule your Automation script, see Schedule Your Script.

That was simple, wasn't it. Now move on to the next example to learn how to create a slightly more complex Excel report.

Create a Multi-Page Excel Report Using One Query

Suppose you want to create a new report each week from the same query while retaining the previous week’s results. In this case, you want to append each week’s results as a new worksheet to a single Excel file. This is an excellent option if you want to compare the results each week (or each day, month, etc.) to see how the data is changing. (And Toad has several data compare features in the application to let you do that.)

  1. Select Tools | Automation to open a new Automation window.
  2. Click the Select to File activity in the Toolbox to add it to the Automation design window.
  3. Select a database connection.
  4. Select a SQL file or enter a SQL statement using one of the methods described in the first example.
  5. Select Excel in the Type field in the Export to File section.
  6. In the Name field, click to select a location and enter a name for your file.
  7. Leave the suffix field blank (adding a date/time suffix could create a new file with each script execution and this is not the objective of this example).
  8. Deselect Overwrite (you do not want to overwrite the file).
  9. Now click Export options. The Export options dialog opens.
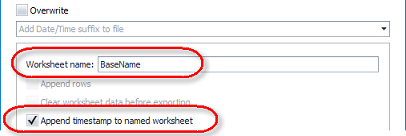
  10. In the Worksheet name field, enter a name to be used as the base worksheet name.
  11. Select Append timestamp to named worksheet. This will append the date and time (that the data was exported) to the base worksheet name. Click OK to save your settings and close the dialog.

  12. Click Run to save and run your script.

  13. Open the Excel file by clicking the link in the Log tab. Notice that the new worksheet’s name includes the base name you specified suffixed with the timestamp.
  14. Run the script a second time and open the file. A new worksheet with a new timestamp was added to the Excel file.

The output of this script is one Excel file containing multiple worksheets. Each worksheet contains a result set from one execution of the script. And each worksheet name records the date and time the result set was exported.

Create a Multi-Page Excel Report Using Multiple Queries

Another variation of the multi-page Excel report is to export the results of multiple queries. Each worksheet in the Excel file will be populated with the result set of a different query. This can be accomplished by using a SQL file that contains multiple SQL statements as the input file.

  1. To start, open a new Automation window.
  2. Click the Select to File activity to add it to the design window.
  3. Select a connection.
  4. Select a SQL file or enter a SQL statement using one of the methods described in the first example. However, this time use a file that contains multiple SQL statements (or enter multiple statements in the editor).
  5. Select Excel in the Type field in the Export to File section.
  6. Click in the Name field to select a location and enter a name for your new Excel file.
  7. Click Export options and make sure the Worksheet name field is blank.

    Note: If the Worksheet name field is not blank, your script will export both result sets into the named sheet, and the second result set will overwrite the first.

  8. Selecting to overwrite the existing file or to add a date/time suffix to the file name is optional in this example.
  9. Click Run to save and run your script.

  10. Open the new file by clicking the link in the Log tab. Notice that the file contains a separate worksheet for the result set of each query.

The output of this script is one Excel file containing multiple worksheets. Each worksheet contains the result set of a different query.

Note: To learn how to export the result sets of multiple queries into a single worksheet (using Automation), see Automate Complex Excel® Reports.

Learn More

As you can see, with Toad Automation you can easily create basic Excel reports, but with a few more script configurations and the use of templates, you can also create attractive and more complex reports. To learn how, see the following tutorials on Automating Excel Reports.

Schedule A Script

See Schedule Your Script to learn how to schedule the Automation script.


Related Topics

Use Database Automation Activities

Specify Excel Export Options

Automate Tasks

Use Automation to schedule a single script to run reports and queries, save results in Excel spreadsheets, and distribute results to the business community via email. You can schedule scripts that perform long-running tasks to run when database activity is light.  

You can also use variables in automation scripts. With variables, you can update information that may be different each time you run the script, such as the department name, revenue, fiscal quarter, or product name. See Using Variables in Automation for more information.

For example, assume you are an analyst at Nick's Flicks movie rentals. You need to run inventory and movie rental reports on a daily basis and distribute them to managers of the inventory department. Using Toad, you can create an automation script that runs the reports, exports them to Excel spreadsheets, and emails the spreadsheets to the inventory department everyday at 2:00 AM.

Troubleshooting: You must surround a variable name with the # sign (for example, #sleep#).

Notes:

  • Automation scripts are compatible with the version of Toad in which they are created. To learn how to upgrade your scripts and scheduled tasks that were created in a previous version of Toad, see Upgrade Automation Scripts and Scheduling Tasks.
  • The Automation module is disabled if Toad was installed with the Prohibit saving passwords option selected.

To automate tasks

  1. Select Tools | Automation.
  2. Click Settings (icon) in the script design window and specify script settings. Enter settings in the bottom pane. Review the following for additional information:

    Activity Input Tab  

    Stop or continue on Error

    Select Stop On Error to stop the script if an error occurs.

    Send email when error occurs

    Select this option to send an email on script error.

    If selected, you must also click Compose Email to compose the email message and to edit the Email Server Settings.

    Note: When you specify the error email settings, Toad saves your settings and uses them in all subsequent automation scripts.

    Use relative path to find files

    Select to convert all local file paths to relative paths in all activities in the script (network file paths remain unchanged). This is useful if you want to share your automation scripts with colleagues or place them on a shared network.

    Toad makes the change the next time you run or save the script.

    If you deselect this option later, the script reverts back to the original absolute paths.

    Note: Toad deselects this option when publishing a script to Intelligence Central.

    Embed files into Automation script

    Embeds Toad input files into the script. This makes it easier to share the script with colleagues.

    Important: To use this option, deselect it, build your script, select input files, then re-select this option. This allows Toad to collect and save the input file paths.

    This option embeds Data Compare, Data Cleansing, Visualization, Pivot Grid, Toad Data Report, and Import/Export template files. Scripts used by the Run Automation Script activity are also embedded, as are SQL query files used as input by an Import/Export template.

    Important: Files linked using the Link to File option in the Select to File, Execute Script, and Select to Editor with Results activities are not embedded [.sql, Editor (.tef), and Query Builder (.tsm) files)].

    Toad embeds the files the next time you run or save the script.

    If necessary, at a later time you can deselect this option and then re-establish links to the original files.

    Note: Toad selects this option when publishing a script to Intelligence Central.

    Truncate log

    Select to overwrite the log file each time the script runs.

    Selected environment

    Use this area to specify a "test" database connection and a "production" database connection and then easily switch between the two.

    • Test—Select to run your script in test mode using the database connection and other settings you specified under Test environment.
    • Production—Select to run your script in production mode using the database connection and other settings you specified under Production environment.

    Note: The Connection field under both environments defaults to the currently-active open connection.

    Variable names

    • Root path—Enter a variable name or use the default name. Then use this variable name in your script wherever you want to apply the path defined under Root path in either the Test settings or the Production settings. The path that is applied depends on which environment (Test or Production) is selected at the time the script is executed.
    • Run mode—Enter a variable name or use the default name. The value assigned to this variable is either Test or Production, based on the environment selected at the time the script is executed.
    Activity Info Tab  

    Name

    Enter a script name.
  3. To build a script, single-click an activity in the Toolbox, or drag an activity from the Toolbox to the Automation script design window. Repeat this process to add additional activities to your script.

    Note: You must drag the activity to plus sign, then release the mouse button after you see the activity's icon replace plus sign.

  4. Click an activity in your script workflow in the design window and then specify the activity's properties in the details pane (bottom pane). Repeat this process for each activity in your script. For a step by step tutorial on building an Automation script, see Getting Started with Automation.

    See the following topics for details about each activity and its properties:

    Tip: You can save an activity and its settings as a template to reuse in other scripts. Right-click the activity in the design window and select Save As Template. After you create the first template, a Templates toolbox displays.

    Note: Click Settings in the design window at any time to go back and review the Automation script settings.

  5. When you finish building your script, select one of the following actions from the Automation toolbar or the Wizard bar:  

    Add to Project

    Add an automation script to the current project in the Project Manager. The script is automatically placed in the project's Automation Scripts folder.

    Save

    Save an automation script (.tas) in a folder on a local or network drive.

    Run

    Run an automation script before scheduling it. The script executes once and the execution log is displayed in the Log window. Resolve any problems that cause activities to fail, or disable failed activities before scheduling the script.

    Tips:

    • Press F5 to run the automation script.
    • To view the script log, select the Log tab or select View | Output.
    Publish Publish script to Toad Intelligence Central. See Publish Automation Scripts to Intelligence Central for more information.

    Schedule

    Schedule an automation script in the Job Manager. You can schedule a script to execute once or to run periodically at a defined interval. See Execute and Schedule Automation Scripts for more information.

Important: To rename an Automation script file, do so through Toad (File | Save File As), not through Windows Explorer. Renaming a script file using Toad ensures that log files are created correctly and properly synced with their scripts.

Tips:

  • Double-click an activity in the script design window to open the Activity Properties pane in a format used in earlier versions of Toad.
  • Right-click within the script design window and select Print Script to print the script's workflow diagram.


Related Topics

Using Bind Variables

Use Database Automation Activities

You can use the following activities in automation scripts.

Note: When building an automation script, you must have the appropriate connections open for database activities.

Tip: You can save an activity and its settings as a template to reuse in other scripts. Right-click the activity in the design window and select Save As Template. After you create the first template, a Templates toolbox displays.

Activity Description

Select to File

Execute an existing SQL script, Query Builder file, or Editor file and export the results to an Excel, HTML, or CSV file.

  1. Select a database connection.
  2. Select a SQL file or enter a SQL statement.
    • Click the drop-down list to select a file from the currently open project in the Project Manager.
    • Click to browse to and select a SQL file.
    • Click to open the SQL file in the Editor where you can modify the SQL file.
    • Enter a SQL statement in the editor. You must first deselect the Link SQL file option.

  3. RowCount variable—Enter a name for the row count variable or use the default. The value assigned to this variable equals the number of rows returned from the activity. See Using Variables in Automation for more information.
  4. Export File Type—Select an export file type.
  5. Export File Name—Click to select a file location and enter a file name. To use a variable as a suffix, enter the hash symbol before and after the variable name (#VariableName#).
  6. Suffix—Select a suffix to append to the file name. Select from the list of existing suffixes, or click to select a variable or build a new suffix using the expression editor.

  7. Overwrite—Select to overwrite the file. If you did not add a suffix to the file name, you can deselect Overwrite to append a new worksheet to the Excel file with each script execution.
  8. Export Options—Click to specify more export options. See Specify Excel Export Options for more information.

    • Worksheet name—Enter a worksheet name. For an existing file, select the worksheet from the list. Overwrite must be deselected to display the list.

      To add a worksheet to an existing file, select Append worksheet from the list and enter a new name.

    • Append rows—Select to append to the selected worksheet.
    • Start export at—Enter the column and row position at which to begin the export.

Tip: After exporting your file, you can use a subsequent activity in your script to email the report, to zip the report in a zip folder, or to copy the report to another location.

Execute Script

Execute an existing SQL script, Query Builder file, or Editor file. You can save the results of the script in a variable or export the results to Local Storage or an Intelligence Central dataset.

  1. Select a database connection.
  2. Select a SQL file or enter a SQL statement.
    • Click the drop-down list to select a file from the currently open project in the Project Manager.
    • Click to browse to and select a SQL file.
    • Click to open the SQL file in the Editor where you can modify the SQL file.
    • Enter a SQL statement in the editor. You must first deselect the Link SQL file option.
  3. Save result set in variable—Enter a name for the result variable, which contains a data table with the results of the execution script.

    Tip: You can use the result variable with the Loop Dataset activity. See Use System Automation Activities for more information.

  4. Local Storage—To export the results to Local Storage, select a database and a new or existing table (or snapshot).
  5. Intelligence Central—To export the results to Intelligence Central as a dataset, click Publishing Wizard and specify your publishing options. See Publish to Toad Intelligence Central for more information.

Review the following for additional information:

  • RowCount variable—Enter a name for the row count variable or use the default. The value assigned to this variable equals the number of rows returned from the activity. See Using Variables in Automation for more information.
  • Overwrite existing dataset—Select to overwrite an existing dataset with the same name.

To learn more about using the Execute Script activity, see the following:

Select to Editor with Results

Execute an existing SQL script or Query Builder query and save it and any results sets in a Toad editor file (.tef).

This file format is useful for building scripts that have large result sets that you do not want to continue executing or for saving results when you have not finished building a script.

  1. Select a database connection.
  2. Select a SQL file or enter a SQL statement.
    • Click the drop-down list to select a file from the currently open project in the Project Manager.
    • Click to browse to and select a SQL file.
    • Click to open the SQL file in the Editor where you can modify the SQL file.
    • Enter a SQL statement in the editor. You must first deselect the Link SQL file option.
  3. Result saved in Editor file—You can select an Editor file from an open project or browse to select a file. Click to edit the selected file.

    Tip: You can use a variable in this field by entering the hash symbol before and after the variable name (#VariableName#).

  4. Append results—Select to include the result set in the Editor file.

Review the following for additional information:

  • RowCount variable—Enter a name for the row count variable or use the default. The value assigned to this variable equals the number of rows returned from the activity. See Using Variables in Automation for more information.
  • Suffix—Select a suffix to append to the file name. Select from the list of existing suffixes, or click to select a variable or build a new suffix using the expression editor.

Export Wizard

Export data from databases, tables, views, or a query into a CSV, Excel, or other file.

Review the following for additional information:

  • Export template—You can select an existing template, edit an existing template, or create a new template.

    Tip: You can use a variable in the file name to select an existing template file by entering the hash symbol before and after the variable name (#VariableName#).

  • Use Automation Connection—Select this option to use the connection associated with the Export Wizard activity. Clear the checkbox to use the connection associated with the export template.
  • RowCount variable—Enter a name for the row count variable or use the default. The value assigned to this variable equals the number of rows returned from the activity. See Using Variables in Automation for more information.

Note: See Export Data with the Export Wizard for more information.

Import Wizard

Import data from a CSV, Excel, or other file into a new table or append to an existing table. You can also import data from one database to another.

Review the following for additional information:

  • Import template—You can select an existing template, edit an existing template, or create a new template.

    Tip: You can use a variable in the file name to select an existing template file by entering the hash symbol before and after the variable name (#VariableName#).

  • Use Automation Connection—Select this option to use the connection associated with the Import Wizard activity. Clear the checkbox to use the connection associated with the import template.
  • RowCount variable—Enter a name for the row count variable or use the default. The value assigned to this variable equals the number of rows returned from the activity. See Using Variables in Automation for more information.

Note: See Import Data for more information.

Toad Report

Use this activity to open a Toad Data Report (executing the query) and then export the results to a file using the layout specified in the Toad Data Report. Several export file formats are available, including PDF, HTML, and Excel.

You can also select multiple Toad Data Reports and export the results to a single file.

Note: You must create a Toad Data Report file (.tdr) before you can select it using this activity.

Review the following for additional information:

  • Select a connection to execute the Toad Data Report query against.
  • Add Reports—Click to browse to and select one or more Toad Data Report files (.tdr). Click the arrow and select From Project Manager to add the reports in the currently-open project.
  • Edit Report—Click to edit the selected report.
  • RowCount variable—Enter a name for the row count variable or use the default. The value assigned to this variable equals the number of rows returned from the activity. See Using Variables in Automation for more information.
  • Export file—Enter a name and select a file type and location for your export file. You can use a variable in this field by entering the hash symbol before and after the variable name (#VariableName#).
  • Suffix—Select a suffix to append to the file name. Select from the list of existing suffixes, or click to select a variable or build a new suffix using the expression editor.

Note: In most cases, the script uses the connection you specify in this activity. However, when a Toad Data Report contains a cross-connection query, the cross-database connection in the report takes precedence.

For more information about Toad Data Reports:

Toad Pivot Grid

Open an existing Toad Pivot Grid file, execute the query, and export the data to Excel or other file format, Local Storage, or Intelligence Central.

Note: You must create a Toad Pivot Grid file (.tpg) before you can select it using this activity.

See Pivot and Chart Data for more information about creating a Pivot Grid.

Review the following for additional information:

  1. Select a connection to execute the Toad Pivot Grid file against.
  2. Select an existing Toad Pivot Grid file. You can browse for a file or select from the currently-open project. Click to edit the selected pivot file.
  3. Export to file—Select a file type and enter a file name and location for your export file. You can use a variable in this field by entering the hash symbol before and after the variable name (#VariableName#).
  4. Suffix—Select a suffix to append to the file name. Select from the list of existing suffixes, or click to select a variable or build a new suffix using the expression editor.

  5. RowCount variable—Enter a name for the row count variable or use the default. The value assigned to this variable equals the number of rows returned from the activity. See Using Variables in Automation for more information.
  6. Export to—Select one of the following:
    • Local Storage—To export pivoted data to Local Storage, select a database and a new or existing table.
    • Intelligence Central—To export pivoted data to Intelligence Central as a dataset, click Publishing Wizard and specify your publishing options. See Publish to Toad Intelligence Central for more information.
Profile Data

Automate data profiling tasks. This activity profiles data from a selected query and exports a report containing the profiling results.

  1. Select a database connection.
  2. Select a SQL file or enter a SQL statement.

    • Click the drop-down list to select a file from the currently open project in the Project Manager.
    • Click to browse to and select a SQL file.
    • Click to edit the selected file.
    • Enter a SQL statement in the editor.

  3. To specify options for the profiling task, click Profiling Options. See Profiling Options for more information.
  4. Create Report—(Required) Select a location, select a file format, and enter a file name for the exported report (PDF, HTML, etc).
  5. Suffix—Select a suffix to append to the file name. Select from the list of existing suffixes, or click to select a variable or build a new suffix using the expression editor.

  6. Export Data Profiling File—(Optional) Select a location and enter a file name for the Toad Profiling Report file (.tpr). See Data Profiling for more information.

    Note: You cannot attach this file in subsequent activities in the script.

Clean Data

Automate data transformation and cleansing tasks. This activity opens an existing Toad Data Cleansing file, performs the transform and cleansing tasks on the current result set, and exports the modified data to a file, Local Storage, or Intelligence Central.

  1. Connection—Select a database connection.
  2. Cleaning file—Select a Toad Data Cleansing file or edit an existing file using one of the following methods:
    • Click the drop-down list to select a file from the currently-open project in the Project Manager.
    • Click to browse to and select a file.
    • Click to edit the selected file.
  3. Error options—Click to specify error options. See Transform and Cleanse Options.
  4. Select one of the following actions:
    • Export to a file—Select a file, or select a location and enter a new file name. You can use a variable in this field by entering the hash symbol before and after the variable name (#VariableName#).  See Specify Excel Export Options for more information.
    • Local Storage—To export to Local Storage, select or create a database. Then select or create a snapshot or table to receive the modified data.
    • Intelligence Central—To export the results to Intelligence Central, click Publishing Wizard and specify your publishing options. See Publish to Toad Intelligence Central for more information.

Review the following for additional information:

  • RowCount variable—Enter a name for the row count variable or use the default. The value assigned to this variable equals the number of rows returned from the activity. See Using Variables in Automation for more information.
  • Suffix—Select a suffix to append to the file name. Select from the list of existing suffixes, or click to select a variable or build a new suffix using the expression editor.

See Transform and Cleanse Data for more information.

Visualize Data

Open an existing Toad Data Visualization file (.tdv), refresh the chart, and export contents as a report. Select from a number of output file formats, including PDF and Excel.

  • Data Visualization document—Select an existing Toad Data Visualization file.
  • Output file—Select a file location, file name, and file type for your output file. You can use a variable in this field by entering the hash symbol before and after the variable name (#VariableName#).
  • Suffix—Select a suffix to append to the file name. Select from the list of existing suffixes, or click to select a variable or build a new suffix using the expression editor.

See Visualize Data for more information.

Compare Data

Open a Toad Data Compare project (.dcp) and export the contents as a summary report and detailed object reports. Select from a number of output file formats for the summary report, including PDF and Excel.

  • Data Compare Project—Select an existing Toad Data Compare project file.
  • Summary Report—Select a file location, file name, and file type for the comparison summary report file.
  • Object reports folder—Select a destination folder for the detailed object comparison reports generated by the activity.
  • Suffix—Select a suffix to append to the file name. Select from the list of existing suffixes, or click to select a variable or build a new suffix using the expression editor.
  • Generate sync script—Select a location and enter a file name to generate a synchronization script. Click to configure options for the synchronization script.
  • Execute script—Select to execute the generated script.
  • Compare result variable—Enter a variable name or use the default. This variable is assigned a value of True or False based on the results of the data comparison.

Refresh a Snapshot

Use this activity to refresh a snapshot in Local Storage or in Toad Intelligence Central (TIC). This action will update the snapshot to reflect the current data in the source table. See Save Data to Local Storage or Snapshots in TIC for more information.

Select one of the following:

  • Local Storage
    • Database—Select the database containing the snapshot to refresh.
    • Snapshot—Select the snapshot to refresh.
  • Intelligence Central
    • Select a destination—Select the TIC connection containing the snapshot to be refreshed.
    • Datasource—Select the data source in TIC containing the snapshot to refresh.
    • Snapshot—Select the snapshot to refresh.

To learn how to use the Refresh Snapshot activity, see the following:

Database Connection

In previous versions of Toad, the Database Connection activity was required in order to specify database connection details.

In the current version of Toad, you can specify the database connection details within each applicable activity, eliminating the need to use the Database activity. You may continue to use the Database activity if you prefer.

Note: The database connection specified for the Database Connection activity takes precedence over the connection specified for the individual activity.

Loop Connections

Loops through multiple connections and executes the activities you specify. Add as many activities as you want to the loop. The Loop Connections activity can have more than one branch.

  • Select connections to loop through—Click Add Connections to select one or more connections to loop through.
  • Connection description variable—Enter a new name for the variable or use the default name. The connection description variable is a SQL-type variable comprised of one row containing the connection information for the current connection.

    Use the following column names to gather connection information from the connection description variable. The exact content of each column depends on the provider type.

    Column Name Description
    DescriptionLong Description of the connection details.
    ProviderType Provider type such as SQLServer, Oracle, or SAP ASE.
    HostName Hostname or instance for the connection.
    UserName User name.
    TrueUserName If the connection supports and uses Windows authentication (e.g., SQL Server connection) this column contains the current Windows Logon name as: domain\username (e.g., "PROD\bgates"). Otherwise, if database authentication is used, it contains the same as the UserName column.
    Database Default Database context for the connection.
  • Next, add activities to the loop to execute for each connection in the connection list.

Note: The connections you specify in the Loop Connections activity take precedence over any connection specified in an individual activity.

Dimensional Viewer

Open an existing Dimensional View file, execute the query, and export the data to Excel, Local Storage, or Intelligence Central.

  1. Select an existing Dimensional View file.
  2. Export to file—To export data to Excel or .csv, select a file type, a file location, and a file name. Click Export Options to specify export options. In the Export dialog, each tab represents a view. See Specify Excel Export Options for more information.

    • Worksheet name—Enter a worksheet name. For an existing file, select the worksheet from the list. Overwrite must be deselected to display the list.

      To add a worksheet to an existing file, select Append worksheet from the list and enter a new name.

    • Append rows—Select to append to the selected worksheet.
    • Start export at—Enter the column and row position at which to begin the export.
  3. Export to:

See Dimensional Viewer for more information.

Notes: 

  • To disable an activity, right-click the activity in the design window and select Disabled. This is helpful if you want to disable an activity while testing other activities.
  • The Stop on Error option for each activity allows you to select whether to stop or continue execution if Toad encounters an error during that activity.
  • To prevent an error in one activity from causing a failure at the script level, clear the Generate Error check box (Activity Info tab) for that activity. See Automation Script Troubleshooting and Error-Handling.
  • Select the Log tab to review a script's execution log.
  • In the Suffix field, the drop-down list includes two predefined suffixes (Date and DateTime). The list also includes any suffixes you have created and saved since installing Toad. To delete a suffix from the list, select the suffix, click , delete the suffix in the Expression field, and click OK.
  • Automation does not support positional parameters denoted by a question mark.
  • For each applicable activity, you can specify the database connection in the activity's properties. The default connection is the currently-active open connection.
  • The connection associated with an activity takes precedence over the connection information in a report or SQL script, unless the report or SQL script information is a cross-connection query.


Related Topics

Automate Tasks

Use File Automation Activities

Use System Automation Activities

Use File Automation Activities

You can use the following activities in automation scripts.

Tip: You can save an activity and its settings as a template to reuse in other scripts. Right-click the activity in the design window and select Save As Template. After you create the first template, a Templates toolbox displays.

Activity Description

Copy File

Copy or move one or more files to another location (for example, to a shared folder where they can be accessed by your business community).

Review the following for additional information:

  • Source file—Select the file to copy.

    In this field, you can also use the asterisk (*) and question mark (?) wildcard characters, as well as variables, in the file name to help you select one or more files (in the same directory) to copy. To use this method:

    1. Specify the file directory by browsing to and selecting one of the files.
    2. Then modify the file name in the Source file field using wildcard characters and/or variables.
  • Copy to folder—Select the destination folder into which you want to copy or move the file or files.
  • Copy name—To rename the copied or moved file, enter a new name.

    Note: This field is only applicable when copying a single source file.

  • Suffix—Select a suffix to append to the file name. Select from the list of existing suffixes, or click to select a variable or build a new suffix using the expression editor.

  • Delete source file—Select to move the file from the source folder to the destination folder. Deselect to copy the file to the destination folder.
  • Retry—Specify the number of times to retry the copy action if an error or timeout occurs.
  • Wait—Specify the number of seconds to wait between retries.

Delete File

Delete one or more files from one or more specified locations. You can also use this activity to delete files that are created previously in the script.

Files to delete—Click Add Files to select one or more files to delete. In the File Collection Editor, do one or both of the following:

  • To delete files created previously in the script, select a file in the left pane and click Add.

    Note: When a file name is displayed for selection in the left pane, any variable names that are used in the file name are visible (#MyVariable#), but suffixes are not visible.

  • To select other existing files, click to browse to and select the files.

    In this field, you can also use the asterisk (*) and question mark (?) wildcard characters, as well as variables, in the file name to help you select one or more files (in the same directory) to delete. To use this method:

    1. Specify the file directory by browsing to and selecting one of the files.
    2. Then modify the file name in the Files to Delete pane using wildcard characters and/or variables.

    Note: As an example of using wildcards and variables, using the file name MonthlyReport_#var#*.xls, where #var# is Feb, would delete all reports whose file name begins with "MonthlyReport_Feb" in the same directory.

Log Comment

Writes a comment to the scripts's log.

Log message—Enter the text of the comment you want to insert into the log when this activity executes.

Zip/Unzip Files

Create a zip file (compressed folder) and add files to it. You can add files created previously in the script to the zip file. Use this activity to zip multiple files and then attach the zip file to an email using the Email activity.

You can also use this activity to unzip a zip file.

Review the following for additional information:

Zip Tab

  • Archive name—Select a location and name for the zip file. You can use a variable in this field by entering the hash symbol before and after the variable name (#VariableName#).
  • Suffix—Select a suffix to append to the file name. Select from the list of existing suffixes, or click to select a variable or build a new suffix using the expression editor.

  • Password—Enter a password if you want to password protect the zip file.
  • Hide password—Select this option to mask password during input.
  • Encryption—Select whether to create a zip file without encryption (Standard) or to encrypt the zip file.

    Note: If you encrypt the zip file, you must have a zip utility that can support 128-bit or 256-bit decryption.

  • Zip all files in this directory—Select a directory. All files in the directory will be added to the zip file. You can use both this field and the Source files field to select files to add to the zip file.
  • Source files—Click Add Files to select one or more files to add to the zip file. In the File Collection Editor, do one or both of the following:
    • To add files created previously in the script, select a file in the left pane and click Add.

      Note: When a file name is displayed for selection in the left pane, any variable names that are used in the file name are visible (#MyVariable#), but suffixes are not visible.

    • To select other existing files, click to browse to and select the files.

      In this field, you can also use the asterisk (*) and question mark (?) wildcard characters, as well as variables, in the file name to help you select one or more files (in the same directory) to add. To use this method:

      1. Specify the file directory by browsing to and selecting one of the files.
      2. Then modify the file name in the Files to Archive pane using wildcard characters and/or variables.

Unzip Tab

  • Archive name—Select a zip file.
  • Password—If password-protected, enter the password.
  • Extract to folder—Select a location to extract the files to.

To learn how to use the Zip/Unzip Files activity, see the following:

Find and Replace

This activity opens one or more files and performs find and replace actions inside the files. You can write the results to a different location and file name.

Review the following for additional information:

  • Find/Replace—You can have multiple Find/Replace tasks within one activity. You can specify a different source file, save file, and action for each Find/Replace task.
  • Source file—Select the file in which to perform the find and replace action for the selected Find/Replace task.

    In this field, you can also use the asterisk (*) and question mark (?) wildcard characters in the file name to help you select one or more files (in the same directory). To use this method:

    1. Specify the file directory by browsing to and selecting one of the files.
    2. Then modify the file name in the Source file field using the wildcard characters.
  • Find—Enter the content to find.
  • Replace with—Select the type of replacement content: a value, contents from a file, or a variable value.
  • Set value—Enter the replacement value, select the replacement variable, or select a file containing replacement content.

  • Save file—Select a location and file name.

    The source file is selected by default.

  • Suffix—Select a suffix to append to the file name. Select from the list of existing suffixes, or click to select a variable or build a new suffix using the expression editor.

Note: Use drag and drop or up/down arrows to change the order of multiple Find/Replace tasks in one activity.

To learn how to use the Find and Replace activity, see the following:

FTP File

Upload or download one or more files using an FTP or SFTP connection. Review the following for additional information:

  • Select an FTP connection—Select an FTP connection or define a new connection.

    Note: You can define a new connection prior to using the FTP activity by selecting View | FTP Connections.

  • Transfer ONLY if—Select this option to set conditions for FTP transfer, and then select a condition from the list. If you select this option, the FTP activity only runs if the condition you specify is met.
    • Local directory exists—Select this option to transfer only if a local directory exists, then browse to and select the directory.
    • Local file exists—Select this option to transfer only if a local file exists, then enter the name of the local file.
    • Remote directory exists—Select this option to transfer only if a remote directory exists, then browse to and select the directory.
    • Remote file exists—Select this option to transfer only if a remote file exists, then enter the name of the remote file.
  • Define Operations—Click to specify the files and other options for the FTP upload or download task. Review the following for additional information:
    • Operation—Select Upload or Download.
    • Use file mask—Select this option if you want to select files by using a file mask. Then specify file mask filtering options in the File Mask fields at the bottom of the page.
    • Move files—Select this option to move the files from the source location to the target location instead of copying them.
  • Retry—Specify the number of times to retry the FTP connection if it fails.
  • Wait—Specify the number of seconds to wait between retries.

To learn how to use the FTP activity, see the following:

Publish Files

Publish one or more files to Intelligence Central. You can select files created by previous activities in this script or other existing files.

Review the following for additional information:

Files to Publish—Click Manage Files to select files created previously in this script or to browse for other files to publish. In the File Collection Editor do one or both of the following:

  • Select one or more previously-created files in the left pane and click Add.
  • Click and then browse to select an existing file.

Publishing Options—Click Publishing Wizard to select an Intelligence Central connection and specify publishing options. See Publish to Toad Intelligence Central for more information.

Notes: 

  • To disable an activity, right-click the activity in the design window and select Disabled. This is helpful if you want to disable an activity while testing other activities.
  • The Stop on Error option for each activity allows you to select whether to stop or continue execution if Toad encounters an error during that activity.
  • To prevent an error in one activity from causing a failure at the script level, clear the Generate Error check box (Activity Info tab) for that activity. See Automation Script Troubleshooting and Error-Handling.
  • Select the Log tab to review a script's execution log.
  • In the Suffix field, the drop-down list includes two predefined suffixes (Date and DateTime). The list also includes any suffixes you have created and saved since installing Toad. To delete a suffix from the list, select the suffix, click , delete the suffix in the Expression field, and click OK.
  • Automation does not support positional parameters denoted by a question mark.

Tips:

  • For activities in which you can add a suffix to the output file, click to build a suffix using the expression editor.
  • You can use the expression editor to select a variable created in a previous activity or select one of your stored bind variables.
  • To learn how to store a bind variable value, see Using Bind Variables.


Related Topics

Automate Tasks

Use Database Automation Activities

Using Variables in Automation

関連ドキュメント

The document was helpful.

評価を選択

I easily found the information I needed.

評価を選択