
SQL Server Reports
The following reports are available from the Reports Manager (Tools | Reports | Reports Manager).
 DBA Reports
| Report Name | Description |
|---|---|
| All jobs | Displays all scheduled SQL Server jobs and the job owner, organized by server. |
| Backup history | Displays the backup start date, type, and device used for the backup for a specified database for a set number of days. |
| Backup status | Displays the database name, date of the last backup, days since the last backup, and the type of backup performed. |
| Current lock report | Displays any locks on the server, including the database name, object or index name, type of lock, resource, mode, and status. |
| Database configuration options | Displays configuration options for each database on the specified server. |
| Database settings | Displays any common options and their values for all the databases on your server. |
| Database user details | Displays the user name, roles, objects, granted/denied status, and column permissions for each database. |
| Display errors | Displays a log file without entries for log backups. This is useful when you have a number of log backup entries and you need to locate non-backup errors. |
| Drive space usage | Displays space for all databases on the server, including free space, space used, maximum size, and growth type. |
| Foreign key sequence |
Displays tables in the order you can either populate or delete from them without violating any foreign key constraints. Objects with the lowest wave number indicate that they can be deleted with the fewest number of foreign key references. Objects with the highest wave number should be populated first. |
| Index description | (SQL Server 2000 only) Displays all indexes for the current database sorted by table. Index information includes whether it is clustered, unique, index keys, and the index size. run frequency, and the maximum duration. |
| Job details | (SQL Server 2000 only) Displays all SQL Server jobs, including whether they are scheduled, enabled, start date and time, |
| Row count for tables with clustered index | Displays the number of rows for all tables on a server that contain a clustered index. |
| Total rows and space used | Displays the total number of rows and space used for each table or view in the current database, including the reserved rows, unused rows, and index size. This report is sorted in descending order by reserved rows. |
| User permissions | Displays users permissions, grouped by role name and object type. |
| Report Name | Description |
|---|---|
| Configuration change history | Displays a history of all sp_configure and Trace Flag Changes recorded by the default trace. |
| Schema change history | Displays a history of all committed DDL statement executions recorded by the default trace. |
| Report Name | Description |
|---|---|
| Indexes | Displays index information for a selected table, including whether the index is clustered, unique, ignores duplicate keys, allows page/row locks, and a list of indexed columns. |
| Non-indexed tables | Displays any tables that have not been indexed for the selected database. |
| Table constraints | Displays any check constraints for a selected table, including whether the constraint is enabled, valid data, and affected columns. |
|
Table extended properties |
Displays any extended properties for a selected table. |
| Table relationships | Displays any foreign key constraints for a selected table, including whether the constraint is enabled, referenced tables, and referenced keys. |
| Tables and columns | Displays all columns for a selected table, including the data type, default value, whether it allows null values, and for SQL Server 2005 any extended properties. |
| Tables and indexes | Displays any indexes for a selected table, including the name, columns included in the index, and whether it is unique or clustered. |
| Report Name | Description |
|---|---|
| Stored procedures | Displays stored procedures for a selected database, including their status, status, replication information, schema version, statistics, and procedure text. |
Publish and Share Reports
Toad provides multiple ways to publish and share information with your business community. Use the following methods to publish and share information from the Project Manager, Reports Manager, and Automation.
- Email reports and files, including Database Diagrams, Query Builder queries, SQL scripts, and results for reports, queries, and scripts.
- Share reports and files in a central location such as the Toad shared folder.
- Add reports and files to a ZIP folder or file.
- Publish reports and files to Toad Intelligence Central
You can use the following methods to publish and share information:
|
To email from... |
Do this... |
|
Automation |
Drag the Send Email activity to the Automation workflow and attach files as needed. The email is sent when the automation script executes. See Use System Automation Activities for more information. |
|
To publish to a central location from... |
Do this... |
|
Project Manager, |
Right-click a report or file and select Send To | Toad Shared. The file is sent to the Toad shared folder specified in Tools | Options | Environment | Network Share. |
|
Automation |
Drag the Copy File activity to the Automation workflow. Specify the file to copy or move and a destination folder. This can be any folder, including the Toad shared folder, or a network folder. The file is copied or moved when the automation script executes. See Use File Automation Activities for more information. |
|
To send to a zip file... |
Do this... |
|
Automation |
Drag the Zip File activity to the workflow. Add reports and files to the Zip file and specify a file name with a .zip extension. The ZIP file can then be emailed with the Send Email activity or copied with the Copy File activity. See Use File Automation Activities for more information. |
| To publish to Intelligence Central from... | Do this... |
|
Project Manager, |
Right-click a file and select Send To | Publish File. See Publish Toad Documents to Intelligence Central for more information. |
|
Automation |
Drag the Publish Files activity to the Automation workflow. Add reports and files created previously in the script or add other existing files. See Use File Automation Activities for more information. |
Tips:
-
To export a Toad report to a file that can be read by other applications, double-click a report in the Reports Manager, click
in the Report Preview window, select a file format, and add the file to a project. Share or publish the file using the Project Manager functions. See Project Manager for more information.
-
To capture report results in a file, add the Toad Report automation activity. This activity runs a Toad report and saves the results in a file format you select. Share or publish the file using the Automation functions. See Use Database Automation Activities for more information.
-
To execute and save a query in a file, add the Select To File automation activity. This activity runs a query or SQL script and exports the results to an Excel spreadsheet. Share or publish the spreadsheet using the Automation functions. See Use Database Automation Activities for more information.
Automate
Getting Started with Automation
Summary
This tutorial helps you get started with Automation by giving you an overview of the Automation module and then guiding you through the process of creating a basic script.
In this tutorial you will learn:
- How to use the Automation window
- How to create a basic script using the Select to File activity
- How to test and run a script
- How to schedule a script
- How to create a template for reusing an Automation activity

Note: The Automation module is disabled if Toad was installed with the Prohibit saving passwords option selected.
Introduction
Toad provides an Automation utility that allows you to easily script database activities and schedule them using the windows scheduler. In this way, database tasks can be automated to save you time. Toad Automation can increase your productivity by allowing you to automate tasks that you perform repeatedly.
The Benefits of Using Automation
- Automating repeatable tasks allows you to be more productive and increases your efficiency.
- Toad Automation scripts are very flexible and extensible, allowing you to customized them to your needs.
- You can create and use variables in Automation scripts. Variables allow you to make your scripts flexible and to customize your scripts to different audience and company needs.
- You can incorporate a variety of templates into Automation scripts. Using templates in your scripts can help you get the most out of automating your tasks. Templates include: Microsoft Excel® files, Export Wizard templates, or Toad Report templates. You can even create an Automation activity template allowing you to reuse an activity.
- There is no limit to the number of tasks you can include in an automation script.
- Toad Automation scripts are conveniently scheduled and run by the Windows scheduler. You can track and manage your scheduled scripts using Toad or the Windows Scheduler interface.
* Did You Know *Opening the Automation WindowThere are several ways to open an Automation window.
|

The Automation Window
-
To get started with Automation, open an Automation window by selecting Tools | Automation.
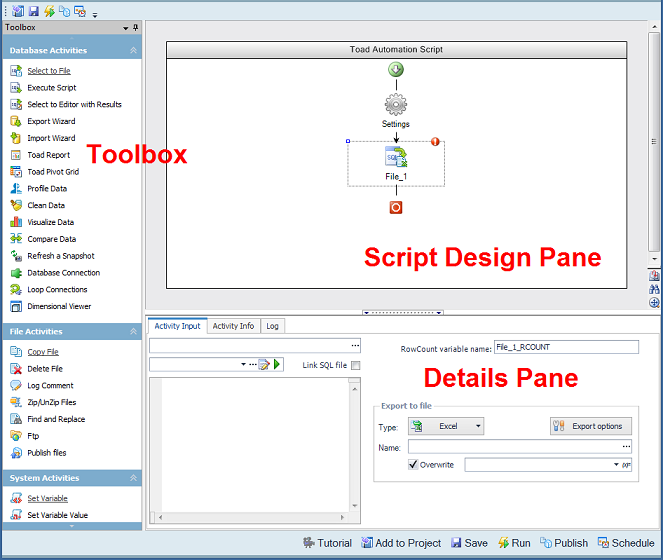
The Automation window consists of a Toolbox pane (along the left side of the window), a design pane (top half of the window), and a details pane (bottom half of the window).
Toolbox—Stores the Automation activities. Click an activity in the Toolbox to add it to the script design pane. Activities are listed by category: Database, File, or System.
Script Design Pane—Graphically displays the script as a workflow. Use the script design pane to build an Automation script. Drag an activity to the design pane to add the activity to a script.
Note: You must drag the activity to anAdd Activity icon
in the Automation workflow. When you see the activity's icon displayed in the workflow, release the mouse button.
Details Pane—Displays an activity’s settings. Click an activity in the design pane to display its configurable settings in the details pane. Use the details pane to specify the settings for each activity in the script.
- In the Toolbox, find the Database Activities group. Single-click the Select to File activity to add it to the script design pane.
-
With the Select to File activity still selected in the script design pane, view the details pane. The details pane allows you to configure settings for the selected activity. The input fields change depending on which activity is currently selected in the design pane.
Note: The Activity Input tab is the tab where you will specify most of an activity's settings.
-
Click
next to the Select to File activity. Toad uses this icon to indicate that more information is required to complete the activity. Click or hover over the icon to display the missing information. Use this icon to help you determine which input fields are required.
Note: This icon is also used to indicate a validation error, for example, when referencing a variable that has not been created yet.
-
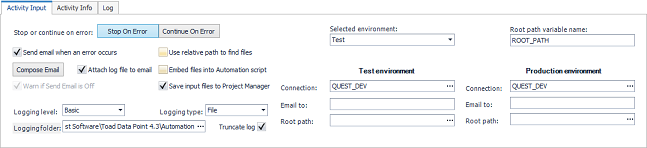
Now click the Settings icon in the design pane. The details pane changes to display input fields for the script’s settings. You can use this area to specify script error handling, logging level, and run environment settings.
-
Click the Stop on Error button, if not already selected. This instructs the script to stop if an error is encountered.
Note: You can also enable or disable the Stop on Error option for each individual activity. If you know that a particular activity will have an error, you can disable the Stop on Error option for just that activity. This option is located on the Activity Info tab for each activity.
-
In addition to selecting the Stop on Error option, enabling the Send email when error occurs and Attach log file to email options is also preferred. This can be very useful if your script encounters an error. Enabling your script to send an email notification on error, as well as on success, helps you to feel confident that your processes are running as expected.
If you choose to enable these options, you must specify email settings. To specify email settings, click the Compose Email button.
- Keep this Automation script window open, and proceed to the next section.
Create a Basic Script
- If you kept the previous Automation window open, you will have a basic script consisting of one activity, the Select to File activity. Click on the Select to File activity in the design pane.
-
In the Activity Input tab, in the first text box, select a database connection, or use the default. The default database connection for each database activity is always the currently-active open connection. To select a different database connection, click
and browse to a different connection.
Note: If you schedule a script to run against a password-protected database for which you did not save the password in Toad, the script will error. To save the password, right-click the connection in the Connection/Navigation Manager and select Properties. Enter the password and select the Save Password option.
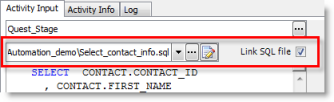
- Now select an input. Most activities require an input, and in the Select to File activity the input is a SQL statement. You can input a SQL statement using one of the following methods:
- Manually enter a SQL statement in the editor box (deselect the Link SQL file option).
- Click
- Select Link SQL file, then click
- Click
to open the SQL file (you previously selected) in the Editor where you can modify the SQL.
- Select Link SQL file, then click the drop-down list to select a file from the currently open project in the Project Manager.
- After selecting or entering your SQL statement, select an output. Select Excel in the Type field in the Export File section.
- Click
- You can also add a suffix to the file name. In the suffix field, click the drop-down to select a datetime stamp, or click
to build an expression. You can use this method to add a variable or a custom datetime stamp. Appending a datetime stamp to the file name allows you to create a unique file with each script execution.
-
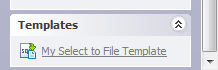
You now have a complete activity, with input, output, and database connection specifications. You can save and reuse this activity in other scripts by saving the activity as a template. To do this, right-click the activity (after configuring all the settings) and select Save As Template. Enter a name for your template and click OK to save it.
Your template now appears in the Toolbox in the Templates category.
- Keep the Automation script window open and proceed to the next section.
Test and Run Your Script
- To test your script, click
- Toad will prompt you to save your script (if you have not already done so). In the Save As dialog, select a location, enter a file name, and click Save.
- Toad then validates your entries and compiles the script. If these processes are successful, the script runs.
-
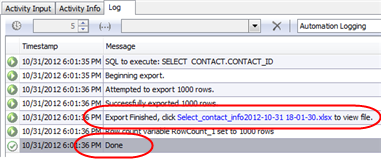
While the script is running, Toad displays your script’s execution progress in the Log tab. The message “Done” indicates script execution is finished.
- When a script produces an output file, a hyperlink to the output file is included in the Log. If your script ran successfully, click the output file hyperlink to view the new Excel file created by your script.
- Click the Settings icon to return to the script’s settings.
-
If you require a more detailed Log, you can change the logging level. In the Settings Activity Input tab, select Verbose from the Logging level drop-down list to create a more detailed log.
Note: If you want to change the location of the Log file, select a new location in the Logging folder input field.
-
Toad allows you to specify both a Test database connection and a Production database connection for each script. Toad also allows you to specify which connection to run your script against when the script executes. Both of these settings are made in the script’s settings. This feature allows you to easily test your script in a test environment before running your script in the production environment.
To specify a test and a production database, make the selections in the Connection text box under Test environment and Production environment in the Settings Activity Input tab. To select which of these databases to run your script against, select Test or Production from the Select environment drop-down list.
- Click the Select to File activity to return to its settings. Then select the Activity Info tab.
-
If you remember from the overview of the Automation window, Toad allows you to enable or disable each activity in a script. This can be helpful when building a script, as it allows you to test one particular activity at a time by disabling the other activities.
In the Activity Info tab, click Disabled to disable the Select to File activity. Notice that the activity now appears shaded in the design pane. To enable the activity again, click Enabled, or right-click the activity in the design pane and select Enabled.
Schedule Your Script
Once you have thoroughly tested your script, you can schedule it.
- To schedule your script, click
-
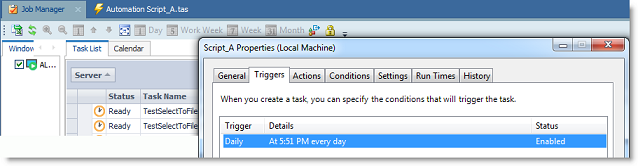
The Job Manager window opens and a task properties dialog displays. The task properties dialog is pre-populated with the information required to run your script as a scheduled task. You only need to schedule it. (The Job Manager uses the Windows Scheduler.)
- To schedule the script, select the Triggers tab. Then select the scheduling trigger and click Edit. In the Edit Trigger dialog, ensure that the On a schedule trigger type is selected. Then specify a frequency, start time, interval, etc.
- Click OK to save your schedule. Click OK to save and close the task properties dialog.
- Your task (script) is now listed in the Task List in the Job Manager. Double-click your task in the list to open the task properties dialog again where you can make modifications, such as re-scheduling or changing the script location. Use the Task List to review the status of your tasks (scheduled scripts).
- By default, the scheduled task runs under your Windows account. If you change your Windows password, you may also need to update the password in your scheduled task (depending on your version of Windows). Click
and select the task to update. Click OK and then enter your password when prompted.
- After upgrading to a new version of Toad, you must migrate the scheduling tasks to the newer version.
- Script Execution and Status. When Toad is in the process of executing a scheduled script, you will see the Toad icon in the lower right corner of the Windows taskbar. To check the status of your scheduled scripts, open the Job Manager (Tools | Administer | Job Manager) and select the Task List.
Now you have learned how to increase your productivity by using Toad Automation to handle your repetitive reporting and deployment tasks!
Learn More
Other Toad Automation tutorials are available. To see more examples and to learn how to build other types of scripts to automate everyday tasks, start with the following:
- Automate Exporting to Excel Reports
- Automate Complex Excel® Reports
- Automate Exporting Data
- Automation and Importing Data
- Automate Sending Email
- Automation and Variables