This manual provides instructions for installing and setting up SharePlex on an Amazon RDS Oracle database.
For the complete SharePlex documentation set, go to https://support.quest.com/shareplex/technical-documents.
You can download, view and save this document in Adobe PDF format. Click Download in the upper right-hand corner of this page. This action downloads the entire publication.
The deployment of SharePlex for an Oracle database hosted on the Amazon RDS service is slightly different from deploying SharePlex for an on-premises Oracle database. In a typical on-premises database environment, a SharePlex administrator can install and set up SharePlex directly on the production database system. However, in an RDS environment, SharePlex cannot be installed on the underlying operating system, which is fully managed by Amazon.
To replicate to or from an Oracle database on RDS, you install SharePlex on a server that is external to the RDS deployment of the Oracle database, and then configure SharePlex to interact with the RDS database through a remote connection. Once SharePlex is deployed, it operates the same way as it does when capturing from, or posting to, an on premises source and target.
Understand the following when using SharePlex in an RDS environment.
In all but one of the supported configurations for replication to or from an RDS database, you need to obtain a SharePlex AMI (Amazon Virtual Machine Instance). This instance is an Amazon Linux virtual machine, hosted on Amazon EC2, with SharePlex pre-installed. An Oracle client is included in the image. You launch the SharePlex instance from your EC2 account and then perform a few tasks to set up licensing and connectivity to the database.
Capture from RDS is supported for Oracle versions 11g R2 (supported 11g R2 versions are 11.2.0.4.v11 or later), 12c R1 (supported 12c R1 versions are 12.1.0.2.v7 or later), and 19c EE & SE2. Post is supported for all Oracle versions that are supported by RDS and SharePlex.
Support of Oracle features on RDS is limited to the default option groups: default:oracle-ee-12-1, default:oracle-ee-11-2, default:oracle-ee-19, and default:oracle-se2-19.
The following SharePlex or Oracle features are not supported for Oracle databases on RDS:
This guide leaves off at the point where you have installed SharePlex and configured the environment to support connection to Oracle sources and targets in an RDS environment. There is still a little work to do before replication can start. To configure SharePlex to replicate your data, see the following guides:
SharePlex Administration Guide: This guide contains instructions for creating the configuration file that contains your replication rules, controlling and monitoring replication, activating replication, and other important tasks.
SharePlex Reference Guide: This guide contains detailed information about how to use each of the SharePlex commands and parameters.
These instructions help you to create your SharePlex instance.
SSH access to your SharePlex instance is allowed only by public key authentication using a key pair. The public key of the key pair is embedded in your SharePlex instance, and a private key is stored by you (the SharePlex user) in a file on the computer from which you will connect to SharePlex. You specify the file in the connection string. The One-Click Launch method requires you to select an existing key pair. The Manual Launch method enables you to create a key pair or select an existing one. To create a key pair, see the Amazon AWS documentation.
To find SharePlex on Amazon AWS
You have the option of creating a SharePlex instance in either of the following ways:
To create a SharePlex AMI instance with one click
Specify the following settings. See the Amazon RDS help if you need more information about these features.
Version: Select the SharePlex version that you want to run.
Region: Select the Amazon region that will host the SharePlex instance.
EC2 Instance Type: Select the virtual machine attributes for the SharePlex instance.
VPC Settings: Select or create a virtual private cloud network and subnet for your SharePlex instance.
Security Group: Select an existing security group, or select Create new based on seller settings to customize the existing SSH rule to your own IP addresses. Note: Any Amazon-generated default security groups shown in the list do not provide enough security for production replication across external networks.
Key Pair: Select a key pair, which will be used as authentication when you log on to the SharePlex instance. Note: To log into SharePlex with th selected key pair, you must be in possession of the .pem file that contains the private key of that key pair.
To create a SharePlex AMI instance manually
Select among options that are related to the operation of the SharePlex instance.
Click Add Tag then provide the following:
Click Next: Configure Security Group.
Select or create a security group that satisfies the SharePlex requirements. To create a rule, see the Prerequisites in these instructions.
Click Launch. The key pair dialog is displayed. Specify how you want to associate a key pair with the SharePlex instance:
Select the SharePlex instance by its assigned name tag, then wait until the Status Checks column shows a Checks Passed status.
Always log on to the SharePlex AMI instance as the ec2-user. This user is the SharePlex Administrator. Use the following command:
ssh -i ~/.ssh/pem_file_name.pem ec2-user@IP_address/hostname
where:
Run the SharePlex license key utility with the following command at the Linux command prompt:
/home/ec2-user/shareplex/proddir/install/splex_add_key
Choose option 2:
SharePlex License Utility
1) Read license key from file
2) Enter license key manually
3) Add license key for alternate host
q) Quit License Utility
Enter option:
Type the license key exactly as you received it from Quest, including the SPLEXKEY= string if one prepends the key, any spaces, and any capitalization. Press Enter when finished typing the key.
Enter the SiteMessage text string provided by Quest with the license key.
SharePlex supports the following SharePlex configurations when the source database is on-premises and the target is an RDS database.
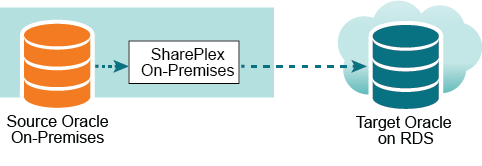
In this scenario, Capture, running on premises, connects to the source database through a bequeath connection and the Post process connects to the RDS database through TNS.
To set up this configuration, install SharePlex on-premises in one of these ways:
You can use your production source server to run all of the SharePlex replication components. In this setup, both source and target replication processes (and their queues) are installed on one server, the production server.
Note: In a high-volume transactional environment, the buildup of data in the post queues and the presence of multiple Post processes may generate unacceptable overhead for a production system. In that case, you should use an intermediary server.
You can use an on-premises intermediary server to run the Import and Post components (and the post queues). This method removes most of the replication overhead from the source server. For more information, see Post to PaaS cloud from an intermediary server on page 1.
Note: To view SharePlex system requirements when installed on premises, see the SharePlex Release Notes.
Install SharePlex
Install SharePlex on the source (and on the intermediary server, if using one for the Post process).
Log in to the system as the user that will be named as the SharePlex Administrator during this installation. This user will own the installation files and binaries.
If sp_cop is running, shut it down.
sp_ctrl> shutdown
Grant executable permissions to the file.
#chmod 555installation_file
Run the .tpm file. If installing SharePlex in a cluster, run the installer from the primary node (the one to which the shared disk is mounted)
# ./installation_file
Verify that the information shown on the first screen corresponds to the Oracle version and platform you are upgrading.
You are prompted for the following:
Note: These are basic installation instructions. For complete pre-installation and installation instructions for on-premises deployment, see the SharePlex Installation and Setup Guide for an Oracle Source.
|
Prompt |
Input |
|---|---|
|
Installation type |
Select <New Installation>. |
|
Product directory location (path) |
Enter the path to the SharePlex installation directory. If the specified directory does not exist, the installer creates it. If the directory exists, it must be empty. |
|
Variable data directory location |
Specify an empty directory. The installer creates the specified directory if it does not exist. Important! Do not install this directory into the SharePlex product directory. |
|
SharePlex Admin group |
Enter the DBA-privileged group to which the SharePlex Administrator user belongs, which will own the SharePlex binaries. If the default group of the SharePlex Administrator is oinstall, select any option, and make certain this user is listed under oinstall in the etc/group file. |
|
TCP/IP port for SharePlex |
Enter the port number to use for SharePlex TCP/IP communications. The default is 2100. |
|
License key (do you have?) |
Press Enter to accept the default of Y (yes). If you do not have a license, enter N (no). |
|
License key |
Enter the license key you received from Quest. |
|
Customer name |
Enter the SiteMessage text string provided by Quest with the license key. |
Create the tnsnames.ora file
On the source or the intermediary system (if using one) create a tnsnames.ora file with connection information for the target RDS database.
Important! The TNS alias cannot contain any dashes (-).
The following is an example:
target =
  (DESCRIPTION =
    (ADDRESS = (PROTOCOL = TCP)(HOST = yourtarget.amazonaws.com) (PORT = 1521))
    (CONNECT_DATA =
      (SERVICE_NAME=orcl)
    )
  )
Run Oracle Setup
On the source, run ora_setup for the source database. See the directions for running Oracle Setup in Database Setup for Oracle.
On the source or intermediary (if using one) run ora_setup again, this time for the target database.
Set up routing in the configuration file
When you create your configuration file, use the name of the local host (where SharePlex is installed) in the routing map so that Post runs locally. The following is an example:
|
datasource:o.source | ||
|
splex.demo_src |
splex.demo_dest |
sphost@o.target |
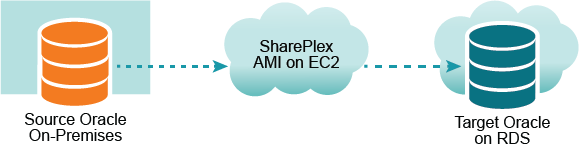
In this scenario, SharePlex runs as an Amazon Machine Image instance on the EC2 service. Capture connects to the source database through TNS and the Post process connects to the RDS database through TNS.
Obtain a SharePlex AMI image
To launch a SharePlex AMI instance, see Configure a SharePlex AMI instance.
Log on to the SharePlex AMI instance
Always log on to the SharePlex AMI instance as the ec2-user. This user is the SharePlex Administrator. Use the following command:
ssh -i ~/.ssh/pem_file_name.pem ec2-user@IP_address/hostname
where:
Create a tnsnames.ora file
On the SharePlex AMI instance, create a tnsnames.ora file with entries for the source and target databases.
|
Important! The tnsnames.ora file must be created in this directory: /usr/lib/oracle/11.2/client64/network/admin. The TNS alias cannot contain any dashes (-). |
The following are examples:
source =
  (DESCRIPTION =
    (ADDRESS = (PROTOCOL = TCP)(HOST = yoursource.amazonaws.com) (PORT = 1521))
    (CONNECT_DATA =
      (SERVICE_NAME=orcl)
    )
  )
target  =
  (DESCRIPTION =
    (ADDRESS = (PROTOCOL = TCP)(HOST = yourtarget.amazonaws.com) (PORT = 1521))
    (CONNECT_DATA =
      (SERVICE_NAME=orcl)
    )
  )
Run ora_setup
On the SharePlex AMI instance, run ora_setup for the source database. See the directions for running Oracle Setup in Database Setup for Oracle.
On the SharePlex AMI instance, run ora_setup again for the target database.
Configure remote capture
Note: Enabling the SP_OCT_OLOG_RDS_MINER parameter is deprecated and no longer supported for Oracle 19c.
Set up routing in the configuration file
When you create the SharePlex configuration file, use the name of the EC2 host of the SharePlex AMI instance in the routing map so that Post runs on that host. The following is an example:
|
datasource:o.source | ||
|
splex.demo_src |
splex.demo_dest |
shareplex_ec2_host.amazonaws.com@o.target |
