
To complete a migration project and reconfigure a user's applications, agents must be configured and deployed by administrators, then run on users' workstations.
To deploy Desktop Update Agent to users' workstations, you need to:
- Download the agent. (On Demand Migration Desktop Update Agent Installer MSI)
NOTE: Desktop Update Agent can be downloaded either during the configuration of the Switch Application task or prior to the configuration.
- Generate an access token to be used by the agent.
- Share the installation through a Group Policy Object or using Microsoft Endpoint Configuration Manager (MECM).

|
|
NOTE: While a managed deployment solution is likely best for broad deployment of DUA, you can also install the agent directly using a command line script. This may be useful for initial testing. See Deploy the agent using the command line. |
Download the agent and generate the required token
-
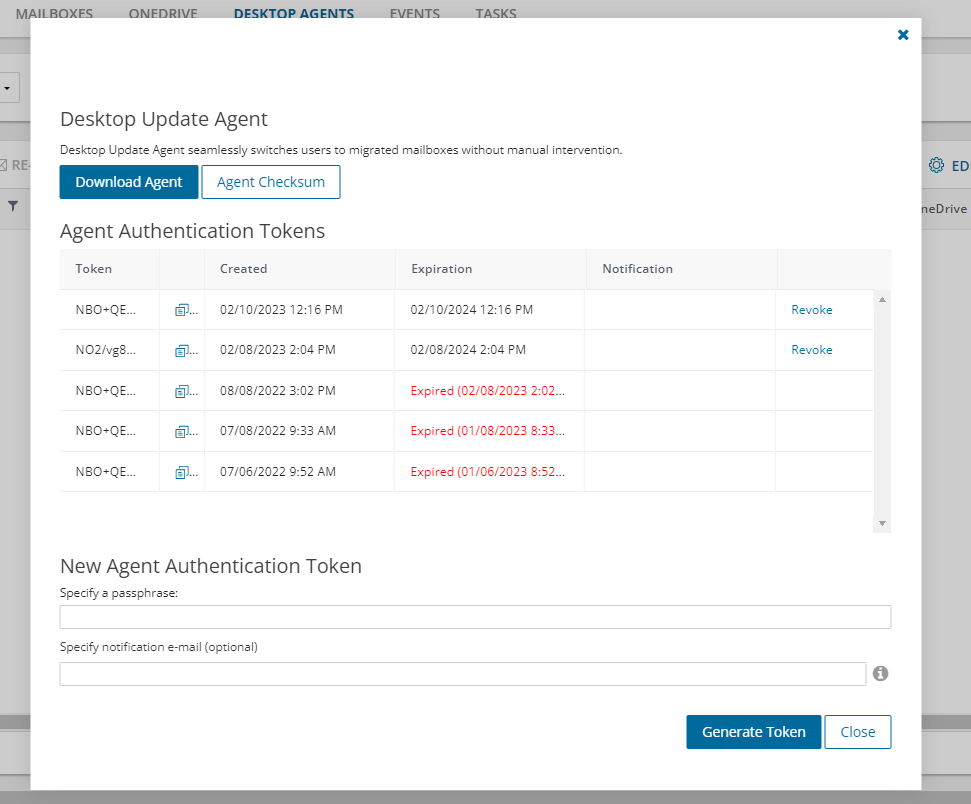
On the On Demand Migration Project page, under Accounts, choose Desktop Agents.
-
Under More, choose the Download Agent menu option.
-
Under New Agent Authentication Token, specify a passphrase. Ensure that you keep this passphrase safe, as it is required when you deploy the agent.
Caution: You will not be able to retrieve this passphrase from On Demand Migration later. -
If required, enter one or more email addresses to send notifications for DUA tokens that are set to expire in 14 days or have been manually revoked.
-
Click Generate Token. A new task will be created to generate the token.
-
Click Download Agent and save a copy of the new token for use during the agent deployment.

Deploy the agent using the command line
This method is recommended primarily for initial testing on a small set of computers. A managed deployment approach such as Deploying the agent with a GPO or Deploying the agent using Microsoft Endpoint Configuration Manager (MECM) is recommended for wide scale deployment to user computers.
To install DUA from Windows PowerShell, use the following procedure:
-
Create a PowerShell script with the required Token (Token Value) and Passphrase (Passphrase Value) values. For example:
msiexec.exe /I 'C:\DUA\ODM_DesktopUpdateAgent.msi' TOKEN=######## PASSPHRASE=##### /qn
NOTE: It is necessary to run PowerShell as Administrator so that the installer can write the token to the registry. If not, an error similar to "Failed to save access token to registry.' may be displayed. - Run the script on the desired computer(s).
Deploying the agent with a GPO
|
|
NOTE: To install the agent using a GPO you need to convert the Desktop Update Agent MSI package and the parameters into an MST file. The following procedure uses Microsoft Orca to create the MST file. Orca installation is available in Windows SDK Components for Windows Installer Developers. |
-
Download the On Demand Migration Desktop Update Agent Installer MSI file. (See Download the agent and generate the required token.)
-
Right-click the On Demand Migration Desktop Update Agent Installer MSI file and select Edit with Orca.
-
From within Orca, select Transform | New Transform.
-
Navigate to the Property table and add the following:
-
Add a Row with property of TOKEN and the token value. The token value previously created in the Agent Download page.
-
Add a Row with property of PASSPHRASE and the passphrase value. The passphrase value previously created in the Agent Download page.
-
-
Select Transform | Generate Transform to complete the MST file creation.
- Right-click the share that contains the ODM Desktop Update Agent MSI, and choose Properties.
- Select the Sharing tab, and select Share.
- Select the required users.
NOTE:
- Ensure the users have Read access.
- Choose Share.
- Choose Done.
- Select the Security tab and ensure Authenticated Users security group has the Read and NTFS permissions.
- From the Start menu, go to Administrative Tools and choose Group Policy Management.
- Right-click the domain or OU you are migrating and choose Create a GPO in this domain, and link it here.
- In the New GPO dialog, enter a name for the GPO and choose OK.
- Select the new GPO and choose OK.
- Right-click the GPO and select Edit.
- Open Computer Configuration | Policies | Software Settings, right-click Software Installation, go to New, and choose Package.
- In the File Name field, enter the UNC path to the On Demand Migration Desktop Update Agent Installer MSI file and choose Open.
- Select the On Demand Migration Desktop Setup Agent and choose Open.
- In the Deploy Software dialog, select Advanced as the deployment method, and select OK.
-
Under the Modifications tab, add the previously created MST file, and click OK.
- Restart the computer for the applied group policy to complete the agent installation.
To configure Desktop Update Agent to run at User Logon using a Group Policy Object:
- From the Start menu, go to Administrative Tools and choose Group Policy Management.
- Right-click the domain or OU you are migrating and choose Create a GPO in this domain, and link it here.
- In the New GPO dialog, enter a name for the GPO and choose OK.
- Select the new GPO and choose OK.
- Right-click the GPO and select Edit.
-
Open Computer Configuration | Policies | Administrative Template | System | Logon ,and right select Run these programs at user logon, and select Edit.
-
Select Enabled | Show and enter the applications you want to run when a user logs in, select OK, then OK again. You must use the full path to the application.
-
Restart the computer for the applied group policy to complete the installation.
On Demand Migration Desktop Update Agent will now open automatically when the user logs in.
Deploying the agent using Microsoft Endpoint Configuration Manager (MECM)
For more details on MECM see Microsoft's documentation.
|
|
NOTE: Before continuing, ensure that:
|
-
Open the pre-configured Microsoft Configuration Manager.
-
From the left navigation menu, select Software Library.
-
Expand Application Management, right-click and select Create Application.
-
In the Create Application Wizard, under Location specify the shared location of the ODM_DesktopUpdateAgent.msi, and click Next.
-
Review the imported application information, and click Next.
-
Specify the Installation program by entering:
msiexec /qb /i "ODM_DesktopUpdateAgent.msi" PASSPHRASE='MyPassphrase' TOKEN="MY_Valid_Token" /q
(replace 'MyPassphrase' and “My_Valid_Token” with the values from On Demand Migration), and click Next. -
Review the Summary and confirm the settings by selecting Next.
-
Review the Completion details and click Close.
-
The On Demand Migration Desktop Update Agent will now be displayed in the application library.
-
Right-click the application and select Properties. Select how you want the application to display in the Software Center, and click OK.
-
Right-click the new application registration and select Deploy. Specify the pre-created workstation collection to which to assign the deployment, and click OK.
-
In the Deployment Wizard, under General | Content specify the distribution point. and click Next.
-
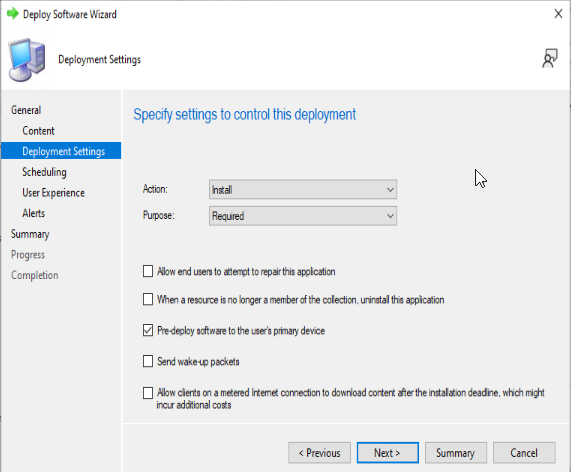
Under General | Deployment Settings, specify the settings to control the deployment.
Setting the Action to Install and the Purpose to Required forces the application to push to the workstation for the required collection.
-
Under General | Scheduling , specify the schedule for the deployment. and click Next.
-
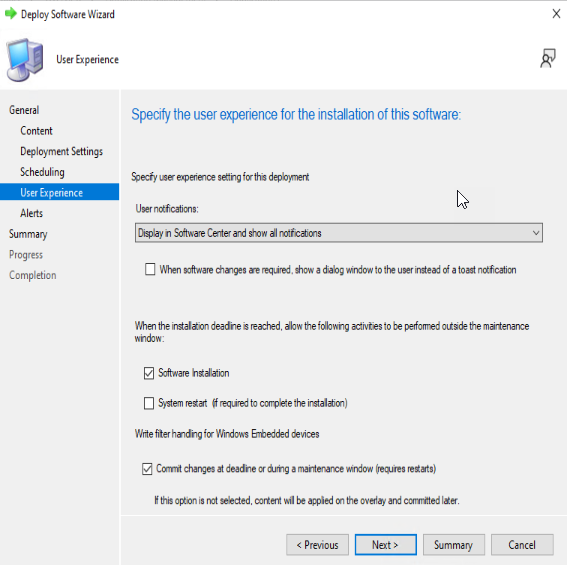
Under General | User Experience, optionally specify additional installation settings including how the application will display in the Software Center on the workstation, and click Next.
-
Under General | Alerts, specify the Configuration Manager and Operation Manager alerting options, and click Next.
-
Confirm the settings on the Summary page, and click Next.
-
Click Close to complete the application deployment.
-
On Demand Migration Desktop Update Agent should now be visible through the Control Panel | Programs and Features, through the Start menu, or an icon in the System Tray.


Deploying the agent using Quest KACE
For more details on KACE see Quest's KACE product information and the KACE Systems Management Appliance Technical Documentation.
|
|
NOTE: Before continuing, ensure that:
|
Within the KACE appliance:
-
On the side navigation bar, expand Scripting, and choose Scripts.
-
Under Choose Action, choose New.
-
Under Script Detail:
-
Under Configure, provide a friendly Name for the script, e.g., On Demand Migration Desktop Update Agent. Select a Type and a Category. Optionally provide a Description and Notes.
-
Under Deploy,
-
Specify the pre-created, desired Labels which will dictate which devices are in scope.
-
Specify Local System for the Windows Run As option.
-
Under Operating Systems, select Edit (pencil icon) to specify the OS versions to receive the agent. Uncheck the All check box, and select only those device OSes you wish to target.
NOTE: This is a good time to review the latest information on OS versions supported by the Desktop Update Agent.
-
-
Under User Notify, notification options are available, and optional for the individual project. Often customers prefer to install the agent without end user awareness.
-
Under Schedule, scheduling options are available, may can be configured for the individual project.
-
Under Dependencies, indicate the location of the Desktop Update Agent installer.
The msi can be located on a central share in the network accessible to all machines, or as most prefer, upload the installation .msi to the KACE appliance, from where it will be pushed out. This is easier than using a network share that will require to have access maintained through ACL’s, group memberships etc. Deploying from the KACE appliance directly allows for devices outside the Domain who communicate with KACE itself to also receive the deployment. -
Under Tasks, choose Add New Task.
-
Under Verify,
-
Choose Launch a Program.Optionally, adjust the attempts and what should happen upon failure.
-
Specify the Directory where the .msi has been uploaded to on the appliance.
-
Specify the File location to point to msiexec.exe (by default c:\windows\sytem32\)
-
Provide the Parameters to install DUA including the required “PassPhrase” and “Token”
For example: /qb /I “ODM_DesktupUpdateAgent.msi” Passphrase:'MypassPhrase' Token="MyToken"
-
-
-
Under On Success choose Log message. For Type, chooseStatus, and provide an installation message to log for the KACE administrator's awareness. Choose Save Changes.
-
-
Review the completed configuration.