Allows an administrator to create mappings for single containers. The source as well as target container must already exist. Performing a mapping operation in this manner is useful for containers such as Enterprise Vault Journal Archives, or where containers need to be merged to a target container.
The following basic information about each container is visible in the grid view:
·Name
·Owner Full Name
·Group
·Type
·Mailbox Type
·Link Name
·Content Count
·Content Size
·Link name
·Mapping Counts for the source and target
Actions to be performed on the Manual Mapping page
·Add Mapping: Adds a mapping for the selected containers. A source and target container must have been selected before this navigation bar item is available.
·Add to Group: One or more containers can be added to an existing or new group. This group membership can then be used for filtering and batching of users for migration.
·Refresh: Refreshes source and target container tables.
·Reset: Resets the source and target container tables back to the default list of columns, and removes any currently defined filters.
Containers that have already been mapped are listed on the Existing Mappings page. This page gives the ability to Enable/Disable mappings for migration and perform other container mapping related actions.
|
|
NOTE: Additional columns are available if the Advanced view is enabled (under the Views tab) though this makes the user interface slower if there are a large number of mappings. |
The table shows the following information for each existing container mapping:
·Container Mapping ID
·Source Container Type
·Source Container User
·Source Group
·Source Container Link Name
·Flag to indicate if the container has an owner
·Flag to indicate if the container has a mailbox
·Target Container Type
·Target Container User
·Target Group
·Target Container Link Name
·Workflow Policy
·Pre-migration
·Filter Policy
·Mapping Template
·Priority
·Item Gathering Enabled: Indicates whether the container mapping is enabled for item gathering (container level).
·Migration Enabled: Indicates whether the container mapping is enabled for migration. Archive Shuttle does NOT start to export / import when a container mapping is disabled for migration.
·Pre-Migration Enabled
·Pre-Migration Finished
·Stage 2: Indicates whether the container mapping has been switched to the target. If it has, Stage 2 of the Workflow has been started.
·Stage 2 Finished: Indicates whether Stage 2 has finished for this mapping
·Target Switch Date Utc
Actions to be performed on the Existing Container Mappings page
These actions can be performed on this page:
Item Collection
·Enable: enable mappings for item collection.
·Disable: disable mappings for item collection.
·Items: Run full or delta items for collection.
·Shortcuts: Run full shortcut collection.
Migrations
·Enable: enable mappings for migration.
·Disable: disable mappings for migration.
·Delete: Delete selection mappings.
Misc.
·Set Priority: Adjust the priority for the selected container mapping(s)
·Enable Stage 2: Switch the selected container(s) to the target
·Set Template: Assign container mapping template.
·View Mappings Health: Navigate to Container Mappings Health page.
·Comment: Comment on selected mapping.
·Switch Target: Change target of migration from a primary mailbox to a secondary or archive mailbox. Select one or more mappings to switch targets, and click OK to confirm.
|
|
NOTES: ·You can currently only switch targets for Office 365 migrations and leavers. ·Once a target has been switched, the action cannot be reverted. ·Virtual journals and journal transformations are not currently supported to switch targets. |
Workflow
·Change & Reset: Change and reset workflow for selected mappings (Stage 2 or pre-migration policies)
|
|
NOTE: You cannot change or set a pre-migration workflow policy for a mapping already enabled in Stage 1. |
Filter
·Set Policy: Set filter policy for selected workflows.
Failed Items
·Set Threshold: Set the failed items threshold.
Staging Area
·Cleanup per Mapping: Start cleanup staging area for selected mappings.
User
·Add to Group: One or more containers can be added to an existing or new group. This group membership can then be used for filtering and batching of users for migration.
·Tag Assignment: You can assign tags to workflows to identify special subset of containers.
On the Mapping Templates page, you can create new bulk mapping templates that you can then apply on the Bulk Mapping page when creating a new mapping.
Below is a list of actions you can take on the Mapping Templates page:
·Add: Create a new mapping template.
·Copy: Duplicate a previously created template.
·Edit: Edit a template.
|
|
NOTE: Mapping templates cannot be edited if the template is applied to a mapping. |
·Delete: Delete a template.
|
|
NOTE: If a user removes a workflow policy used by the template, the template will be marked as invalid. This will be shown with an exclamation mark in the IsValid column of the grid. |
·Validate: This validates the links and policies associated with the template.
·Refresh: Refresh the guid.
·Export: Export the grid in a .pdf, .xls, .xlsx or .csv format.
Creating a mapping template
1.On the Mapping Templates page, click Add.
Enter a name and description for the template, and click Next.
2.Select the target container type for the template, and click Next.
3.Select the migration type, and click Next.
4.Select the target link from the drop down menu, and click Next.
5.Select the Workflow Policy and Ownerless Workflow Policy from the drop down menus. Optionally, add a pre-migration Workflow Policy from the drop down menu. Then click Next.
6.Select a filter policy from the drop down menu, then click Next.
7.Select a settings template from the drop down menu, then click Next.
8.Select a file name policy from the drop down menu, then click Next.
9.Choose whether to enable or disable item collection and migration to begin immediately, and click Next.
10. Enter a numeric value to set priority, and click Next.
11. Review the summary of the bulk mapping template, and click Confirm.
Applying a mapping template
1.Go to the Bulk Mappings page, and click on the container to apply the template to. Then click Add Mappings.
2.Select the template from the drop down menu, then wait for a few moments as the template is applied. Click Next.
3.Review the summary, then click Next. The template is now applied to the container mapping.
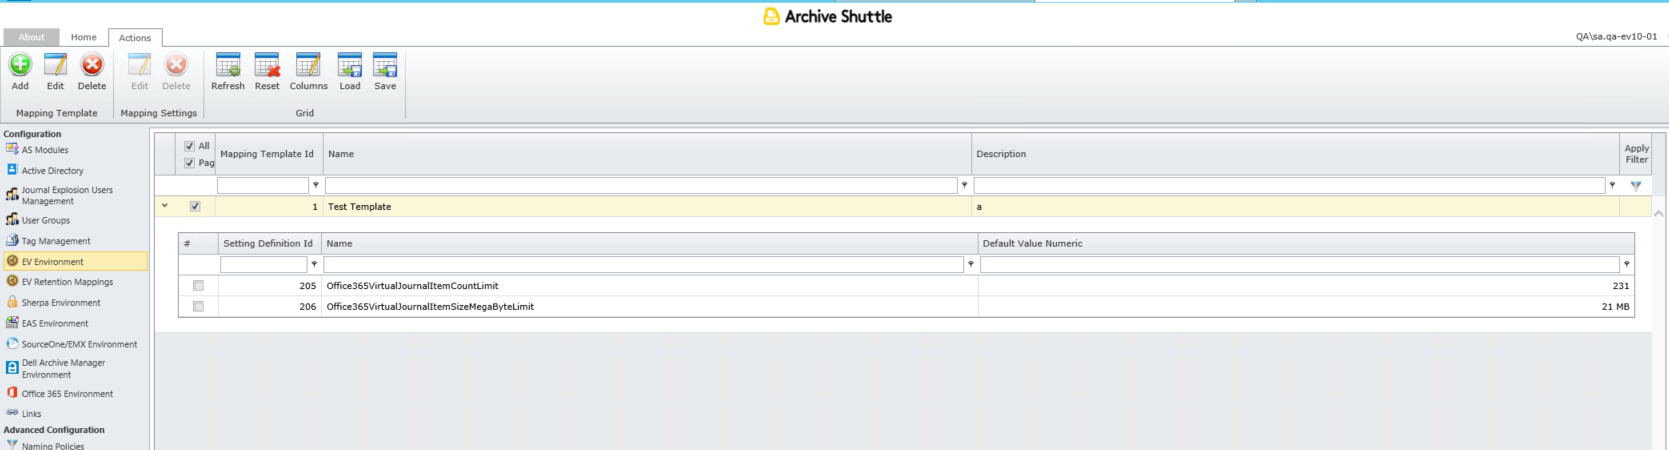
Using the Setting Templates feature, you can create a container mapping template where you can set the total mailbox item count limit or item size limit. Then, when creating a mapping, you can assign a template and override settings for the Office 365 Module in SysConfig.
|
|
NOTE: Currently the Mapping Templates feature is available for Virtual Journal only. |