Copy/Append - Oracle to PostgreSQL
The copy/append command allows users to set up replication and/or (re)synchronize individual tables. It requires an ODBC configuration for the Oracle database.
Users may copy/append individual tables to a single target, specify multiple targets, or all targets in the replication configuration.
| Important: Before you use this command, review all of this documentation. Improper use could result in lost data and out-of-sync conditions. |
The copy command
Use the copy command to synchronize a table (or tables) from one host to any other host when you want the target table truncated prior to synchronizing data.
The append command
Use the append command to synchronize a table (or tables) from one host to any other host when you do not want the target table truncated prior to synchronizing data.
When to use the copy/append command
Use the copy/append command in the following ways:
- To migrate a database.
- To sync a table that the Compare/Repair process is unable to repair.
What the copy/append command supports
The copy/append command supports the following:
What the copy/append command does not support
The copy/append command does not support:
-
Data types that are not supported by SharePlex replication between the source and target
-
Tables using transformation, unless the transformation is also being applied on the target
-
Network configurations where a pass-through server is used to transfer data between the source and target servers
-
Sequences, indexes, constraints, triggers, and grants options
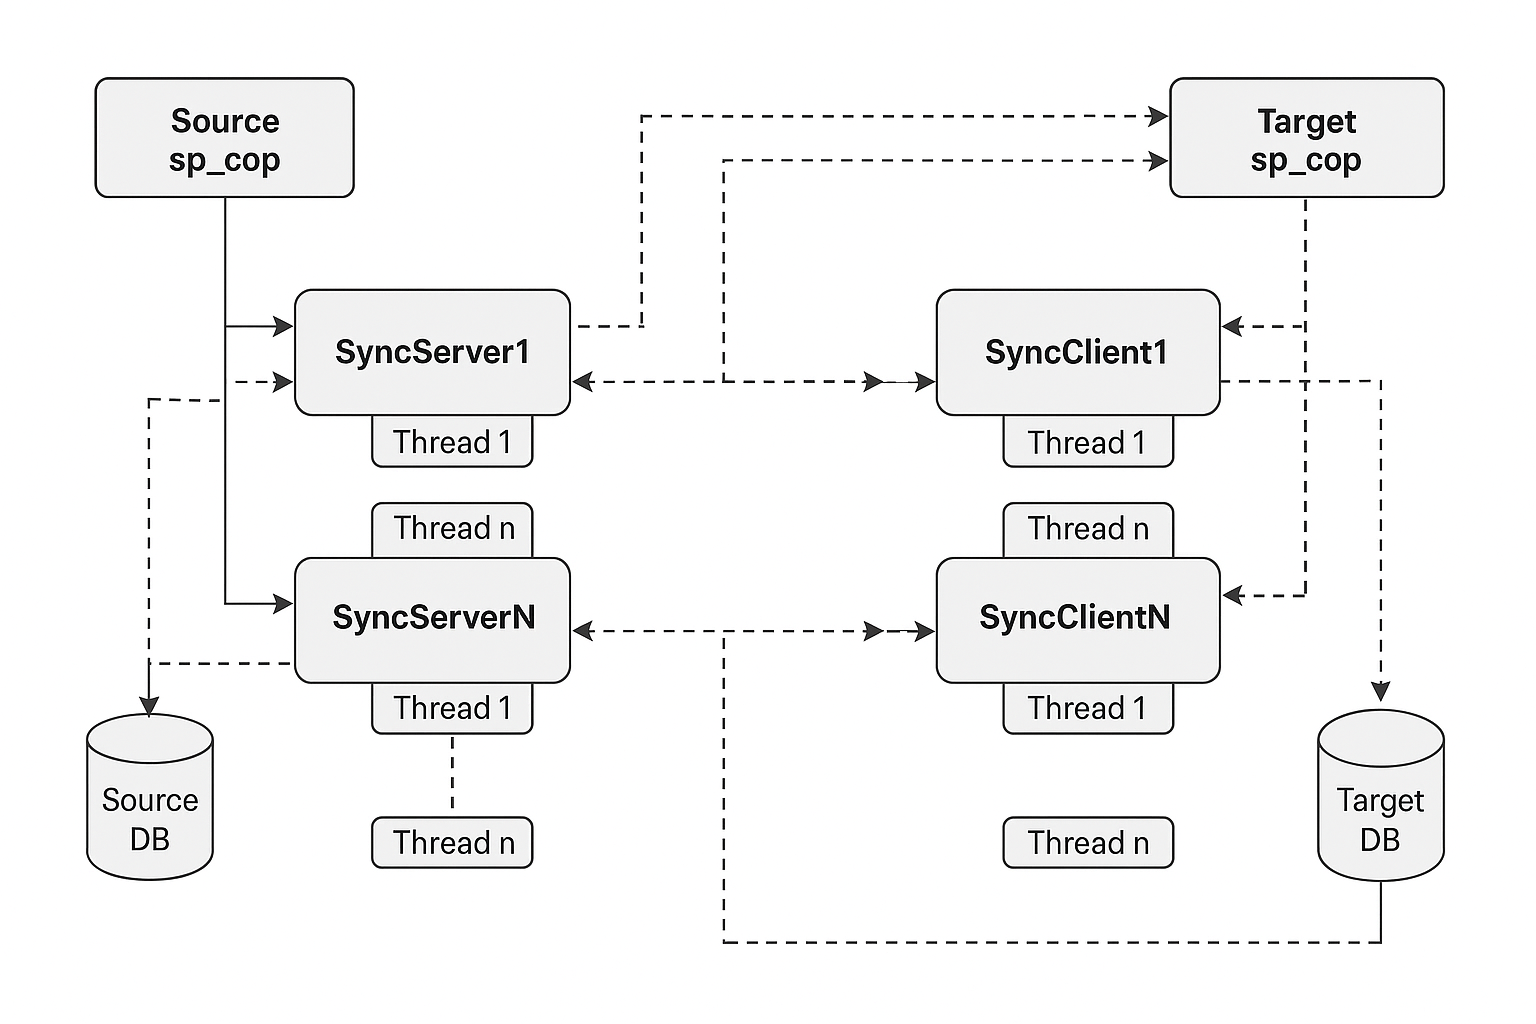
Data synchronization architecture
This diagram illustrates a multi-threaded architecture for synchronizing data between a source and a target system.
Overview of copy/append process
The copy/append command initiates a process to synchronize individual tables between individual hosts.
The following is the sequence of events that illustrates simple synchronization process activity:
- Log onto the target system and issue the start launcher command from sp_ctrl.
- When the copy/append command is issued from an sp_ctrl session, sp_cnc spawns sp_xsync_svr processes on the source system. The number of processes spawned equals the value of the SP_XSY_PROCESSES parameter.
-
Each sp_xsync_svr process handles one table at a time.
- The sp_xsync_svr connects to the target sp_cop system and starts the sp_xsync_clt on the target system.
- The sp_xsync_svr sends parameter information and table metadata to sp_xsync_clt.
-
If the object being copied is under replication, sp_xsync_clt must wait until it receives the sync marker. The Post process thread should wait until the table copy is complete.
-
The sp_xsync_svr process transfers data to the sp_xsync_clt process until the copy is complete.
-
If the object being copied is under replication, the Post process thread re-initiates and resumes its posting activities.
Running concurrent copy processes
You can issue multiple copy/append commands at a time. Users should note that while the copy process is in progress the Post process stops all replication for the tables being copied/appended.
Identifying synchronization processes
The synchronization processes are listed in the sp_ctrl console as they are started by sp_cop process. To identify the process use your operating system to locate the executables.
-
sp_xsync_svr
-
sp_xsync_clt
Tuning parameters for the synchronization
The following is a list of parameters associated with synchronization using the copy/ append command. These parameters are all live and take effect the next time the command is issued.
- SP_XSY_COMPRESSION: This parameter adjusts the data compression from off (0) to full (22). The default integer value is set to three (3).
- SP_XSY_BUFFER_SIZE: This parameter adjusts the amount of data that is buffered before being sent to the target system. The default integer value is 500 MB.
- SP_XSY_POST_TIMEOUT: This parameter sets the number of seconds that the synchronization process will wait for the Poster process to be ready and the synchronization to begin. The default integer value is set to 1800 seconds (30 minutes).
- SP_XSY_READ_BUFFER_SIZE: This parameter adjusts the amount of data that is buffered before being sent to the target system for advanced data types. The default integer value is 1 MB.
- SP_XSY_SVR_THREADS: This parameter sets the number of threads in the sp_xsync_svr process. The default integer value is 2 threads.
-
SP_XSY_CLT_THREADS: This parameter sets the number of threads in the sp_xsync_clt process. The default integer value is 2 threads.
- SP_XSY_PROCESSES: This parameter sets the number of sp_xsync_svr processes to be created. The default integer value is 2 processes.
-
SP_XSY_LOG_FILESIZE: This parameter controls the maximum log file size. The default integer value is 50 MB.
-
SP_XSY_LOG_NUMFILES: This parameter controls the number of log files before rolling over. The default integer value is 3 files.
-
SP_XSY_SYNC_DEBUG: This parameter is used to adjust the debug levels for logging. The default value is 0x00000000.
Viewing copy status
The best way to view the status of one or more copy/append commands is to use the copy status command or the append status command. The basic command displays the results of all copy/append processes on a system.
The basic command displays the status of all copy/append jobs currently running on the system, and the most recently executed copy/append if it isn’t included in the currently running list. This list can be filtered to show only a specified status.
The best way to view the results of one or more copy/append commands is to use the report command with the copy option in sp_ctrl.
In the example text that follows, the copy/append command was issued against a table not in replication. The copy status that follows displays basic information about the table and the status of the procedure.
sp_ctrl (alvlabl17:8708)> copy sp_iot.SYNC_iot_BASIC to sp_iot.SYNC_iot_BASIC for o.w920a32f at irvqasu15@o.a102u64f force
sp_ctrl (alvlabl17:8708)> copy status 111 for o.w920a32f
Host : alvlabl17.quest.com
Started : 17-MAR-08 13:59:28
Job Type : Copy
Status : Done
| 1 |
"SP_IOT"."SYNC_IOT_BASIC1" |
3720 |
100 |
Done |
N/A |
0:08 |
| 2 |
"SP_IOT"."SYNC_IOT_BASIC2" |
3720 |
100 |
Error |
N/A |
0:08 |
| 3 |
"SP_IOT"."SYNC_IOT_BASIC3" |
3720 |
100 |
Done |
N/A |
0:08 |
To filter this list to only show the tables with a status of error, execute the following command:
sp_ctrl (alvlabl17:8708)> copy status 111 for o.w920a32f “Error”
Using a synchronization routing file
The synchronization routing file is very similar in structure to a configuration file used for activation, in that the file contents have the same formatting requirements. The difference between the two files is that some tables or objects in a configuration file may not be supported by the synchronization process and therefore should not be included in a synchronization routing file. For example, horizontally or vertically partitioned tables are not supported by the synchronization process and should not be included in a synchronization routing file.
Use of wildacrds in synchronization routing files is supported. The application of wildcards in a synchronization routing file is the same as in a config file. For information about how SharePlex supports wildcards, see the SharePlex Administration Guide.
Example routing file
| Datasource:o.s_sid1 |
| "S_SCHEMA0"."SYNC_MULTI_TRGT" |
"d_schema0"."sync_multi_trgt" |
d_host1@r.d_dbid1 |
| "S_SCHEMA0"."SYNC_MULTI_TRGT" |
"d_schema0"."sync_multi_trgt" |
d_host2@r.d_dbid1 |
| "S_SCHEMA0"."SYNC_MULTI_TRGT" |
"d_schema0"."sync_multi_trgt_bu" |
d_host1@r.d_dbid2 |
| Note: The copy/append command copies tables in random order and does not take into account referential integrity. Therefore, we recommend that users copy/append only one table at a time, or limit the copy/append to a very small number of tables. |
Using copy with partitioned replication
When tables in a configuration use partitioned replication:
- The copy/append command will support the copying of individual tables and individual partitioned tables.
- Specifying a partition as a target but not a source is not supported.
- The copy/append command does not support vertically or horizontally partitioned tables currently in replication.
Controlling the number of processing threads
To take advantage of machines with multiple processors, you can set the number of copy/append processing threads on the source system using the SP_XSY_SVR_THREADS parameter. The default value of this parameter is set to two (2) threads, and the range of valid values is from 1 to 32 threads.
You can also set the number of copy/append processing threads on the target system using the SP_XSY_CLT_THREADS parameter. The default value of this parameter is set to two (2) threads, and the range of valid values is from 1 to 32 threads.
Using wildcards in command line syntax
Wildcards may be employed when specifying the source_table portion of the copy/append command. Additionally, you may use not notation to exclude specific objects.
You may specify all the tables in a specific schema using the following:
sp_ctrl (irvspxu14:8567)> copy scott.%
In the above example, all objects under the scott schema will be copied, provided the objects are currently in replication.
You can also set exclusions using the following:
sp_ctrl (irvspxu14:8567)> copy scott.% not (%"foo"%)
In the above example, all objects under the scott schema, except objects whose name contain “foo”, will be copied, provided the objects are currently in replication.
For more information about how SharePlex supports wildcards, see the SharePlex Administration Guide.
Other considerations for using copy/append
- When using the copy/append command to sync a table that is out-of-sync or when using the copy/append command to place a table into replication while instantiating it the Post process will pause for tables being copied/appended while the table is being copied. The Post process will resume for tables being copied/appended when the copy/append command is complete. This does not apply to a table that is being added to replication through a new route.
- The copy/append command can operate on multiple tables based on the value of the SP_XSY_PROCESSES parameter.
- When using the copy/append command for a table not in a known replication route the user must employ the force option. To employ copy/append on objects not in replication the user must employ the force option.
- When using the copy/append command for a table in replication, all SharePlex processes (Capture, Read, Export, Import, Post) must be running when you issue the copy/append command, and they must remain running throughout the processes.
- Do not use the copy/append command in a cascading replication environment.
- Tables with foreign keys should have those keys disabled and then re-enabled.
-
When objects are in replication, the copy/append command briefly locks the source table, while the target table is not locked. The source tables can undergo changes while they are being copied or appended; however, it is assumed that the target table will not undergo any changes by any process or application other than SharePlex.
- The copy/append command will only be able to copy or append data between two objects on the same database if the objects reside in different schemas.
- Activating a new config while the copy/append process is running may cause the synchronization process to fail.
Note: The syntax for the copy and append commands are exactly the same. The examples that appear below utilize the copy command, but the append command can be invoked by simply substituting append for copy.
Usage
| Supported sources: |
Oracle |
| Supported targets: |
PostgreSQL |
| Authorization level: |
Operator (2) |
| Issues on: |
source system |
| Related commands: |
None |
Syntax
|
{copy | append} source_schema.source_table.[partition]
|
[not (list of exceptions)]
[totarget_schema.target_table[.partition]]
[at target_host[@target_SID]
[for o.source_SID]
[force]
[status] |
[ on host |
on host:portnumber |
on login/password@host |
on login/password@host:portnumber ] |
| {copy | append} using filename |
[for o.source_SID]
[force] |
[ on host |
on host:portnumber |
on login/password@host |
on login/password@host:portnumber ] |
Syntax description
|
source_schema.source_table |
Specifies an individual source schema and source table name or a group of objects using wildcards. Not valid if using {copy | append} with the usingfilename syntax.
When used without the totarget_schema.target_table option, this syntax assumes that the synchronization target is the same as the replication target.
Examples:
sp_ctrl(SysA)>copy s_user1.sync_single_tbl
sp_ctrl(sysA)>append s_user1.sync_single_tbl |
| filename |
The name of a synchronization routing file containing the tables to be synchronized. File names are case-sensitive.
Use this option when using the {copy | append} using command.
Example:
sp_ctrl(SysA)>copy using sync_file_2.txt
sp_ctrl(sysA)>append using sync_file_2.txt |
| [not (list of exceptions)] |
Specifies an exception list of tables not to be copied/appended when the table specification includes wildcards.
The exception_list is a list of table names that should not be copied/appended.
Consider three tables: copytest1, copytest2, and copytest3. In the example below, only the data from the copytest3 table is copied to the target.
sp_ctrl > copy s_user1.% not (copytest1,copytest2) |
| totarget_schema.target_table [.partition] |
Specifies the target table for synchronization. This option only valid with the source_schema.source_table option.
If the table is not in replication, use this option in conjunction with the attarget_host@ [target_dbid] option.
Examples:
sp_ctrl(SysA)>copy s_user1.sync_single_tbl to d_user1.sync_single_tbl
sp_ctrl(SysA)>append s_user1.sync_single_tbl to d_user1.sync_single_tbl |
| at target_host@ [target_DBID] |
Specifies the location of the target table for synchronization. Use in conjunction with the totarget_schema.target_table [.partition] option.
Examples:
sp_ctrl(SysA)>copy s_user1.sync_single_tbl to d_user1.sync_single_tbl at d_host1@r.d_sid1
sp_ctrl(SysA)>append s_user1.sync_single_tbl to d_user1.sync_single_tbl at d_host1@r.d_sid1 |
| for o.source_SID |
Use to specify the datasource that contains the objects to be synchronized, if there is no active configuration, or if there are more than one active configurations.
Examples:
sp_ctrl(SysA)>copy s_user1.sync_single_tbl for o.source_sid at target_host@o.target_sid force
sp_ctrl(SysA)>append s_user1.sync_single_tbl for o.source_sid at target_host@o.target_sid force |
| force |
Use this option when tables intended for synchronization are not in replication or when the table route does not match an existing or known route.
Examples:
sp_ctrl(SysA)>copy s_user1.sync_single_tbl at target_host@r.target_sid force
sp_ctrl(SysA)>append s_user1.sync_single_tbl at target_host@r.target_sid force |
| status |
Displays status history for previous copy/append commands.
sp_ctrl(SysA)>copy status
sp_ctrl(SysA)>append status |
Remote options
These options enable you to issue the command on a remote machine and to script commands that include a login name, password, port number, or combination of those items.
| on host |
Execute the command on a remote system (one other than the one where the current sp_ctrl session is running). You are prompted for login credentials for the remote system. If used, must be the last component of the command syntax.
Example: sp_ctrl(sysB)>status on SysA |
| on host:portnumber |
Execute the command on a remote system when a remote login and port number must be provided. If used, must be the last component of the command syntax.
Example: sp_ctrl(sysB)>status on SysA:8304 |
| on login/password@host |
Execute the command on a remote system when a remote login, password, and host name must be provided. If used, must be the last component of the command syntax.
Example:sp_ctrl(sysB)>status on john/spot5489@SysA |
| on login/password@host:portnumber |
Execute the command on a remote system when a remote login, password, host name, and port number must be provided. If used, must be the last component of the command syntax.
Example: sp_ctrl(sysB)>status on john/spot5489@SysA:8304 |
This section explains how users can copy or append data from Oracle to various supported Cloud platforms.
Copy - Oracle to Parquet file format
The copy command allows users to set up replication and/or (re)synchronize individual tables. It requires an ODBC configuration for the Oracle database.
Users may copy individual tables to a single target, specify multiple targets, or all targets in the replication configuration.
| Important: Before you use this command, review all of this documentation. Improper use could result in lost data and out-of-sync conditions. |
The copy command
Use the copy command to instantiate data from the source Oracle table (or tables) into Parquet file format.
When to use the copy command
Use the copy command to migrate a database.
What the copy command supports
The copy command supports the following:
What the copy command does not support
The copy command does not support:
-
Data types that are not supported by SharePlex replication between the source and target
-
Tables using transformation, unless the transformation is also being applied on the target
-
Network configurations where a pass-through server is used to transfer data between the source and target servers
-
Sequences, indexes, constraints, triggers, and grants options
Copying data from Oracle to Parquet file format
The Copy command can generate instantiation file(s) in Parquet format containing the current snapshot of data from an existing Oracle table.
To configure this process, set the necessary parameters for x.file as described in the Targetsection. In addition to those, the two parameters listed below will determine the instantiation file size and Parquet row group size:
init_file_size
Specifies the size (in GB) of uncompressed data to be written to each file. If set to 0, a single file will be created containing all data from the source table.
Default: 1
Valid Values: Any value ≥ 0 (in GB)
init_row_group_size
Defines the size (in MB) of uncompressed data to be written in each row group. The value will be internally adjusted to the nearest multiple of 64 MB.
Default: 128
Valid Range: 64 ≤ x ≤ 1024 (in MB)
At the target storage, a new folder will be created using the fully qualified table name. The generated Parquet files will be stored inside this folder.
Each instantiation file will be named using a sequence number, timestamp, and the key word in it .
The format will be:
<schema.table>/<seq_no>_<timestamp>_init.parquet
Example:
USERS.DEMO_TABLE/0000000000_20250130132206_init.parquet
Note: Metadata fields such as spx_opd, oracle_scn, and spx_time which are present in replication files, will NOT be included in the instantiation file. These files will only contain the columns defined in the Oracle table.
If you need to copy data from Oracle to Parquet without the table being part of active replication, use the force option:
copy {source_owner}.{source_table} for {source_sid} at {target_host}@x.file force
Overview of copy process
The copy command initiates a process to synchronize individual tables between individual hosts.
The following is the sequence of events that illustrates simple synchronization process activity:
- Log onto the target system and issue the start launcher command from sp_ctrl.
- When the copy command is issued from an sp_ctrl session, sp_cnc spawns sp_xsync_svr processes on the source system. The number of processes spawned equals the value of the SP_XSY_PROCESSES parameter.
-
Each sp_xsync_svr process handles one table at a time.
- The sp_xsync_svr connects to the target sp_cop system and starts the sp_xsync_clt on the target system.
- The sp_xsync_svr sends parameter information and table metadata to sp_xsync_clt.
-
If the object being copied is under replication, sp_xsync_clt must wait until it receives the sync marker. The Post process thread should wait until the table copy is complete.
-
The sp_xsync_svr process transfers data to the sp_xsync_clt process until the copy is complete.
-
If the object being copied is under replication, the Post process thread re-initiates and resumes its posting activities.
Running concurrent copy processes
You can issue multiple copy commands at a time. Users should note that while the copy process is in progress the Post process stops all replication for the tables being copied.
Identifying synchronization processes
The synchronization processes are listed in the sp_ctrl console as they are started by sp_cop process. To identify the process use your operating system to locate the executables.
-
sp_xsync_svr
-
sp_xsync_clt
Tuning parameters for the synchronization
The following is a list of parameters associated with synchronization using the copy command. These parameters are all live and take effect the next time the command is issued.
Note: When the Oracle source table contains 6 or fewer characters in a LOB or LONG datatype column, performing an Oracle-to-Parquet copy operation may result in additional characters being appended to the end of the data, causing inconsistencies. To avoid this issue and ensure the data is copied accurately, data compression between the copy server and client should be disabled by setting the parameter SP_XSY_COMPRESSION to 0.
- SP_XSY_BUFFER_SIZE: This parameter adjusts the amount of data that is buffered before being sent to the target system. The default integer value is 500 MB. If the table contains LOB column(s), the average size of the LOB data is taken into consideration. Therefore, it is recommended to increase this buffer size when the table contains large LOB data, depending on the available memory.
- SP_XSY_POST_TIMEOUT: This parameter sets the number of seconds that the synchronization process will wait for the Poster process to be ready and the synchronization to begin. The default integer value is set to 1800 seconds (30 minutes).
- SP_XSY_READ_BUFFER_SIZE: This parameter adjusts the amount of data that is buffered before being sent to the target system for advanced data types. The default integer value is 1 MB.
- SP_XSY_SVR_THREADS: This parameter sets the number of threads in the sp_xsync_svr process. The default integer value is 2 threads.
- SP_XSY_PROCESSES: This parameter sets the number of sp_xsync_svr processes to be created. The default integer value is 2 processes.
-
SP_XSY_LOG_FILESIZE: This parameter controls the maximum log file size. The default integer value is 50 MB.
-
SP_XSY_LOG_NUMFILES: This parameter controls the number of log files before rolling over. The default integer value is 3 files.
-
SP_XSY_SYNC_DEBUG: This parameter is used to adjust the debug levels for logging. The default value is 0x00000000.
Viewing copy status
The best way to view the status of one or more copy commands is to use the copy status command. The basic command displays the results of all copy processes on a system.
The basic command displays the status of all copy jobs currently running on the system, and the most recently executed copy if it isn’t included in the currently running list. This list can be filtered to show only a specified status.
The best way to view the results of one or more copy commands is to use the report command with the copy option in sp_ctrl.
In the example text that follows, the copy command was issued against a table not in replication. The copy status that follows displays basic information about the table and the status of the procedure.
sp_ctrl (alvlabl17:8708)> copy sp_iot.SYNC_iot_BASIC to sp_iot.SYNC_iot_BASIC for o.w920a32f at irvqasu15@o.a102u64f force
sp_ctrl (alvlabl17:8708)> copy status 111 for o.w920a32f
Host : alvlabl17.quest.com
Started : 17-MAR-08 13:59:28
Job Type : Copy
Status : Done
| 1 |
"SP_IOT"."SYNC_IOT_BASIC1" |
3720 |
100 |
Done |
N/A |
0:08 |
| 2 |
"SP_IOT"."SYNC_IOT_BASIC2" |
3720 |
100 |
Error |
N/A |
0:08 |
| 3 |
"SP_IOT"."SYNC_IOT_BASIC3" |
3720 |
100 |
Done |
N/A |
0:08 |
To filter this list to only show the tables with a status of error, execute the following command:
sp_ctrl (alvlabl17:8708)> copy status 111 for o.w920a32f “Error”
Using a synchronization routing file
The synchronization routing file is very similar in structure to a configuration file used for activation, in that the file contents have the same formatting requirements. The difference between the two files is that some tables or objects in a configuration file may not be supported by the synchronization process and therefore should not be included in a synchronization routing file. For example, horizontally or vertically partitioned tables are not supported by the synchronization process and should not be included in a synchronization routing file.
Use of wildacrds in synchronization routing files is supported. The application of wildcards in a synchronization routing file is the same as in a config file. For information about how SharePlex supports wildcards, see the SharePlex Administration Guide.
Example routing file
| Datasource:o.s_sid1 |
| "S_SCHEMA0"."SYNC_MULTI_TRGT" |
"d_schema0"."sync_multi_trgt" |
d_host1@r.d_dbid1 |
| "S_SCHEMA0"."SYNC_MULTI_TRGT" |
"d_schema0"."sync_multi_trgt" |
d_host2@r.d_dbid1 |
| "S_SCHEMA0"."SYNC_MULTI_TRGT" |
"d_schema0"."sync_multi_trgt_bu" |
d_host1@r.d_dbid2 |
| Note: The copy command copies tables in random order and does not take into account referential integrity. Therefore, we recommend that users copy only one table at a time, or limit the copy to a very small number of tables. |
Controlling the number of processing threads
To take advantage of machines with multiple processors, you can set the number of copy processing threads on the source system using the SP_XSY_SVR_THREADS parameter. The default value of this parameter is set to two (2) threads, and the range of valid values is from 1 to 32 threads. The client process will always run on a single thread..
Using wildcards in command line syntax
Wildcards may be employed when specifying the source_table portion of the copy command. Additionally, you may use not notation to exclude specific objects.
You may specify all the tables in a specific schema using the following:
sp_ctrl (irvspxu14:8567)> copy scott.%
In the above example, all objects under the scott schema will be copied, provided the objects are currently in replication.
You can also set exclusions using the following:
sp_ctrl (irvspxu14:8567)> copy scott.% not (%"foo"%)
In the above example, all objects under the scott schema, except objects whose name contain “foo”, will be copied, provided the objects are currently in replication.
For more information about how SharePlex supports wildcards, see the SharePlex Administration Guide.
Other considerations for using copy
- When using the copy command to sync a table that is out-of-sync or when using the copy command to place a table into replication while instantiating it the Post process will pause for tables being copied while the table is being copied. The Post process will resume for tables being copied when the copy command is complete. This does not apply to a table that is being added to replication through a new route.
- The copy command can operate on multiple tables based on the value of the SP_XSY_PROCESSES parameter.
- When using the copy command for a table not in a known replication route the user must employ the force option. To employ copy on objects not in replication the user must employ the force option.
- When using the copy command for a table in replication, all SharePlex processes (Capture, Read, Export, Import, Post) must be running when you issue the copy command, and they must remain running throughout the processes.
- Do not use the copy command in a cascading replication environment.
-
When objects are in replication, the copy command briefly locks the source table, while the target table is not locked. The source tables can undergo changes while they are being copied; however, it is assumed that the target table will not undergo any changes by any process or application other than SharePlex.
- Activating a new config while the copy process is running may cause the synchronization process to fail.
Usage
| Supported sources: |
Oracle |
| Supported targets: |
Parquet file format |
| Authorization level: |
Operator (2) |
| Issues on: |
source system |
| Related commands: |
None |
Syntax
|
{copy} source_schema.source_table.[partition]
|
[not (list of exceptions)]
[at target_host[@target_SID]
[for o.source_SID]
[force]
[status] |
[ on host |
on host:portnumber |
on login/password@host |
on login/password@host:portnumber ] |
| {copy} using filename |
[for o.source_SID]
[force] |
[ on host |
on host:portnumber |
on login/password@host |
on login/password@host:portnumber ] |
Syntax description
|
source_schema.source_table |
Specifies an individual source schema and source table name or a group of objects using wildcards. Not valid if using {copy} with the usingfilename syntax.
Example:
sp_ctrl(SysA)>copy s_user1.sync_single_tbl |
| filename |
The name of a synchronization routing file containing the tables to be synchronized. File names are case-sensitive.
Use this option when using the {copy} using command.
Example:
sp_ctrl(SysA)>copy using sync_file_2.txt |
| [not (list of exceptions)] |
Specifies an exception list of tables not to be copied when the table specification includes wildcards.
The exception_list is a list of table names that should not be copied.
Consider three tables: copytest1, copytest2, and copytest3. In the example below, only the data from the copytest3 table is copied to the target.
sp_ctrl > copy s_user1.% not (copytest1,copytest2) |
| at target_host@ [target_DBID] |
Specifies the location of the target table for synchronization.
Example:
sp_ctrl(SysA)>copy s_user1.sync_single_tbl to d_user1.sync_single_tbl at d_host1@r.d_sid1 |
| for o.source_SID |
Use to specify the datasource that contains the objects to be synchronized, if there is no active configuration, or if there are more than one active configurations.
Example:
sp_ctrl(SysA)>copy s_user1.sync_single_tbl for o.source_sid at target_host@o.target_sid force |
| force |
Use this option when tables intended for synchronization are not in replication or when the table route does not match an existing or known route.
Example:
sp_ctrl(SysA)>copy s_user1.sync_single_tbl at target_host@r.target_sid force |
| status |
Displays status history for previous copy command.
sp_ctrl(SysA)>copy status |
Remote options
These options enable you to issue the command on a remote machine and to script commands that include a login name, password, port number, or combination of those items.
| on host |
Execute the command on a remote system (one other than the one where the current sp_ctrl session is running). You are prompted for login credentials for the remote system. If used, must be the last component of the command syntax.
Example: sp_ctrl(sysB)>status on SysA |
| on host:portnumber |
Execute the command on a remote system when a remote login and port number must be provided. If used, must be the last component of the command syntax.
Example: sp_ctrl(sysB)>status on SysA:8304 |
| on login/password@host |
Execute the command on a remote system when a remote login, password, and host name must be provided. If used, must be the last component of the command syntax.
Example:sp_ctrl(sysB)>status on john/spot5489@SysA |
| on login/password@host:portnumber |
Execute the command on a remote system when a remote login, password, host name, and port number must be provided. If used, must be the last component of the command syntax.
Example: sp_ctrl(sysB)>status on john/spot5489@SysA:8304 |
Description
SharePlex provides the following scripts to automate the building of a configuration file to specify Oracle source objects.
- config.sql: configure all tables and optionally all sequences in the database.
- build_config.sql: configure multiple or all tables in a schema
Supported source and target database
Oracle to Oracle
Use config.sql
The config.sql script enables you to build a configuration that lists all of the tables, and optionally all of the sequences, in all of the schemas of a database. This script saves time when establishing a high-availability replication strategy or other scenario where you want the entire database to be replicated to an identical secondary database.
Conditions for using config.sql
To run config.sql:
-
Change directories to the config sub-directory of the SharePlex variable-data directory. The config.sql script puts configurations in the current working directory, and SharePlex configurations must reside in the config sub-directory.
cd /vardir/config
- Log onto SQL*Plus as SYSTEM.
-
Run config.sql using the full path from the util sub-directory of the SharePlex product directory.
@ /proddir/util/config.sql
Refer to the following table when following the prompts:
| Target machine |
The name of the target machine, for example SystemB. |
| Source database SID |
The ORACLE_SID of the source (primary) Oracle instance, for example oraA. Do not include the o. keyword. The ORACLE_SID is case-sensitive. |
| Target database SID |
The ORACLE_SID of the target (destination) Oracle instance, for example oraB. Do not include the o. keyword. The ORACLE_SID is case-sensitive. |
| Replicate sequences |
Enter y to replicate sequences or n not to replicate sequences. |
| SharePlex oracle username |
The name of the SharePlex user in the source database. This entry prevents the SharePlex schema from being replicated, which would cause replication problems. If a valid name is not provided, the script fails. |
Note: The name assigned by SharePlex to the configuration is config.file. If you run the script again to create another configuration file, it overwrites the first file. To preserve the original file, rename it before you create the second one.
Next steps:
-
If any tables or owners are case-sensitive, open the configuration file with the edit config command in sp_ctrl, then use the text editor to enclose case-sensitive table and owner names within double-quote marks, for example “scott”.“emp”. The script does not add the quote marks required by Oracle to enforce case-sensitivity.
sp_ctrl> edit config filename
-
To ensure that the configuration is in the correct location, issue the list config command. If the name of the configuration is not shown, it was created in the wrong directory. Find the file and move it to the config sub-directory of the variable-data directory.
sp_ctrl> list config
Use build_config.sql
The build_config.sql script enables you to build a configuration that contains multiple (or all) tables in a schema. It is an interactive script that prompts for each component of the configuration step by step. Instead of entering the information for each object and the routing individually, you can use a wildcard to select certain tables at once, or you can select all of the tables in the schema.
Conditions for using build_config.sql
- Source and target table names must be the same.
- The script does not support sequences. Before you activate the configuration that the script builds, you can use the edit config command in sp_ctrl to add entries for sequences.
- The script does not support partitioned replication. You can use the copy config command to copy the configuration that the script builds, then use the edit config command to add entries for the tables that use partitioned replication. Activate the new configuration, not the original.
- The script does not configure objects in the SYS, SYSTEM, and SharePlex schemas. These schemas cannot be replicated since they are system and/or instance-specific.
- You can run build_config.sql for different schemas, then combine those configurations into one configuration by using a text editor. Make certain to eliminate all but one Datasource:o.SID line, which is the first non-commented line of the file. Do not move the file out of the config sub-directory.
- You can use the edit config command to make any other changes as needed after the configuration is built.
To run build_config.sql:
-
Change directories to the config sub-directory of the SharePlex variable-data directory. The build_config.sql script puts configurations in the current working directory, and SharePlex configurations must reside in the config sub-directory.
cd /vardir/config
- Log onto SQL*Plus as SYSTEM.
-
Run build_config.sql using the full path from the util sub-directory of the SharePlex product directory.
@ /proddir/util/build_config.sql
Refer to the following table when following the prompts.
| Target machine |
The name of the target machine, for example SystemB. |
| Source database SID |
The ORACLE_SID of the source (primary) Oracle instance, for example oraA. Do not include the o. keyword. The ORACLE_SID is case-sensitive. |
| Target database SID |
The ORACLE_SID of the target (destination) Oracle instance, for example oraB. Do not include the o. keyword. The ORACLE_SID is case-sensitive. |
| Owner of the source database tables |
The owner of the source tables. |
| Owner of the target database tables |
The owner of the target tables. |
| Table name to include (blank for all) |
Do one of the following:
- Press Enter to accept the default, which selects all tables that belong to the source owner.
- Enter a wildcard (%) character and a string to select certain tables, for example %e_salary%.
- Enter an individual table name.
|
| Name of the output file to create |
A name for the configuration. The script gives the file a .lst suffix, for example Scott_config.lst. |
Next steps:
-
If any tables or owners are case-sensitive, open the configuration with the edit config command in sp_ctrl, then use the text editor to enclose case-sensitive table and owner names within double-quote marks, for example “scott”.“emp”. The script does not add the quote marks required by Oracle to enforce case-sensitivity.
sp_ctrl> edit config filename
-
To ensure that the configuration is in the correct location, issue the list config command. If the name of the configuration is not shown, it was created in the wrong directory. Find the file and move it to the config sub-directory of the variable-data directory.
sp_ctrl> list config
