Version
The version command displays information about the version of the Rapid Recovery software installed on the specified server. If you do not specify a core or protected server, the information returned applies to the Core on which you are currently working.
Usage
The usage for the command is as follows:
/[version | ver] -protectedserver [name | IP address]
Command Options
The following table describes the options available for the version command:
Table 77: Version command options
-? |
Display this help message. |
-core |
Optional. Remote Core host machine IP address (with an optional port number). By default, the connection is made to the Core installed on the local machine. |
-user |
Optional. User name for the remote Core host machine. If you specify a user name, you must also provide a password. If none is provided, then the credentials for the logged-on user are used. |
-password |
Optional. Password to the remote Core host machine. If you specify a password, you also have to provide a user name. If none is provided, then the credentials for the logged-on user are used. |
-protectedserver |
Optional. The protected machine for which you want to view version information. If you do not specify a protect machine, the return is information about the Core machine on which you are working. |
Example:
Display information about the version of Rapid Recovery installed on the current Rapid Recovery Core:
>cmdutil /version
VirtualStandby
You can use the virtualstandby command to export data from a Rapid Recovery protected machine to a compatible virtual machine.
Usage
The usage for the command is as follows:
/virtualstandby -edit -exporttype [esxi | vm | hyperv | vb] -core [host name] -user [user name] -password [password] -protectedserver [name | IP address] -volumes [volume names] -vmname [virtual machine name] -gen2 -hostname [virtual host name] -hostport [virtual host port number] -hostusername [virtual host user name] -hostpassword [virtual host password] [-ram [total megabytes] | -usesourceram] -diskprovisioning [thin | thick] -diskmapping [automatic | manual | withvm] -targetpath [location] -pathusername [user name] -pathpassword [password] [-uselocal machine] -initialexport
Command Options
The following table describes the options available for the virtualstandby command:
Table 78: VirtualStandby command options
-? |
Display this help message. |
-exporttype |
This option exports data from a protected machine to one of the following specified virtual servers:
- esxi (ESXi)
- vm (VMware Workstation)
- hyperv (Hyper-V)
- vb (VirtualBox)
|
-core |
Optional. Remote Core host machine IP address (with an optional port number). By default, the connection is made to the Core installed on the local machine. |
-user |
Optional. The user name for the remote Core host machine. If you specify a user name, you must also provide a password. If none is provided, then the credentials for the logged-on user are used. |
-password |
Optional. The password to the remote Core host machine. If you specify a password, you also have to provide a user name. If none is provided, then the credentials for the logged-on user are used. |
-protectedserver |
Use this option to specify the protected machine whose recovery points you want to export. |
-volumes |
Optional. Use this option to list the names of the volumes that you want to export. If you do not specify volumes, then all volumes in the recovery point will export. Enclose values in double quotes and separate them with a space; for example: "c:" "d:". Do not use trailing slashes in volumes names. |
-ram |
Use this option to allocate a specific amount of RAM on the virtual server. |
-usesourceram |
Optional. Use this option to allocate the same amount of RAM on the virtual server that the source machine contains. |
-vmname |
The Windows name of the virtual machine. |
-gen2 |
Optional. This option specifies Generation 2 of the VM server. If you do not specify the generation, the command uses Generation 1. The following operating systems support Generation 2:
- Windows
- Windows Server 2012 R2
- Windows 8.1
- Ubuntu Linux
- CentOs
- RHEL
- Oracle Linux 7
|
-hostname |
For ESXi and Hyper-V virtual exports only. The virtual server host name. |
-linuxhostname |
For VirtualBox exports only. The virtual server host name. |
-hostport |
For ESXi and Hyper-V virtual exports only. The virtual server port number. |
-hostusername |
For ESXi and Hyper-V virtual exports only. The user name for the virtual server host. |
-hostpassword |
For ESXi and Hyper-V virtual exports only. The password for the virtual server host. |
-diskprovisioning |
For ESXi exports only. Optional. The amount of disk space that you want to allocate on the virtual machine. Use one of the two following specifications:
- Thick - This specification makes the virtual disk as large as the original drive on the protected machine.
- Thin - This specification allocates the amount of actual disk space occupied on the original drive with a few additional megabytes.
The default specification is "thin." |
-diskmapping |
For ESXi exports only. Optional. This option determines how to map the disks from the protected machine to the virtual machine. Use one of the following values:
- auto - This value automatically maps the disks.
- manual - This value lets you map the disks manually.
- withvm - This value stores the virtual disks in a datastore that you select.
The default value is "auto." |
-targetpath |
For VMware Workstation and VirtualBox exports only. This option specifies the local or network path—or Linux path, for VirtualBox only—to the folder where you want to store the virtual machine files. |
-pathusername |
For VMware Workstation exports only. It is the user name for the network machine. It is only required when you specify a network path in the -targetpath option. |
-pathpassword |
For VMware Workstation exports only. It is the password for the network machine. It is only required when you specify a network path in the -targetpath option. |
-uselocalmachine |
For Hyper-V exports only. Optional. Use this command to connect to the local Hyper-V server. This option ignores the -hostname, -hostport, -hostusername, and -hostpassword options. |
-edit |
Optional. This option lets you edit existing virtual machines. It ignores the -exporttype and -initialexport options. |
-initialexport |
Optional. This option specifies whether to start an initial on-demand virtual machine export after you configure a continuous virtual standby. |
Examples:
Set up a virtual standby export to an ESXi virtual machine with the name, amount of RAM, and disk size of the source protected server:
>cmdutil /virtualstandby -exporttype esxi -core 10.10.10.10 -user administrator -password 23WE@#$sdd -protectedserver 10.10.5.22 -vmname Win2008-Smith -hostname 10.10.10.23 -hostport 443 -hostusername root -hostpassword 12QWsdxc@# -usesourceram -diskprovisioning thick
Set up a virtual standby export to a VMware Workstation machine file on the local drive:
>cmdutil /virtualstandby -exporttype vm -core 10.10.10.10 -user administrator -password 23WE@#$sdd -protectedserver 10.10.5.22 -vmname Win2008-Smith -targetpath c:\virtualmachines -ram 4096
Set up a virtual standby export to a Hyper-V machine files and store them on a remote machine:
>cmdutil /virtualstandby -exporttype hyperv -core 10.10.10.10 -user adminstrator -password 23WE@#$sdd -protectedserver 10.10.5.22 -vmname Win20008-Smith -vmlocation \\WIN7-Bobby\virtualmachines -hostname 10.10.10.23 -hostport 443 -hostusername root -hostpassword 12QWsdxc@# -ram 4096
Localization
When running on the same machine on which Rapid Recovery Core is installed, the Rapid Recovery Command Line Management utility bases its display language on the language set for the Rapid Recovery Core. In this release, supported languages include English, Chinese (Simplified), French, Korean, German, Japanese, Portuguese (Brazil), and Spanish.
If the Rapid Recovery Command Line Management utility is installed on a separate machine, English is the only language supported.
PowerShell module
Rapid Recovery consists of several software components. Key components relevant to this topic include the following:
- The Rapid Recovery manages authentication for protected machines, schedules for transferring data for backup and replication, export to virtual machines, reporting, and bare metal restore (BMR) to similar or dissimilar hardware.
- The Rapid Recovery Agent is responsible for taking volume snapshots and for fast transfer of the data to the repository managed by the Core.
- The Rapid Recovery PowerShell Module is a Windows utility that lets users interact with the Core server by using Windows PowerShell® scripts. This module offers some of the same functionality that the Rapid Recovery Core Console graphic user interface (GUI) provides. For example, the Rapid Recovery PowerShell Module can mount Rapid Recovery recovery points or force a snapshot of a protected machine.
The PowerShell module interacts with the Rapid Recovery Core
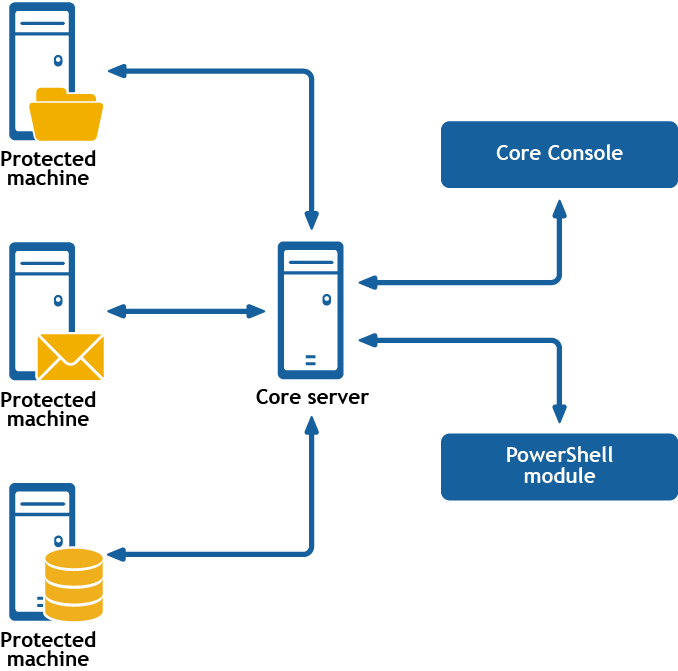
PowerShell is a Microsoft .NET Framework-connected environment designed for administrative automation. This section describes the Rapid Recovery PowerShell module and the cmdlets administrators can use to script certain functions without interaction with the Rapid Recovery Core GUI.
 NOTE: You can also run PowerShell scripts as pre and post scripts. For more information and sample scripts, see Scripting.
The Rapid Recovery PowerShell Module is automatically installed and registered when you install the Rapid Recovery Core. The module is installed in your Windows system directory in the path: [Environment.SystemDirectory]\WindowsPowerShell\v1.0\Modules\RapidRecoveryPowerShellModule. For example, for x86 or 32-bit OS, it is installed in C:\Windows\System32\WindowsPowerShell\v1.0\Modules\RapidRecoveryPowerShellModule. When using the module, run PowerShell as an Administrator, and then change the directory to the location of the module.
