The options for creating and managing the settings for your FTP servers, users and groups are arranged into three tabs.
In order to create a new virtual FTP server on your machine:
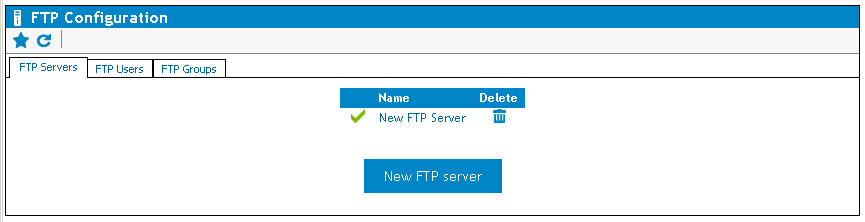
You need to define at least one virtual FTP server on the FTP Servers tab of the FTP Configuration screen.
If no FTP servers are defined then this screen will be blank, except for the New FTP server button.
Once you have defined a new server they will be listed in a table.
Figure 13: The FTP Servers list.
To delete a server:
Click on the red box in the delete column to the right of a given server.
To start/stop the server:
Click on the status indicator to the left of the virtual server.
Likewise, if you start a stopped or disabled FTP server it will be Enabled, and it will start automatically on rebooting.
The name of the virtual FTP server. This is for reference purposes only. You can call your server whatever you want. This is what will be displayed on the FTP Configuration page, the login message from the FTP server, and so on.
The port in use by the virtual FTP server. The default is the standard FTP port, 21.
The IP address to use. You can select one item from the list. If you select All available interfaces the virtual FTP server will listen on all assigned IP addresses.
The IP Filtering drop-down list lets you specify the IP addresses from which to accept connections. By default, the clients can come from any IP address. The IP filtering engine is the same as that used by ExpertAssist itself. Please see the section on IP filtering under Security for more information.
If a server is enabled, it will start automatically with ExpertAssist. If disabled, you will need to start it manually.
Enter a range of ports to use for passive FTP data transfers. These ports will be used on FTP server when the client is connecting in passive mode (PASV command). Passive mode is needed if the FTP client is connecting from behind the firewall and the FTP server cannot establish incoming connection to the client.
Select the corresponding IP address from the drop-down list for the network interface in the same subnet with the NAT router. This should be the network interface that allows connecting from the FTP server to NAT router.
Enter the subnet mask for the network interface in the same subnet with the NAT router.
Enter the external IP address for the NAT router.
Select this box to indicate if the FTP server is enabled. This has the same meaning as clicking the green circle status indicator on the FTP Servers tab.
Select this checkbox to use implicit SSL encryption (passive security). Implicit security provides and “always-on” mode security when you don’t have to bother about turning the SSL security mode on FTP server each time you connect to FTP server. Once the implicit SSL encryption is enabled, you can connect to a FTP as usual and you will always have your connection encrypted through the SSL.
The root directory for the virtual FTP server. If you leave this field blank the drive list will be used as the root.
If you enable this option, shell links (.lnk files) pointing to directories will be displayed as directories, enabling you to use Unix and NTFS file system hard links.
The global download speed limit for the server. No matter how fast users are accepting data, the server will not send it any faster than the speed specified here.
The global upload limit to the server. No matter how fast users are sending data, the server will not accept it any faster than the speed specified here.
|
|
Note: The following FTP server configuration pages will become available as buttons at the bottom of the page: Security, Windows Users, Welcome, ODBC |
The Security configuration page lets you specify various security and connection-related options.
Table 3: FTP Server Security options.
|
Maximum number of simultaneous connections |
The maximum number of simultaneous connections to the FTP server. Setting it to zero means that there are no limits. |
|
Maximum number of failed login attempts |
If a user fails to log in with this many tries the connection will be dropped and the user’s originating IP will be locked out on FTP server. |
|
Login timeout |
The maximum number of seconds the user can take to log in until control connection will be closed by FTP server. |
|
No transfer timeout |
The connection will be considered idle and will terminate after the specified number of seconds have elapsed on an open connection without a file transfer or directory listing. |
|
Stalled transfer timeout |
This is the amount of time a file transfer can spend without sending or receiving any data before it is considered stalled and thus terminated. |
|
Allow keep-alives |
FTP clients use various commands to keep the connection from being idle. When enabled, FTP commands such as CWD, PWD or the ubiquitous NOOP will reset the No transfer timeout counter (described above). If disabled, only an actual file transfer or a directory listing will reset the counter. |
|
Thread priority |
You can select the priority of the threads servicing users for the FTP server. If you are running an FTP server on an otherwise busy host computer it might be a good idea to set the priority to a lower value than the default Normal setting. |
|
Allow unsecured FTP connections |
If this option is disabled the FTP client must support and utilize SSL. Client connected though unsecure FTP will get error 524 Only secure authentication is allowed. |
|
Allow data connections to go to different IPs than that of the control connection (enable FXP, basically) |
The FTP protocol uses two connections: The control connection and the data connection. The data connection is where all the raw data is sent, the control connection is used to send commands to the server and receive replies. Normally data connections are set up to the same IP address as that of the control connection, but in order to facilitate server-to-server file transfers it may be desirable to allow data connections to go to different IP addresses. If you are not using server-to-server transfers you can safely disable this option. |
|
Quoted password changes |
This determines whether the parameters of the SITE PSWD command are in quotes or simply surrounded by a space. (SITE PSWD oldpwd newpwd vs. SITE PSWD "oldpwd" "newpwd"). Which form is used depends on the targeted FTP client. |
|
Anti-hammer filter This feature is similar to ExpertAssist’s IP address lockout settings. By default if 4 trials to establish more simultaneous data connections than it is allowed from an IP address occur within one minute, the IP address will be locked out for one hour. When the client IP gets locked out, the FTP client receives an error response 421 Connection rejected. Service available in 01:00:00 from the server. | |
|
Enabled |
Select this box to enable the anti-hammer filter. |
|
Number of invalid attempts before locking out |
You can change the number of bad login attempts from 4 to anything you want. |
|
Reset invalid attempt counter after |
You can modify the time before the invalid attempt count is reset to zero. |
|
Lock out for |
You can choose the duration for which the user is locked out after the specified number of invalid attempts has been made. |
You can connect to the newly defined FTP server with any FTP client, but you are not able to log in until you have created a new FTP user and give them access to the server or you can allow any Windows NT user to access the new virtual FTP server.
The difference between FTP users and NT users is simple. NT users are pre-existing users in the Windows local SAM user database and Active Directory. Creating and managing local users from SAM database is done either via the HTML-based User Manager included in ExpertAssist, or the User Accounts applet that comes with Windows. You cannot explicitly tell the FTP server the directories and files to which the user has access, but Windows access rights will be enforced. If a user can access a file below the server’s root directory locally or over the network, he will be able to do so via FTP as well. If a user has no rights to a file or a directory, he will not be able to access the object with FTP either. This is enforced by the FTP server by having the thread servicing the user impersonate him towards the operating system as soon as login is complete.
FTP users, on the other hand, are created and managed within the FTP configuration pages. You can tell the server which files or folders the user can access, where he can read from, where he can write to. When an FTP user logs on, the thread servicing the user is executing under the LocalSystem account by default. This is rather undesirable, so you can specify an NT user account on a per-server basis that will be impersonated when servicing FTP users. We will return to FTP users later in this chapter, when discussing the content of the FTP Users tab.
The Windows account which the FTP users will impersonate under can be defined by specifying a username, domain and password for an existing Windows account using the corresponding fields on the Windows Users page. This is used when an FTP user logs on: the thread servicing the user will be impersonating this account towards the operating system. If you enter an incorrect username or an incorrect password here, the FTP user will receive a 'Login incorrect' message from the FTP server, even if he enters his credentials correctly.
To grant access to a Windows NT user or group on the FTP server, select its name in the list on the right and click the Apply button. To revoke access from a user or a group, select its name in the list on the left, and click the Apply button.
To list user accounts from a domain rather than from the local computer, enter the domain’s name in the ‘default domain’ field and click the Apply button.
Now that you have granted access to an NT user, you can use an FTP client to connect and log in to the FTP server. The user will have access to all files and directories below the server’s root directory. However, on an NTFS file system, NT access restrictions will apply. For example, if the user does not have the rights to read or write in a certain directory, he will not be able to do so via FTP either. The FTP server enforces this in a very effective way: the thread servicing the user will impersonate him towards the operating system as soon as login is successful.
The Welcome configuration page allows you to view and modify the welcome message for your users:
The first message the user will see when they log in will be the ExpertAssist welcome banner. If you do not wish to let the outside world know which FTP server you are running, you can disable this via the checkbox at the bottom of this window.
The next message the user will see looks like this by default:
——————————————————————————————
Welcome to the _!SERVER_NAME!_ FTP server,
running on _!OS_VERSION!_.
The server has been up for _!SERVER_UPTIME!_.
Data downloaded: _!BYTES_DOWN!_
Data uploaded: _!BYTES_UP!_
Sessions serviced: _!TOTAL_LOGINS!_
——————————————————————————————
You can change this to anything you like, or leave it blank if you'd prefer no login message for your users. If you disable both the banner and the welcome note, the FTP Server will just send ‘Welcome’ whenever somebody connects to the FTP port. This is because the FTP specification requires a server to send a code and some text when a connection is established.
By default, the post-login message looks like this:
——————————————————————————————
Welcome, _!USER_NAME!_, to _!SERVER_NAME!_.
Your last successful login was at _!LAST_LOGIN!_.
Good logins so far: _!GOOD_LOGINS!_.
Bad logins so far: _!BAD_LOGINS!_.
You have uploaded _!BYTES_UP!_ and downloaded
_!BYTES_DOWN!_ in your previous sessions.
——————————————————————————————
User logged in.
The final line reading User logged in cannot be customized, as this is a requirement of FTP protocol. The rest you can change to suit your preferences, or leave blank.
The following variables can be inserted into the welcome messages, and they will be automatically replaced with their corresponding values:
The name of the FTP server.
The operating system and its version.
The amount of time the server has been up.
The amount of data uploaded and downloaded. These variables behave differently when used in the pre-login or post-login messages. In the pre-login message, they represent a server-wide value, while in the post-login message they represent the amount of data transferred by the user.
The number of successful logins to the FTP server. Only valid in the pre-login message.
The number of logins and unsuccessful login attempts for the user logging in. Only valid in the post-login message.
The last successful login by the user. Only valid in the post-login message.
These welcome messages are server-wide settings, and apply to all users and groups. When you specify a welcome message for an FTP group or an FTP user, it will override the post-login message defined here.
The ODBC option allows you to specify a database as a source of user information.
With this configuration page you can set up a database to contain user information. This can be any database type: Oracle, SQL Server, Microsoft Access, or even a plain text file. You need to create an ODBC data source that refers to this database so that ExpertAssist can access it. The data source must be a so-called System Data Source, as this is the only ODBC source available to processes running in the system context.
|
|
Note: The data source should be of the System DSN type. |
|
|
Note: On 64-bit Windows environments please use the Microsoft SQL system or SNAC drivers as these are the only ODBC providers available for System data sources. |
When you have your database and ODBC data source ready, we advise you to test it by querying it with a tool that supports ODBC queries, such as a spreadsheet program or the Windows built-in ODBC Data Source Administrator tool.
|
|
Note: On 64-bit Windows please make sure to use the 64-bit ODBC Data Source Administrator tool. It is available under the %systemroot%\system32 folder. |
You should have all user information available in one table. If you already have a user database and user information is in separate tables, you should set up a query within your database that contains all user-related fields. ExpertAssist only reads from the database.
Suppose that you have a user database in a data source called FTPUsers. The user information is present in a database table called Users. A database SQL login called ea is able to read from the Users table. You should also supply the password for this user.
Set this checkbox to enable the use of ODBC.
Enter the name of the System DNS created using the ODBC Data Source Administrator tool to be used as the data source.
Enter the User Name that is used to access the ODBC data source.
Enter the Password that is used to access the ODBC data source.
The amount of time to wait while establishing a connection before ending the connection attempt.
Enter the name of the database table that the ODBC data source will use.
Enter database table field (column) name storing the users’ login names.
Enter database table field (column) name storing the users’ passwords.
Enter database table field (column) name storing the users’ home directory path here. Users have full access to their home directory, but have neither read nor write permissions outside of it. The path can be an absolute path (such as z:\ftp\users\~john) or it can be relative to the server root (such as /users/~john).
Optional) The quota field will restrict user from storing more data in his home directory and its subdirectories than the number of bytes specified here.
Optional) These fields restrict download/upload speed. They are optional, and should be an integer number specifying bytes per second.
Optional) Enter database table field (column) name storing the user’s status. Within the database this field should store an integer value. When the value is non-zero, the user is disabled and cannot log in.
Optional) Enter database table field (column) name that specifies the maximum simultaneous connections to this FTP server for a user.
Optional) Enter database table field (column) name that specifies the maximum number of simultaneous connections per unique IP address for a user.
(Optional) Enter database table field (column) name storing a custom welcome message for the user.
If you click on the FTP Configuration page under the Server Functions object and select the FTP Users tab, you can view, create or modify your existing FTP users. These are only defined in ExpertAssist and unlike Windows NT users they do not exist outside of the FTP server.
As on the FTP Users tab, users are shown in a table, with a delete column to the right.
Below this is the New FTP user button.
To create a new FTP user, click on the New FTP user button on the FTP Users tab of the FTP Configuration page.
Enter the desired username and password on the Settings for FTP user page. You can also specify upload and download speed limits for the user. If not set to zero (meaning disabled) these options override the global FTP server settings.
You can also enable or disable their ability to change this password, and select an IP from the IP filter drop-down list.
Click Apply to create the user.
When you create a new user the following options become available:
Groups
Permissions
Ratio
Disable
Home/Quota
Max Connections
Welcome
Permissions Report
The newly created user cannot log in yet: you have to assign permissions to them for an FTP server and a path so that the user is able to use the account.
This configuration page lets you specify the FTP groups to which the user belongs. For more details on FTP groups, please see the next section.
Selecting a group that the user is a member of and clicking the Apply button will remove the user from that group. Selecting a group that the user is not a member of and clicking the Apply button will add the user to that group.
The Back button takes you back to the Settings for FTP user page.
This configuration page lets you edit users’ access rights to directories. To grant access to a directory on a server, select the virtual server from the server list, select the type of rights you wish to assign to the user, enter the path to the directory and click the Apply button.
The path you specify can be a full path, containing a drive letter, or a path relative to the server’s root directory. If you assign rights to a path that is not within the server’s root directory, the setting will have no effect at all.
The following rights are possible:
L – Show directory contents.
Allows the user to list the contents of the directory.
R – Read file.
Download files from the directory.
C – Create subdirectories.
Create new directories in the directory.
D – Delete/rename file.
Delete or rename a file or a directory. Also required to be able to overwrite files.
W – Create/modify file.
Create a new file and/or write data to it.
Full access.
All of the above.
The rights you specify for a directory are automatically inherited by its subdirectories, unless you specify different rights for them.
The following method is used when checking access rights to a directory:
The current virtual server’s access list is enumerated for the current user.
When the directory closest to the directory in question is found, the access rights specified for that directory is used. For example, if the user has LRW rights for C:\Work, he has LR rights for C:\Work\CPP, and the directory in question is C:\Work\CPP\Project1, only LR rights are returned – meaning that the user can only list and read files, but not write to them.
If an NT user is specified on the Windows Users configuration page for the server to run FTP accounts under, further Windows NT-enforced restrictions might apply, based on file system permissions. This configuration page is available from the Settings for FTP server page.
You can also make the user member of one or more groups, and these groups can also be members of one or more groups. For an explanation of this scenario, please see the FTP Groups section.
This configuration page lets you edit the upload/download ratio settings for users. The upload/download ratio lets you control how much data the user has to upload before he can download anything.
If the Upload ratio is set to 1, and the Download ratio is set to 5, the user can download 5 bytes for every byte uploaded. If it were the other way around, the user would have to upload 5 bytes to be able to download one. You can enter any positive integer number in either of these fields.
There are four possible settings for the Ratio type:
The Per IP ratio expiration time setting allows you to expire the per-IP credits after a certain amount of time. If the user logs back from the same IP address after not visiting the server for this much time, he will have to start over building up his credits.
The ratio setting applies to all virtual FTP servers.
To let the user download files without uploading, you can specify a starting credit. The amount given is in kilobytes – the user will be able to download the specified amount of data without uploading.
The following configuration page lets you explicitly disable (or ban) a user on a virtual FTP server. Disabled users cannot log in, even if they have rights on an FTP server. You can also disable a connected user from the FTP status page.
This configuration page lets you specify home directories for the user. A home directory is basically the entry point for a user on an FTP server. When the user logs in, he will find himself in the directory you specify here. If no home directory is specified, he will be logged in to the server’s root directory. The user can move out from his home directory if he has rights to an outside directory. You can use a full path, starting with a drive letter, when specifying home directories – or you can enter a relative path to the server’s root directory.
You should make sure that the user has rights to his entry point on the server – either to his home directory, or if the home directory is not specified, to the root directory of the server. If the user has no rights to the entry point, he will not be able to log in. If the user’s home directory is specified above the server’s root, the user will not be able to log in.
You can specify quotas for your users. Quotas are only enforced on home directories, and apply to all files contained in the home directory and its subdirectories. If a user has rights to upload files outside of his home directory, he will be able to do so without restrictions – quotas only apply to the home directory and its contents.
The ExpertAssist can help to enforce disk quotas for user accounts. When a user starts to upload a file, the FTP server quickly scans the contents of the directory to determine if the user is below or above the quota. If the quota is not exceeded, the upload can be started – however, the FTP server will interrupt the transfer as soon as the file being uploaded starts to exceed the specified quota.
Home directory quotas are entirely optional, by leaving the field empty you choose not to limit the amount of data that can be stored on the server by the user.
You can specify the maximum number of simultaneous connections for a user account on this configuration page. By default, a user account can be used to log in any number of times, until exhausting the maximum number of connections for the virtual FTP server, or exhausting the resources of the computer.
Simply select the server on the right, enter the number of maximum simultaneous connections in the Count field and click the Apply button.
To remove a limitation, select it in the list on the left and click the Apply button.
You can also limit the number of simultaneous connections to be established by the user from a single IP address. The Per IP field serves this purpose. When left blank, or a zero is entered, this limitation is disabled and the user can establish that many connections as defined in the Count field. If you enter a numeric value, a single computer can be used to log in that many times with the account.
It is a good idea to limit certain user accounts (for example the Anonymous account) this way. An overall maximum connection limit defined in the Count field ensures that the server cannot be overloaded by thousands of Anonymous users, and a Per IP limitation makes sure that no single user can take up all available connections.
You can compose a custom welcome message for the user in this window.
——————————————————————————————
Welcome, _!USER_NAME!_, to _!SERVER_NAME!_.
Your last successful login was at _!LAST_LOGIN!_.
Good logins so far: _!GOOD_LOGINS!_.
Bad logins so far: _!BAD_LOGINS!_.
You have uploaded _!BYTES_UP!_ and downloaded
_!BYTES_DOWN!_ in your previous sessions.
_!QUOTA!_
——————————————————————————————
Messages specified here override any post-login message specified for the virtual FTP server. In this case, messages specified for any groups the user belongs to will be disregarded as well. See the equivalent section on welcome messages above for the available variables.
The permissions report can be retrieved for any FTP user. It will list all FTP servers, and all the rights a user has on the given server.
This report can be useful if you have a more complicated setup of groups and users, and would like to see what exactly the user can do on the system, and from where these rights come.
If you click on the FTP Groups tab on the FTP Configuration page under the Server Functions object, you can easily control the resources available to your FTP users. As on the FTP Servers and FTP Users tabs, groups are shown in a table, with a Delete column to the right.
To add a new FTP Group click on New FTP group.
You can make a group a member of another group, thus bringing in any permissions or restrictions for its member users from the parent group.
Selecting a group in the Member of list and clicking the Apply button will remove it from that group. Selecting a group in the Not member of list and clicking the Apply button will add the group to it.
You can also specify a welcome message for a group. Whenever a member logs in, he will see this message instead of the server’s general welcome message.
With this configuration page you can specify the rights to servers and directories.
The configuration page works very much like the Permissions configuration page within the FTP Users tab. For a basic description please see the appropriate section of this document.
There are some scenarios, however, that might require further explanation.
Suppose the following, rather complicated scenario:
So, what exactly User1 can do in the aforementioned directories?
He has LR rights. He was explicitly granted LR rights to this directory, and this overrides anything else.
He has LR rights. He was explicitly granted LR rights to the directory closest to this one (C:\), and no groups that he is a member of, directly or indirectly, specify anything else for the C:\TEMP directory.
LRW rights again. See the first case.
LRWD, because Group1 has LRWD rights. Even though Group2, which Group1 is a member of, specifies LR access for this directory, Group1 is the least indirect object that specifies actual rights for the directory. Group2 is one more indirection away, with User1 only being a member of it because he is a member of Group1, and is therefore overridden by Group1.
Full access. Both Group2 and Group3 are two indirections away, they both specify access rights to the same directory, so the deciding factor between Group2 and Group3 is that Group2 is the first one in the Member of list of the Group1.
The options for creating and managing the settings for your FTP servers, users and groups are arranged into three tabs.
In order to create a new virtual FTP server on your machine:
You need to define at least one virtual FTP server on the FTP Servers tab of the FTP Configuration screen.
If no FTP servers are defined then this screen will be blank, except for the New FTP server button.
Once you have defined a new server they will be listed in a table.
Figure 13: The FTP Servers list.
To delete a server:
Click on the red box in the delete column to the right of a given server.
To start/stop the server:
Click on the status indicator to the left of the virtual server.
Likewise, if you start a stopped or disabled FTP server it will be Enabled, and it will start automatically on rebooting.
The name of the virtual FTP server. This is for reference purposes only. You can call your server whatever you want. This is what will be displayed on the FTP Configuration page, the login message from the FTP server, and so on.
The port in use by the virtual FTP server. The default is the standard FTP port, 21.
The IP address to use. You can select one item from the list. If you select All available interfaces the virtual FTP server will listen on all assigned IP addresses.
The IP Filtering drop-down list lets you specify the IP addresses from which to accept connections. By default, the clients can come from any IP address. The IP filtering engine is the same as that used by ExpertAssist itself. Please see the section on IP filtering under Security for more information.
If a server is enabled, it will start automatically with ExpertAssist. If disabled, you will need to start it manually.
Enter a range of ports to use for passive FTP data transfers. These ports will be used on FTP server when the client is connecting in passive mode (PASV command). Passive mode is needed if the FTP client is connecting from behind the firewall and the FTP server cannot establish incoming connection to the client.
Select the corresponding IP address from the drop-down list for the network interface in the same subnet with the NAT router. This should be the network interface that allows connecting from the FTP server to NAT router.
Enter the subnet mask for the network interface in the same subnet with the NAT router.
Enter the external IP address for the NAT router.
Select this box to indicate if the FTP server is enabled. This has the same meaning as clicking the green circle status indicator on the FTP Servers tab.
Select this checkbox to use implicit SSL encryption (passive security). Implicit security provides and “always-on” mode security when you don’t have to bother about turning the SSL security mode on FTP server each time you connect to FTP server. Once the implicit SSL encryption is enabled, you can connect to a FTP as usual and you will always have your connection encrypted through the SSL.
The root directory for the virtual FTP server. If you leave this field blank the drive list will be used as the root.
If you enable this option, shell links (.lnk files) pointing to directories will be displayed as directories, enabling you to use Unix and NTFS file system hard links.
The global download speed limit for the server. No matter how fast users are accepting data, the server will not send it any faster than the speed specified here.
The global upload limit to the server. No matter how fast users are sending data, the server will not accept it any faster than the speed specified here.
|
|
Note: The following FTP server configuration pages will become available as buttons at the bottom of the page: Security, Windows Users, Welcome, ODBC |
The Security configuration page lets you specify various security and connection-related options.
Table 3: FTP Server Security options.
|
Maximum number of simultaneous connections |
The maximum number of simultaneous connections to the FTP server. Setting it to zero means that there are no limits. |
|
Maximum number of failed login attempts |
If a user fails to log in with this many tries the connection will be dropped and the user’s originating IP will be locked out on FTP server. |
|
Login timeout |
The maximum number of seconds the user can take to log in until control connection will be closed by FTP server. |
|
No transfer timeout |
The connection will be considered idle and will terminate after the specified number of seconds have elapsed on an open connection without a file transfer or directory listing. |
|
Stalled transfer timeout |
This is the amount of time a file transfer can spend without sending or receiving any data before it is considered stalled and thus terminated. |
|
Allow keep-alives |
FTP clients use various commands to keep the connection from being idle. When enabled, FTP commands such as CWD, PWD or the ubiquitous NOOP will reset the No transfer timeout counter (described above). If disabled, only an actual file transfer or a directory listing will reset the counter. |
|
Thread priority |
You can select the priority of the threads servicing users for the FTP server. If you are running an FTP server on an otherwise busy host computer it might be a good idea to set the priority to a lower value than the default Normal setting. |
|
Allow unsecured FTP connections |
If this option is disabled the FTP client must support and utilize SSL. Client connected though unsecure FTP will get error 524 Only secure authentication is allowed. |
|
Allow data connections to go to different IPs than that of the control connection (enable FXP, basically) |
The FTP protocol uses two connections: The control connection and the data connection. The data connection is where all the raw data is sent, the control connection is used to send commands to the server and receive replies. Normally data connections are set up to the same IP address as that of the control connection, but in order to facilitate server-to-server file transfers it may be desirable to allow data connections to go to different IP addresses. If you are not using server-to-server transfers you can safely disable this option. |
|
Quoted password changes |
This determines whether the parameters of the SITE PSWD command are in quotes or simply surrounded by a space. (SITE PSWD oldpwd newpwd vs. SITE PSWD "oldpwd" "newpwd"). Which form is used depends on the targeted FTP client. |
|
Anti-hammer filter This feature is similar to ExpertAssist’s IP address lockout settings. By default if 4 trials to establish more simultaneous data connections than it is allowed from an IP address occur within one minute, the IP address will be locked out for one hour. When the client IP gets locked out, the FTP client receives an error response 421 Connection rejected. Service available in 01:00:00 from the server. | |
|
Enabled |
Select this box to enable the anti-hammer filter. |
|
Number of invalid attempts before locking out |
You can change the number of bad login attempts from 4 to anything you want. |
|
Reset invalid attempt counter after |
You can modify the time before the invalid attempt count is reset to zero. |
|
Lock out for |
You can choose the duration for which the user is locked out after the specified number of invalid attempts has been made. |
You can connect to the newly defined FTP server with any FTP client, but you are not able to log in until you have created a new FTP user and give them access to the server or you can allow any Windows NT user to access the new virtual FTP server.
The difference between FTP users and NT users is simple. NT users are pre-existing users in the Windows local SAM user database and Active Directory. Creating and managing local users from SAM database is done either via the HTML-based User Manager included in ExpertAssist, or the User Accounts applet that comes with Windows. You cannot explicitly tell the FTP server the directories and files to which the user has access, but Windows access rights will be enforced. If a user can access a file below the server’s root directory locally or over the network, he will be able to do so via FTP as well. If a user has no rights to a file or a directory, he will not be able to access the object with FTP either. This is enforced by the FTP server by having the thread servicing the user impersonate him towards the operating system as soon as login is complete.
FTP users, on the other hand, are created and managed within the FTP configuration pages. You can tell the server which files or folders the user can access, where he can read from, where he can write to. When an FTP user logs on, the thread servicing the user is executing under the LocalSystem account by default. This is rather undesirable, so you can specify an NT user account on a per-server basis that will be impersonated when servicing FTP users. We will return to FTP users later in this chapter, when discussing the content of the FTP Users tab.
The Windows account which the FTP users will impersonate under can be defined by specifying a username, domain and password for an existing Windows account using the corresponding fields on the Windows Users page. This is used when an FTP user logs on: the thread servicing the user will be impersonating this account towards the operating system. If you enter an incorrect username or an incorrect password here, the FTP user will receive a 'Login incorrect' message from the FTP server, even if he enters his credentials correctly.
To grant access to a Windows NT user or group on the FTP server, select its name in the list on the right and click the Apply button. To revoke access from a user or a group, select its name in the list on the left, and click the Apply button.
To list user accounts from a domain rather than from the local computer, enter the domain’s name in the ‘default domain’ field and click the Apply button.
Now that you have granted access to an NT user, you can use an FTP client to connect and log in to the FTP server. The user will have access to all files and directories below the server’s root directory. However, on an NTFS file system, NT access restrictions will apply. For example, if the user does not have the rights to read or write in a certain directory, he will not be able to do so via FTP either. The FTP server enforces this in a very effective way: the thread servicing the user will impersonate him towards the operating system as soon as login is successful.
The Welcome configuration page allows you to view and modify the welcome message for your users:
The first message the user will see when they log in will be the ExpertAssist welcome banner. If you do not wish to let the outside world know which FTP server you are running, you can disable this via the checkbox at the bottom of this window.
The next message the user will see looks like this by default:
——————————————————————————————
Welcome to the _!SERVER_NAME!_ FTP server,
running on _!OS_VERSION!_.
The server has been up for _!SERVER_UPTIME!_.
Data downloaded: _!BYTES_DOWN!_
Data uploaded: _!BYTES_UP!_
Sessions serviced: _!TOTAL_LOGINS!_
——————————————————————————————
You can change this to anything you like, or leave it blank if you'd prefer no login message for your users. If you disable both the banner and the welcome note, the FTP Server will just send ‘Welcome’ whenever somebody connects to the FTP port. This is because the FTP specification requires a server to send a code and some text when a connection is established.
By default, the post-login message looks like this:
——————————————————————————————
Welcome, _!USER_NAME!_, to _!SERVER_NAME!_.
Your last successful login was at _!LAST_LOGIN!_.
Good logins so far: _!GOOD_LOGINS!_.
Bad logins so far: _!BAD_LOGINS!_.
You have uploaded _!BYTES_UP!_ and downloaded
_!BYTES_DOWN!_ in your previous sessions.
——————————————————————————————
User logged in.
The final line reading User logged in cannot be customized, as this is a requirement of FTP protocol. The rest you can change to suit your preferences, or leave blank.
The following variables can be inserted into the welcome messages, and they will be automatically replaced with their corresponding values:
The name of the FTP server.
The operating system and its version.
The amount of time the server has been up.
The amount of data uploaded and downloaded. These variables behave differently when used in the pre-login or post-login messages. In the pre-login message, they represent a server-wide value, while in the post-login message they represent the amount of data transferred by the user.
The number of successful logins to the FTP server. Only valid in the pre-login message.
The number of logins and unsuccessful login attempts for the user logging in. Only valid in the post-login message.
The last successful login by the user. Only valid in the post-login message.
These welcome messages are server-wide settings, and apply to all users and groups. When you specify a welcome message for an FTP group or an FTP user, it will override the post-login message defined here.
The ODBC option allows you to specify a database as a source of user information.
With this configuration page you can set up a database to contain user information. This can be any database type: Oracle, SQL Server, Microsoft Access, or even a plain text file. You need to create an ODBC data source that refers to this database so that ExpertAssist can access it. The data source must be a so-called System Data Source, as this is the only ODBC source available to processes running in the system context.
|
|
Note: The data source should be of the System DSN type. |
|
|
Note: On 64-bit Windows environments please use the Microsoft SQL system or SNAC drivers as these are the only ODBC providers available for System data sources. |
When you have your database and ODBC data source ready, we advise you to test it by querying it with a tool that supports ODBC queries, such as a spreadsheet program or the Windows built-in ODBC Data Source Administrator tool.
|
|
Note: On 64-bit Windows please make sure to use the 64-bit ODBC Data Source Administrator tool. It is available under the %systemroot%\system32 folder. |
You should have all user information available in one table. If you already have a user database and user information is in separate tables, you should set up a query within your database that contains all user-related fields. ExpertAssist only reads from the database.
Suppose that you have a user database in a data source called FTPUsers. The user information is present in a database table called Users. A database SQL login called ea is able to read from the Users table. You should also supply the password for this user.
Set this checkbox to enable the use of ODBC.
Enter the name of the System DNS created using the ODBC Data Source Administrator tool to be used as the data source.
Enter the User Name that is used to access the ODBC data source.
Enter the Password that is used to access the ODBC data source.
The amount of time to wait while establishing a connection before ending the connection attempt.
Enter the name of the database table that the ODBC data source will use.
Enter database table field (column) name storing the users’ login names.
Enter database table field (column) name storing the users’ passwords.
Enter database table field (column) name storing the users’ home directory path here. Users have full access to their home directory, but have neither read nor write permissions outside of it. The path can be an absolute path (such as z:\ftp\users\~john) or it can be relative to the server root (such as /users/~john).
Optional) The quota field will restrict user from storing more data in his home directory and its subdirectories than the number of bytes specified here.
Optional) These fields restrict download/upload speed. They are optional, and should be an integer number specifying bytes per second.
Optional) Enter database table field (column) name storing the user’s status. Within the database this field should store an integer value. When the value is non-zero, the user is disabled and cannot log in.
Optional) Enter database table field (column) name that specifies the maximum simultaneous connections to this FTP server for a user.
Optional) Enter database table field (column) name that specifies the maximum number of simultaneous connections per unique IP address for a user.
(Optional) Enter database table field (column) name storing a custom welcome message for the user.
If you click on the FTP Configuration page under the Server Functions object and select the FTP Users tab, you can view, create or modify your existing FTP users. These are only defined in ExpertAssist and unlike Windows NT users they do not exist outside of the FTP server.
As on the FTP Users tab, users are shown in a table, with a delete column to the right.
Below this is the New FTP user button.
To create a new FTP user, click on the New FTP user button on the FTP Users tab of the FTP Configuration page.
Enter the desired username and password on the Settings for FTP user page. You can also specify upload and download speed limits for the user. If not set to zero (meaning disabled) these options override the global FTP server settings.
You can also enable or disable their ability to change this password, and select an IP from the IP filter drop-down list.
Click Apply to create the user.
When you create a new user the following options become available:
Groups
Permissions
Ratio
Disable
Home/Quota
Max Connections
Welcome
Permissions Report
The newly created user cannot log in yet: you have to assign permissions to them for an FTP server and a path so that the user is able to use the account.
This configuration page lets you specify the FTP groups to which the user belongs. For more details on FTP groups, please see the next section.
Selecting a group that the user is a member of and clicking the Apply button will remove the user from that group. Selecting a group that the user is not a member of and clicking the Apply button will add the user to that group.
The Back button takes you back to the Settings for FTP user page.
This configuration page lets you edit users’ access rights to directories. To grant access to a directory on a server, select the virtual server from the server list, select the type of rights you wish to assign to the user, enter the path to the directory and click the Apply button.
The path you specify can be a full path, containing a drive letter, or a path relative to the server’s root directory. If you assign rights to a path that is not within the server’s root directory, the setting will have no effect at all.
The following rights are possible:
L – Show directory contents.
Allows the user to list the contents of the directory.
R – Read file.
Download files from the directory.
C – Create subdirectories.
Create new directories in the directory.
D – Delete/rename file.
Delete or rename a file or a directory. Also required to be able to overwrite files.
W – Create/modify file.
Create a new file and/or write data to it.
Full access.
All of the above.
The rights you specify for a directory are automatically inherited by its subdirectories, unless you specify different rights for them.
The following method is used when checking access rights to a directory:
The current virtual server’s access list is enumerated for the current user.
When the directory closest to the directory in question is found, the access rights specified for that directory is used. For example, if the user has LRW rights for C:\Work, he has LR rights for C:\Work\CPP, and the directory in question is C:\Work\CPP\Project1, only LR rights are returned – meaning that the user can only list and read files, but not write to them.
If an NT user is specified on the Windows Users configuration page for the server to run FTP accounts under, further Windows NT-enforced restrictions might apply, based on file system permissions. This configuration page is available from the Settings for FTP server page.
You can also make the user member of one or more groups, and these groups can also be members of one or more groups. For an explanation of this scenario, please see the FTP Groups section.
This configuration page lets you edit the upload/download ratio settings for users. The upload/download ratio lets you control how much data the user has to upload before he can download anything.
If the Upload ratio is set to 1, and the Download ratio is set to 5, the user can download 5 bytes for every byte uploaded. If it were the other way around, the user would have to upload 5 bytes to be able to download one. You can enter any positive integer number in either of these fields.
There are four possible settings for the Ratio type:
The Per IP ratio expiration time setting allows you to expire the per-IP credits after a certain amount of time. If the user logs back from the same IP address after not visiting the server for this much time, he will have to start over building up his credits.
The ratio setting applies to all virtual FTP servers.
To let the user download files without uploading, you can specify a starting credit. The amount given is in kilobytes – the user will be able to download the specified amount of data without uploading.
The following configuration page lets you explicitly disable (or ban) a user on a virtual FTP server. Disabled users cannot log in, even if they have rights on an FTP server. You can also disable a connected user from the FTP status page.
This configuration page lets you specify home directories for the user. A home directory is basically the entry point for a user on an FTP server. When the user logs in, he will find himself in the directory you specify here. If no home directory is specified, he will be logged in to the server’s root directory. The user can move out from his home directory if he has rights to an outside directory. You can use a full path, starting with a drive letter, when specifying home directories – or you can enter a relative path to the server’s root directory.
You should make sure that the user has rights to his entry point on the server – either to his home directory, or if the home directory is not specified, to the root directory of the server. If the user has no rights to the entry point, he will not be able to log in. If the user’s home directory is specified above the server’s root, the user will not be able to log in.
You can specify quotas for your users. Quotas are only enforced on home directories, and apply to all files contained in the home directory and its subdirectories. If a user has rights to upload files outside of his home directory, he will be able to do so without restrictions – quotas only apply to the home directory and its contents.
The ExpertAssist can help to enforce disk quotas for user accounts. When a user starts to upload a file, the FTP server quickly scans the contents of the directory to determine if the user is below or above the quota. If the quota is not exceeded, the upload can be started – however, the FTP server will interrupt the transfer as soon as the file being uploaded starts to exceed the specified quota.
Home directory quotas are entirely optional, by leaving the field empty you choose not to limit the amount of data that can be stored on the server by the user.
You can specify the maximum number of simultaneous connections for a user account on this configuration page. By default, a user account can be used to log in any number of times, until exhausting the maximum number of connections for the virtual FTP server, or exhausting the resources of the computer.
Simply select the server on the right, enter the number of maximum simultaneous connections in the Count field and click the Apply button.
To remove a limitation, select it in the list on the left and click the Apply button.
You can also limit the number of simultaneous connections to be established by the user from a single IP address. The Per IP field serves this purpose. When left blank, or a zero is entered, this limitation is disabled and the user can establish that many connections as defined in the Count field. If you enter a numeric value, a single computer can be used to log in that many times with the account.
It is a good idea to limit certain user accounts (for example the Anonymous account) this way. An overall maximum connection limit defined in the Count field ensures that the server cannot be overloaded by thousands of Anonymous users, and a Per IP limitation makes sure that no single user can take up all available connections.
You can compose a custom welcome message for the user in this window.
——————————————————————————————
Welcome, _!USER_NAME!_, to _!SERVER_NAME!_.
Your last successful login was at _!LAST_LOGIN!_.
Good logins so far: _!GOOD_LOGINS!_.
Bad logins so far: _!BAD_LOGINS!_.
You have uploaded _!BYTES_UP!_ and downloaded
_!BYTES_DOWN!_ in your previous sessions.
_!QUOTA!_
——————————————————————————————
Messages specified here override any post-login message specified for the virtual FTP server. In this case, messages specified for any groups the user belongs to will be disregarded as well. See the equivalent section on welcome messages above for the available variables.
The permissions report can be retrieved for any FTP user. It will list all FTP servers, and all the rights a user has on the given server.
This report can be useful if you have a more complicated setup of groups and users, and would like to see what exactly the user can do on the system, and from where these rights come.
If you click on the FTP Groups tab on the FTP Configuration page under the Server Functions object, you can easily control the resources available to your FTP users. As on the FTP Servers and FTP Users tabs, groups are shown in a table, with a Delete column to the right.
To add a new FTP Group click on New FTP group.
You can make a group a member of another group, thus bringing in any permissions or restrictions for its member users from the parent group.
Selecting a group in the Member of list and clicking the Apply button will remove it from that group. Selecting a group in the Not member of list and clicking the Apply button will add the group to it.
You can also specify a welcome message for a group. Whenever a member logs in, he will see this message instead of the server’s general welcome message.
With this configuration page you can specify the rights to servers and directories.
The configuration page works very much like the Permissions configuration page within the FTP Users tab. For a basic description please see the appropriate section of this document.
There are some scenarios, however, that might require further explanation.
Suppose the following, rather complicated scenario:
So, what exactly User1 can do in the aforementioned directories?
He has LR rights. He was explicitly granted LR rights to this directory, and this overrides anything else.
He has LR rights. He was explicitly granted LR rights to the directory closest to this one (C:\), and no groups that he is a member of, directly or indirectly, specify anything else for the C:\TEMP directory.
LRW rights again. See the first case.
LRWD, because Group1 has LRWD rights. Even though Group2, which Group1 is a member of, specifies LR access for this directory, Group1 is the least indirect object that specifies actual rights for the directory. Group2 is one more indirection away, with User1 only being a member of it because he is a member of Group1, and is therefore overridden by Group1.
Full access. Both Group2 and Group3 are two indirections away, they both specify access rights to the same directory, so the deciding factor between Group2 and Group3 is that Group2 is the first one in the Member of list of the Group1.

