Install Remote Agents
You can install agents to remote computers from your Benchmark Factory console. You must be able to connect to the remote machine.
To install remote agents from the console
- Select Edit | Settings | Agent.
- On the Agent Settings page, click Setup New User Agent. The Setup User Agent dialog opens.
-
Enter the connection information for the remote machine. Review the following for additional information:
IP Address / Name Enter the IP address or name of the remote machine. User Name Enter the user name to use to connect.
Note: Only accounts in the Administrators group on the remote machine can install or launch remote Agents. If in a domain, connect using a domain account in the Administrators group.
Password Enter the password to use to connect.
Use Windows session credentials Select to use Windows credentials.
# of Agents Specify the number of agents to deploy on this machine. - Click OK. Benchmark Factory checks the remote machine for an installed agent.
- If no agent is found, Benchmark Factory prompts you to install the agent. Click Yes in the prompt window. The Setup User Agent dialog opens.
-
In the Installer field, browse to and select the Benchmark Factory installer.
Note: The Installer can be located on your local machine or on the remote machine.
-
Click OK. The installer installs the agent component on the remote machine.
Note: If the agent fails to install, you may need to configure the firewall or attempt one of the troubleshooting techniques. See Configure Firewall for Remote Agent Install/Start-Up.
- When the agent is successfully installed, the progress window closes and the new remote agent displays in the list.
- After the remote agent is installed, you can double-click the agent name in the list to modify agent options.
Configure Firewall
In order to install remote agents and allow communication with remote agents after installation, you may need to configure the firewall on the console machine and on each agent machine. See Configure Firewall for Remote Agent Install/Start-Up to learn more.
If you configure the firewall and then encounter an error when attempting to install a remote agent, find some troubleshooting techniques here: Troubleshooting.
Run Benchmark Factory with Multiple Agents
You can install agents on multiple agent machines in order to run tests using multiple agents. To configure Benchmark Factory with multiple agents you must:
- Load the proper client libraries (i.e. Oracle, SQL server, etc.) on the Benchmark Factory Console and Agent Machine.
- Install Benchmark Factory on the local and agent machines.
Install Multiple Agents
For best results, install remote agents through your Benchmark Factory console. You can install remote agents from the Settings dialog (Edit | Settings | Agent) or from the Agent page of the New/Edit Job Wizard. See Install Remote Agents for more information.
You can also install agents manually on the agent machine. If you do, you must configure the agent on the agent machine (see below). Then, in your local Benchmark Factory, you must set up the agent to register it with the console. See Agent Settings for more information.
Configure Agent Machine
If you set up an agent machine by installing Benchmark Factory manually, you must configure the agent on the agent machine.
Each Benchmark Factory Agent must be configured with the address of the Benchmark Factory Console. Each Agent sends load testing results back to the Benchmark Factory Console.
If you use only the agent installed locally on the console machine, make sure your local agent is configured with the IP address (name) of your local machine.
To configure Benchmark Factory Agents
- On each agent machine, go to Program Files\Quest Software\Benchmark Factory <version>\bin and double-click Agent.exe to open the Agent dialog.
- Select Options | Settings.
-
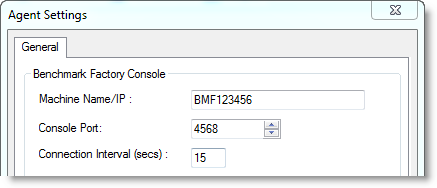
In Machine Name/IP field, enter the address of the Benchmark Factory console machine. In the Console Port field, enter the port for the Benchmark Factory console.
- Click OK.
- Repeat this procedure for each Agent machine
Set Up the Agents
To run a job using multiple agent machines, after the agents are installed and configured, you must set up (or add) each remote agent to the Benchmark Factory console.
- If the agent was installed manually, you can set up the agent in Edit | Settings | Agent. See Agent Settings for more information.
- If the agent was installed remotely through the Benchmark Factory console, the agent is automatically set up.
Running a Job With Multiple Agents
To run a job with multiple agents
- Open the New Job Wizard and create a workload.
- Click Agent in the left panel of the New Job Wizard.
- For an existing job, open the job in the Edit Job Wizard and click Agent in the left pane.
- From the list, select the agents to use. The list displays agents you have previously set up in Benchmark Factory.
- To add an agent, click Setup New User Agent. See Agent Settings for more information.
- As the job runs, all connected Agents will display in the Agent view/pane of the Benchmark Factory console.
Note: When you run a job using one or more local agents, if Agent utilization of resources on the local machine is too high, errors could occur.
View Agents from Benchmark Factory Console
When you run multiple Agents for load testing, you can view the Agents results as they run from the Benchmark Factory Console.
To view the Agents from the Benchmark Factory Console
- From the Benchmark Factory main menu, select View | Agent. The Agent view displays. Statistics from All Agents connected to the Benchmark Factory Console and running are displayed here.
Test Status Tab
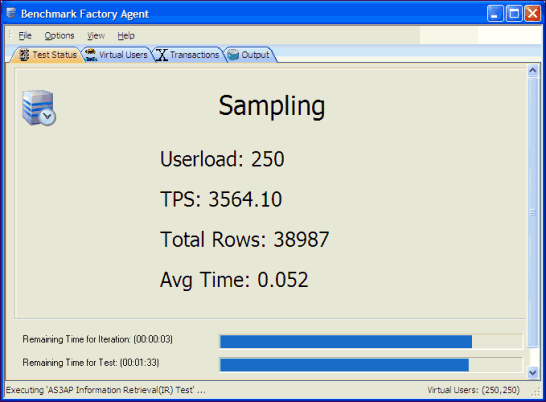
The Test Status tab displays information about the test you are currently running.
Virtual Users Tab
The Virtual Users tab provides the raw data from each virtual user. A tabular format shows each virtual user with its measurements.
To adjust or customize Virtual Users columns
- Right-click on the Virtual Users column heading. A drop-down displays.
- Make the desired adjustments.


