Chatta subito con l'assistenza
Chat con il supporto

SQL Navigator for Oracle 8.0 - User Guide

Quick Overview Working With SQL Navigator Navigation Oracle Logon Code Editor Visual Object Editors Team Coding and Version Control Systems Modules, Windows And Dialogs
Analyze Tool Auto Describe Tool Benchmark Factory Bookmarks Dialog Capture Web Output Change Logon Password Dialog Code Analysis Code Assistant Code Road Map Code Templates Code Test Database Source Code Search Dialog DB Navigator Describe Difference Viewer Edit Data ER Diagram Explain Plan Tool Export Table Find and Replace Dialog Find objects Dialog Find Recycle Bin Objects Dialog Formatting Options HTML Viewer Import HTML as PL/SQL Import Table Java Manager Job Scheduler Locate In Tree Output Window PL/SQL Profiler Profile Manager Project Manager Publish Java to PL/SQL Quick Browse Rename Object Search Knowledge Xpert Select DB Object Dialog Server Output Server Side Installation Wizard Session Browser Source Preview SQL Modeler SQL Optimizer Task Manager Web Support Configuration Dialog Wrap Code
View | Preferences About Us

Add to Catalog & Edit Dialogs

Add a code snippet or folder to the Code Assistant Code and SQL Catalog. Manage items in the catalog.

Field Description

Name

Make the name descriptive.

Names can be up to 35 characters long and contain uppercase letters, lowercase letters, and any of the following characters:

_ - & space < > / , ' ( ) ..

Entry Type

Select Code Snippet or Folder.

Snippet

The snippet of code.

Note: For code snippets only.

Information

The text to be displayed in the Code Assistant Information pane.

Hint

The text to be used as a hint in the status bar at the bottom of the Code Assistant window.

Image

The icon to identify the code snippet in the catalog (Generic, Function, or Procedure).

Note: For code snippets only.

Code Road Map

The Code Road Map graphically displays the complex PL/SQL interdependencies within a database.


Code Road Map Toolbar

Icon Tool Tip Description

New code road map

This opens the Model Code Dialog.

Clear diagram

Clear the model window. Revert to the initial start up state.

Open file

Open a saved map file (Extension: .crm).

Save file as

Save the map with a new name (Extension: .crm).

Save file

Save the map (Extension: .crm).

Save diagram as text file

Save the map as a text file.

The file consists of a list of the objects and what they reference.

For example the following might be the results of a small code map:

PROCEDURE CRM_TEST EX_PROC_1 ---> PACKAGE CRM_TEST EX_PACK_2

PROCEDURE CRM_TEST EX_PROC_1 ---> PROCEDURE CRM_TEST EX_PROC_2

PROCEDURE CRM_TEST EX_PROC_1 ---> PROCEDURE CRM_TEST EX_PROC_3

PROCEDURE CRM_TEST EX_PROC_1 ---> TABLE CRM_TEST EMP_SNAPSHOT

PROCEDURE CRM_TEST EX_PROC_1 ---> VIEW CRM_TEST SALES

The map is laid out as follows where the arrow means "calls".

OBJECT-TYPE SCHEMA OBJECT NAME --> OBJECT-TYPE SCHEMA OBJECT NAME

Save diagram as bitmap

Create a bitmap version of the map.

TIP: You could copy the image to the clipboard. Right click over the map and select Copy Image to Clipboard.

Print diagram

Print the model side of the map.

Print preview

Preview before printing.

Code road map info

Add a comment to your code map.

Collapse packages

Collapse/Expand Package View.

Icon Tool Tip Description
Collapse Packages Show/Hide referenced sub units under the object type.
Expand Packages


Note: Applicable to Code Type | Package as set in the Model Code Dialog.

Refresh diagram

Refresh the diagram.

Choose colors for database objects

Color code database objects.

Zoom

Zoom in or out of the model.

Previous auto layout / Next auto layout

Scroll through layouts of the Code Road Map.


The Code Model

The code model consists of two panels. The left panel shows a list of components in a hierarchical tree. The right panel shows a graphic model of the code. The design is similar to models created using SQL Modeler.

Hierarchical Tree Graphical Model

The hierarchical tree is organized by object type. All procedures are listed under the Procedures node, and all tables under the Tables node.

Click on an object to highlight it in the Graphical Model.

Each object listing contains the name of the object, the schema where it resides, and the type of object. For Code Type | Package in Collapse Package view, any sub units that are referenced will be included under the object type. For example:
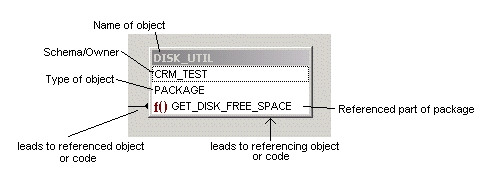
Lines indicate where an object is dependent on another. Lines have a knob end (the referencing object) and an arrow end (the referenced object).

In this example, DISK_UTIL references the library NT_KERNEL, specifically from the function GET_DISK_FREE_SPACE. The model is in Collapse Package view.

A self-recursive reference is shown with the arrow returning back to the object, as follows:

Actions:

  • Click on an object in the tree view and the Graphic Model centers on that object.
  • Right-click on an object to display the popup menu from the Schema Browser for that object.
  • F4 performs a Describe, if SQL Navigator supports Describes on that object type.
  • Double-click an object to perform a Describe.

Actions:

  • Right-click on an object to display the popup menu from the Schema Browser for that object type.
  • F2 toggles full screen mode.
  • F4 or Double-clicking on an object performs a Describe, if SQL Navigator supports Describes on that object type.

Model Code Dialog

Select the code to map and the options to use when the code is mapped.

Field Description

Schema

The schema where the code is located.

Code Type

Select from: function, package, procedure and trigger.

Code Unit

The options depend on the Code Type selected.

Sub Unit

The various parts of the package, sorted alphabetically. The first sub unit is selected by default.

Note: Visible for Code Type | Package.

Levels to Model

The number of levels to model down from the starting object. The default is ten.

Display Mode

Option Description

Code Only

Model the code the object calls.

Display a graphical representation of the run-time, call-stack dependencies.

Code + Data

Model both the code called and data (tables, views, and so on) referenced by the object.

Display the database objects the code references and in what manner (for example, read versus write). You can also include pertinent triggers and views. Views are essentially treated as tables.

Display Options

Select as appropriate. These options affect the visual display of the map. The data in the map is not affected.

  • Expand packages and types for calls into them
  • Include triggers (for Code + Data)
  • Include views (for Code + Data)
  • Include calls to SYS-owned objects
  • Include calls to other schema PL/SQL

Code Templates

Insert ready-made code segments into any active editor window.

Action Description

Insert code from a template into an active editor window.

  1. In the editor, place the cursor where you want to insert the code segment.
  2. Choose one of the following:
    • Type the shortcut key to the code template.
    • Type the full or partial name of the code template and press Ctrl+J to either insert the matching code template or select from a list of matches.
    • Press Ctrl+J. Select the template name from the drop-down list and press Enter.

Add / Edit / Delete code templates.

Click View | Code Templates | Edit Code Templates. This opens the Code Shortcuts And Templates Dialog

Each template is a file in the SQL Navigator installation Templates directory.

The maximum number of templates allowed, including preformatted templates, is 100.


Standard code routines for which templates have been provided:

Code Description

Shortcut Key

Basic Loop Statement

Shift+Ctrl+L

Boolean Statement

Shift+Ctrl+B

Close Cursor Statement

Shift+Ctrl+C

DBMS_OUTPUT.Put_Line

Shift+Ctrl+D

Exception

Shift+Ctrl+E

Exit When Statement

Shift+Ctrl+X

For Loop Statement

Shift+Ctrl+F

GOTO Label Statement

Shift+Ctrl+G

IF Statement

Shift+Ctrl+A

MLSLABEL Statement

Shift+Ctrl+M

Number Statement

Shift+Ctrl+N

Open_Cursor Statement

Shift+Ctrl+O

Raise_Exception

Shift+Ctrl+R

SQLCODE Statement

Shift+Ctrl+S

VARCHAR2 Statement

Shift+Ctrl+V

Variable_name

Shift+Ctrl+T

While Condition Statement

Shift+Ctrl+W

Related Documents

The document was helpful.

Seleziona valutazione

I easily found the information I needed.

Seleziona valutazione