Important Information about Reconfiguring Distributed Migration After an Upgrade from Version 9.1 or Earlier
To provide more efficient resource utilization, the Distributed Migration model has been re-architected to eliminate the use of a Controller to push jobs to agents. Instead, Distributed Migration uses a Windows Service that allows any available agent to pull a migration job that has been set to Run Remotely directly from the Distributed Database.
If you configured Distributed Migration prior to version 9.2, you will need to reconfigure each agent in order to continue using Distributed Migration and to run any migration jobs remotely.
NOTE: You will notice after an upgrade that the Configure Distributed Migration and Configure Self-Service options no longer display in the Content Matrix Console ribbon (Self-Service Migration has been removed as of version 9.2) and the Manage Agents dialog is empty. To accommodate the change from a "push" to a "pull" model, Content Matrix uses a new SQL table, Agents V2.
If you are configuring Distributed Migration for the first time, you can find complete information, including an overview of the Distributed Migration model, system requirements, and instructions in the Metalogix Content Matrix SharePoint Edition user documentation.
REMINDER: As of version 9.2, Distributed Migration is no longer available for eRoom and Public Folder Editions.
Reconfiguring Distributed Migration
·Before reconfiguring agents, cancel or wait for all active Distributed Migration jobs (that is, jobs that have been set to Run Remotely) to complete.
·For each agent, follow the procedure for Configuring Agents for Distributed Migration.
NOTE: It is recommended that you use the former Controller machine as the first agent to ensure that the proper settings are copied to the Distributed Database.
You can check the Manage Agents dialog and run a remote job to verify that Distributed Migration has been successfully reconfigured.
Configuring Agents for Distributed Migration
Configuring an Agent for Distributed Migration consists of the following high-level tasks:
I.Install the latest version of Content Matrix then create and/or connect to the Distributed Database.
II.Copy the Agent Service installation files to the agent machine and install from a Command Prompt.
III.For the first agent, generate a unique security certificate for the Metalogix Agent Service.
NOTE: Once created on the first agent, the name of the certificate is stored in the Distributed Database and then it can be copied to other agents. (The same certificate needs to be used across all agents.)
IV.Install the Metalogix Agent Service, which
·installs the Agent Service as a Windows service
·installs the certificate to My User Account storage
·saves the certificate name to the Distributed Database
V.Start the Metalogix Agent Service.
Permission Requirements
The account used to configure agents for Distributed Migration must:
·be an Administrator
AND
·have permissions to Log on as a Service (via Administrative Tools > Local Security Policy > User Rights Assignment).
To install the latest version of Content Matrix then connect to the Distributed Database:
1.Log into the machine using an account that meets Permissions Requirements.
2.Download or copy the latest version of the Content Matrix installation kit to the machine.
3.Install the Content Matrix Console and the Metalogix Extension Web Service (MEWs). (See the Metalogix Advanced Installation Guide for details.)
4.Open the Console and create/connect to the Distributed Database as follows:
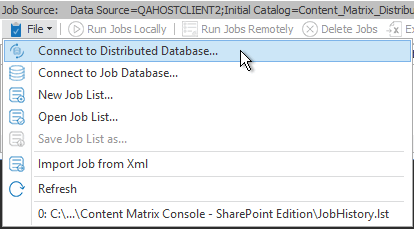
a)From the Job List, choose File > Connect to Distributed Database.
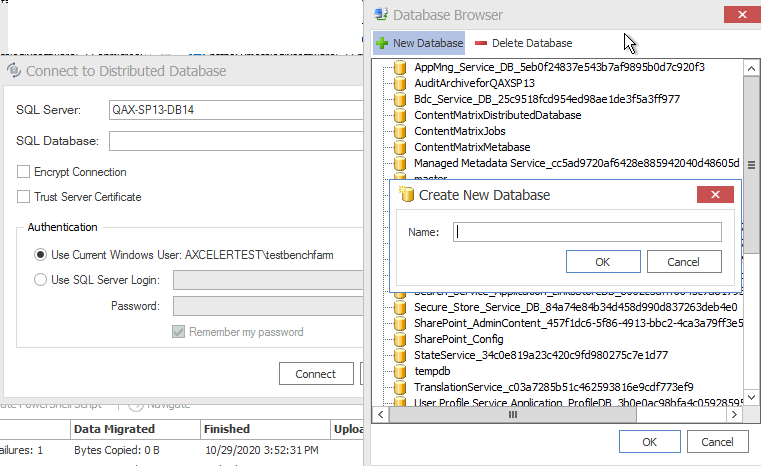
b)Enter or browse to the SQL Server and SQL Database you want to use. If the database does not already exist, create it.
NOTE: Remember to use the same Distributed Database for all agents in the "cluster."
Whenever a machine connects to the Distributed Database, a pop-up will display with the option of copying User Mappings and other local machine settings to the database.
CAUTION: If you are configuring multiple agents, remember that if you click [Yes], any User Mappings and settings that already exist in the Distributed Database will be overwritten.
If you want to use an encrypted connection to the database, check the Encrypt Connection box
NOTE: If the certificate used for encryption is not trusted, you will also need to check the Trust Server Certificate box.
5.Close the Content Matrix Console.
To copy the Agent Service installation files to the agent machine:
1.Copy the ContentMatrixAgentService_[version].zip file from the Content Matrix download folder and extract the files (the recommended location is C:\Program Files (x86)\Metalogix\Agent Service).
2.Open a Command Prompt using the Run as Administrator option.
3.Change the directory to point to the location containing the Agent Service files.
To generate a self-signed certificate for agents:
NOTE: Create the certificate for the first agent only, then copy that certificate to additional agent machines. Make sure that the folder into which you are generating the certificate already exists.
At the command prompt, use following command to generate a certificate:
Metalogix.Agent.exe --generateCertificate <certificateName> --certificatePassword <certificatePassword> --path <certificatePath>
EXAMPLE:
Metalogix.Agent.exe --generateCertificate ContentMatrixAgentCertificate --certificatePassword certPass --path "C:\Content Matrix Certificates"
NOTES:
·When generating a certificate, there is no need to enter the file extension as it will be ignored.
·It is necessary to use double quotation marks (" ") to enclose:
§a password that contains special characters
§a file path that contains spaces (as shown in the example above).
To install the Metalogix Agent Service:
NOTE: If you have already created a self-signed certificate on the first agent, make sure it is copied to the other agent(s) before performing this procedure .
At the command prompt, use following command:
Metalogix.Agent.exe -i --user <domain\username> --password <password> --certificatePath <certificatePath>\<certificateName.FileExtension> --certificatePassword <certificatePassword>
EXAMPLE:
Metalogix.Agent.exe -i --user metalogix\Administrator --password userPass# --CertificatePath "C:\Content Matrix Certificates\ContentMatrixAgentCertificate.pfx" --certificatePassword certPass
NOTE: It is necessary to use double quotation marks (" ") to enclose:
·a password that contains special characters
·a file path that contains spaces (as shown in the example above).
To Start the Metalogix Agent Service:
1.Navigate to Administrative Tools > Services > Metalogix Agent Service.
2.Right-click and choose Start.
About Us
Quest creates software solutions that make the benefits of new technology real in an increasingly complex IT landscape. From database and systems management, to Active Directory and Office 365 management, and cyber security resilience, Quest helps customers solve their next IT challenge now. Around the globe, more than 130,000 companies and 95% of the Fortune 500 count on Quest to deliver proactive management and monitoring for the next enterprise initiative, find the next solution for complex Microsoft challenges and stay ahead of the next threat. Quest Software. Where next meets now. For more information, visit www.quest.com.


