Tags are an organizational mechanism that can be used on any source or target container to identify special subset of the containers within a migration.
Tags can be used to:
·Flag users under legal consideration
·Group users into migration waves
·Identify problematic containers
·Identify VIPs that require special consideration
·Identify containers that are out of scope
Tags can be created, modified, and assigned. Then, tags can be filtered. Tags can be created and applied to any of these pages:
·User Information
·Bulk Mapping
·Existing Mapping
·Stage 1
·Stage 2
|
|
NOTE: Tags can be used with any type of container (including ownerless ones). Additionally,tags can be assigned for a mappings source and target containers. |
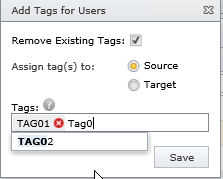
When you select objects and click the Tag Assignment button, you can create, remove, or assign tags using this window:
Tag Management Page
The Configuration > Tag Management page shows a list of current tags and the number of containers assigned each tag. A tag can be expanded to review the containers that have the tag.
On this page, you can:
Add: Create a new container tag.
Edit: Modify a container tag.
Delete: Remove a container tag.
Unassign containers: Unassign containers.
Assign Users (.csv Import): An imported .csv file can be used to assign one or more tags to user group containers. Click here to view instructions on creating a .csv file. The supported fields for matching the containers are:
·UserSid
·SaMAccountName
·Container Name
The format of the .csv file should be one of the following:
·SID,tagname
·samAccountName,tagname
·ContainerName,tagname
You can use the separator drop down box to change the punctuation used to separate each property (comma, semi colon, colon, vertical line). For example, using the examples above:
·SID;tagname
·samAccountName;tagname
·ContainerName;tagname
Multiple tags can be assigned to a container, for example:
·samAccountName,tag1,tag2,tag3
Assign User Groups: You can assign a tag to all members of a group using the Assign User Groups button. This allows you to select a group and assign a specific tag to all containers in that group. This can be useful when you are transitioning from using groups, to using tags.
Refresh: Update the grid.
Columns: Modify the columns in the grid.
Reset: Reset the grid to its default state.
Load: Load a previously saved .csv file for the grid.
Save: Save the grid layout as a .csv file. Click the Shared box to share the layout to other users.
To create a .csv file compatible for use with Archive Shuttle, follow these steps in Microsoft Excel. This is to be used when adding multiple tags to a value.
1.Add each value into its own cell. Do not separate each value with separators such as commas, semi colons or colons, unless necessary (see below). Use the table below as an example:
|
Column A |
Column B |
Column C |
Column D |
|---|---|---|---|
|
ColumnName |
tag1 |
tag2 |
tag3 |
The output of this would look like the following, using commas as the separator, and Container Name as the importing field, as defined when importing into Archive Shuttle: ContainerName,tag1,tag2,tag3
2.Save under CSV UTF-8 (Comma delimited) (*.csv).
3.Import the .csv file into the chosen grid.
If a comma is necessary in a cell, for example when separating a first name and a last name, then use the instructions below:
1.Add each value into its own cell. Use the table below as an example:
|
Column A |
Column B |
Column C |
Column D |
|---|---|---|---|
|
FirstName,LastName |
tag1 |
tag2 |
tag3 |
The output of this would look like the following, using semi colons as the separator, and Container Name as the importing field, as defined when importing into Archive Shuttle: "FirstName,LastName";tag1;tag2;tag3
2.Save under CSV UTF-8 (Comma delimited) (*.csv).
3.Import the .csv file into the chosen grid.
This is an overview page of all the Enterprise Vault (EV) environments that are needed for the migration project. New Enterprise Vault Directories can be added, and Archive Shuttle collects information about this Enterprise Vault directory through the assigned Archive Shuttle Enterprise Vault Collector module.
For every Enterprise Vault Directory, the table lists the following information:
·Vault Store Name
·Number of Archive in this Vault Store
·Total Item Count in this Vault Store
·Total Item Size in this Vault Store
·Total Shortcut Count in the archives associated mailbox
·Total Legal Hold Count
·Archive Gathering Enabled
·Backup Mode enabled
|
|
NOTE: The data values will only be shown on screen when Archive Gathering has been enabled, and an EV Collector module has been linked (see below) |
Actions to be performed on the EV Environment page
Add EV Directory: Adds an Enterprise Vault Directory to Archive Shuttle. The following information is needed in order to perform this action:
·Module to associate: Archive Shuttle Enterprise Vault Collector module which should be responsible for collecting information about this Enterprise Vault Directory.
·Display Name: Friendly name for this Enterprise Vault Directory. This is only a display name and can be used to identify this Enterprise Vault Directory.
·EV SQL Server: SQL Server name / instance where this Enterprise Vault Directory hosts its Directory database. This can be a hostname, a Fully Qualified Domain Name, an IP Address or all of the previous with a SQL Named Instance provided:
oExample: mysqlserver.mydomain.com
omysqlserver
o192.168.0.1
omysqlserver.mydomain.com\instance
omysqlserver\instance
o192.168.0.1\instance
|
|
NOTE: To configure the SQL server to use a port other than 1433, use a comma to define the port. Look at an example below to define a server using port 53179: Without configuration: 192.168.0.1\instance With configuration: 192.168.0.1\instance,53179 |
·EV SQL Database Name: Database name. Defaults to EnterpriseVaultDirectory. This entry is for display purposes only.
Sync all EV Environments: Queues an update request for all Enterprise Vault Directories by their respective Archive Shuttle Enterprise Vault Collector Modules.
Sync Active Directory: Queues an update request for all enabled Active Directory Domains by their respective Archive Shuttle Active Directory Collector modules.
Archive Gathering
Enable: Enable Archive Gathering for the selected Vault Store(s).
Disable: Disable Archive Gathering for the selected Vault Store(s).
Run Now: Queue an Archive Gathering request for the selected Vault Store(s).
Refresh: Refresh the information on the displayed EV Environment table.
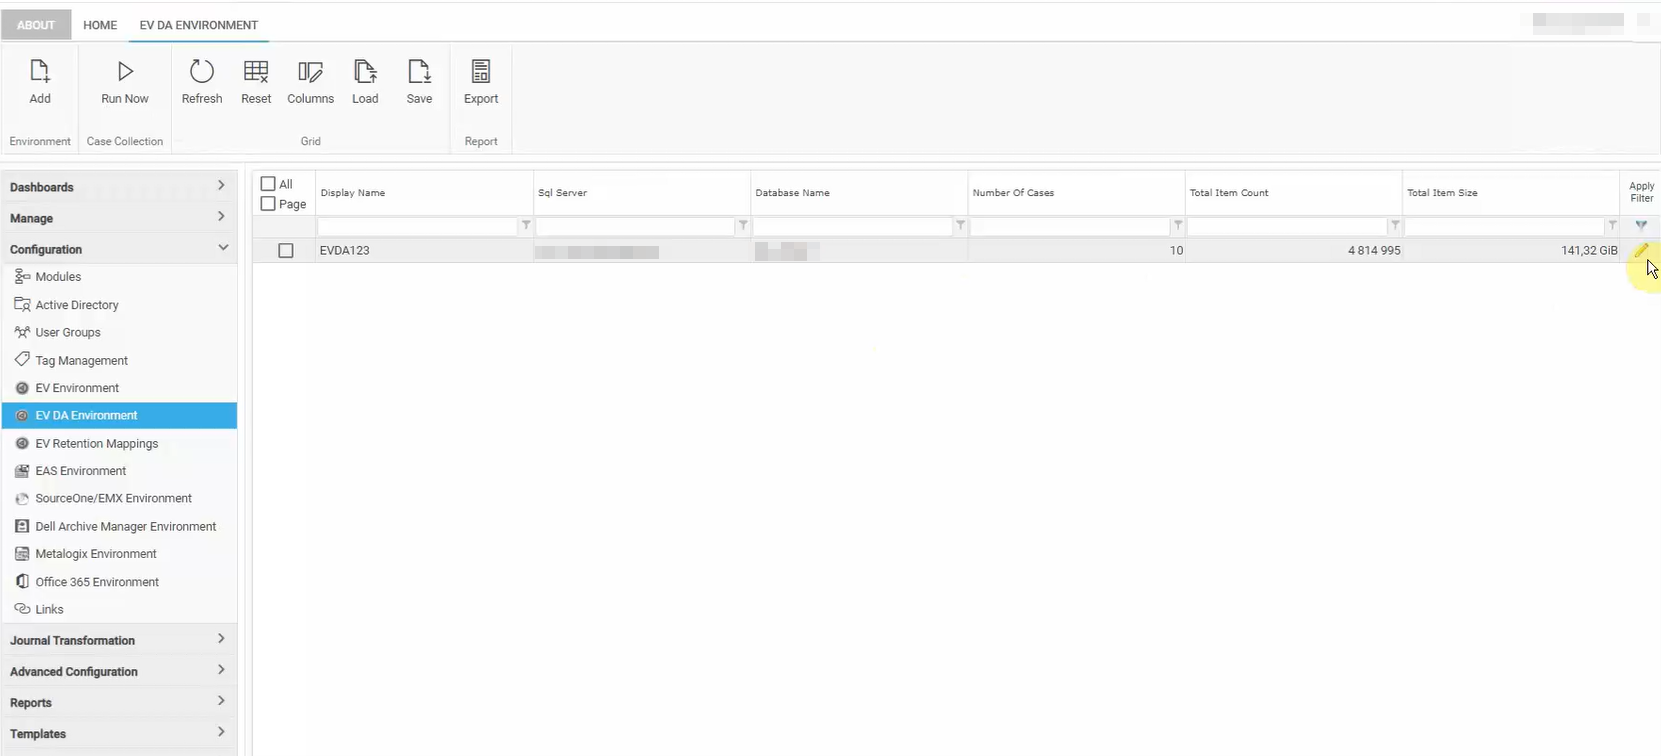
This is an overview page of Enterprise Vault Discovery Accelerator (EV DA) customers that are needed for the migration project. New EV DA customer databases can be added here, and Archive Shuttle collects information from the environment to get information about the cases associated with that customer database through the assigned Archive Shuttle Enterprise Vault Collector module.
|
|
NOTES: ·Enterprise Vault export and collector modules must run under the user account which has access to the Enterprise Vault and Enterprise Vault Discovery Accelerator server. ·An Enterprise Vault Discovery Accelerator environment requires dependency on an existing Enterprise Vault environment. |
EV DA cases will be shown on the bulk mappings, manual mappings and existing mappings pages as an archive type. Collection of items from EV DA cases are processed automatically after a mapping is created in the Bulk Mapping wizard (when collection of items is enabled.)
All target containers are supported for migration (Office 365, Exchange, Enterprise Vault, PST and Storage Import).
For more on Enterprise Vault Discovery Accelerator, click here.
User interface
For every Enterprise Vault Discovery Accelerator directory, the table lists the following information:
·Display Name
·SQL Server
·Database name
·Number of Cases
·Total Item Count
·Total Item Size
The actions you can take on this page are:
·Add: Add an EV DA environment.
·Run Now: Collect cases immediately.
·Refresh: Refresh table to show up to date statistics.
·Reset: Reset the grid to default layout.
·Columns: Choose which columns to display.
·Load: Load previously saved grid layout.
·Save: Save current grid layout. Click the Shared box to share the layout to other users.
·Export: Export grid into a .pdf, .xls, .xlsx or .csv format.
How to add an Enterprise Vault Discovery Accelerator environment
1.On the EV DA Environment page, click Add.
2.Select the module to associate with this environment. This module is responsible in collecting information on the EV DA directory.
3.Enter the Associated EV SQL server. This is the SQL server name/instance where this directory hosts its database. This can be a hostname, a Fully Qualified Domain Name, an IP Address or all of the previous with a SQL Named Instance provided. Examples include:
omysqlserver.mydomain.com
omysqlserver
o192.168.0.1
omysqlserver.mydomain.com\instance
omysqlserver\instance
o192.168.0.1\instance
4.Enter the EV DA SQL Server. If this value is empty, the value from the Associated EV SQL server field will be used instead.
5.Enter the EV DA customer database SQL database name. This is the name of the database associated with your EV DA customer in the Discover Accelerator user interface.
6.Enter the Link SQL server. This should be filled by default.
7.Click Add.
Repeat these steps for each EV DA customer you wish to add to Archive Shuttle.
Additional details
·Migration from EV DA cases supports the following filters:
oPath
oItem Date
oItem Size
·Journal Transformation is currently not supported.
·EV DA supports the migration of EML messages.