Granting Full Control on the Microsoft Exchange System Objects Organizational Unit
The Target Exchange Account used by Migration Manager for Exchange agents needs the Full Control permission on the Microsoft Exchange System Objects organizational unit (OU) in all domains in which target Exchange 2010 servers involved in public folder synchronization reside.
- In the Active Directory Users and Computers snap-in, right-click the Microsoft Exchange System Objects OU and click Properties.
|

|
NOTE: If there is no Microsoft Exchange System Objects OU, you should select View | Advanced Features in the Active Directory Users and Computers snap-in. |
- On the Security tab, click Add, and select the Target Exchange Account (in our example, QMM_Trg_Ex).
- Select the account name, and then enable the Allow option for the Full Control permission in the Permissions box.
- Click the Advanced button. In the Advanced Security Settings dialog box, select the account you specified on step 2, and click Edit.
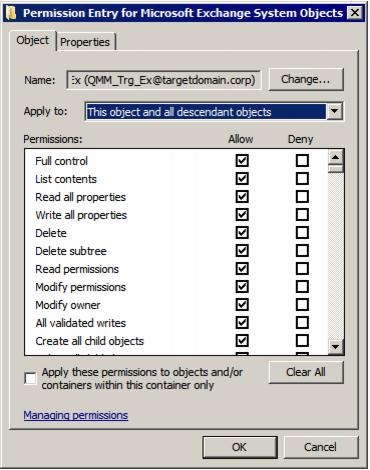
- In the Permission Entry dialog box, select This object and all descendant (child) objects from the Apply to drop-down list.
-
Close the dialog boxes by clicking OK.
Granting Permission to Make Public Folders Mail-Enabled
Granting Permission to Make Public Folders Mail‑Enabled
If a public folder is mail-enabled in the source organization, the Public Folder Target Agent needs to be able to make it mail-enabled in the target organization as well. To achieve this, assign your Target Exchange Account permissions to run the Enable-MailPublicFolder cmdlet, as follows:
- Add this account to the Public Folder Management group in the target Exchange 2010 organization:
- In the Active Directory Users and Computers snap-in select the Microsoft Exchange Security Groups node.
- In the right pane, right-click Public Folder Management group and click Properties .
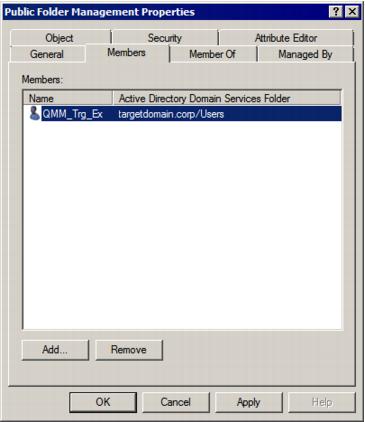
- On the Members tab click Add and select the Target Exchange Account (in our example, QMM_Trg_Ex).
- Close the dialog boxes by clicking OK
|

|
Caution: If the Target Exchange Account is located in another trusted forest, you cannot add the account to the Public Folder Management group. In this case grant the following permissions for the Exchange Administrative Group (FYDIBOHF23SPDLT) container and its descendant (child) objects to the account in the Configuration partition using the ADSIEdit snap-in:
- Modify public folder replica list permission
- Modify public folder deleted item retention permission
- Modify public folder quotas permission
|
- Give the account the Full Control permission on the CN=<ExchangeOrganizationName>,CN=Microsoft Exchange,CN=Services,CN=Configuration,DC=<...>,DC=<...> container:
-
- From the Start menu, select Run. In the Run dialog box, type ADSIEdit.msc. Click OK.
|

|
NOTE: If you have a Windows 2003 domain controller, the ADSIEdit utility, which is part of the Windows 2003 Support Tools, may not be installed. In this case install the Support Tools by running the Support\Tools\Suptools.msi file located on the Windows 2003 CD. |
- In the ADSIEdit snap-in, open the CN=<ExchangeOrganizationName>,CN=Microsoft Exchange,CN=Services,CN=Configuration,DC=<...>,DC=<...> container
- Right-click the CN=<ExchangeOrganizationName> container and click Properties.
- In the Properties dialog box, click the Security tab.
- On the Security tab, click Advanced.
- In the Advanced Security Settings dialog box, click Add.
- In the Select User, Computer, Service Account, or Group (or similar) dialog box, select the Target Exchange Account (in our example, QMM_Trg_Ex) and click OK.
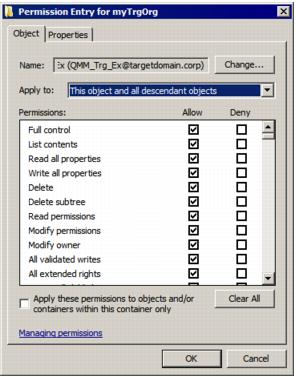
- In the Permission Entry for dialog box, select This object and all descendant (child) objects from the Apply to drop-down list.
- Allow Full Control permission for the Target Exchange Account.
-
Close the dialog boxes by clicking OK.
Granting Full Control on Exchange 2010 Mailboxes
The Target Exchange Account used by Migration Manager for Exchange agents needs the Full Control permission on each mailbox database involved in migration and on its associated public folder database if it exists.
To grant the required permissions to the <User> (in our example, LA\QMM_Trg_Ex), run the following two cmdlets in Exchange Management Shell:
Get-MailboxDatabase | Add-ADPermission -User <User> -AccessRights GenericAll -ExtendedRights Receive-As
Get-PublicFolderDatabase | Add-ADPermission -User <User> -AccessRights GenericAll -ExtendedRights Receive-As
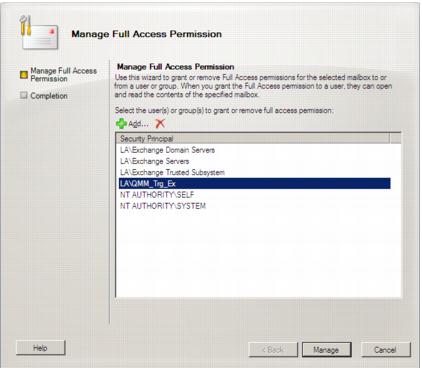
To verify that all permissions for the Target Exchange Account are set correctly, select any mailbox involved in the migration in the Migration Manager Console and check that the Target Exchange Account has Full Access permissions for the mailbox.
Granting Membership in Recipient Management Group
To perform Move mailbox operations, the Target Exchange Account needs to be assigned permissions to run the following cmdlets:
- New-MoveRequest
- Get-MoveRequest
- Remove-MoveRequest
- Get-MoveRequestStatistics
To grant these permissions, add the account to the Recipient Management group in the target Exchange 2010 organization, as follows:
- In the Active Directory Users and Computers snap-in select the Microsoft Exchange Security Groups node.
- In the right pane, right-click Recipient Management group and select Properties from the shortcut menu.
- On the Members tab click Add and select the Target Exchange Account (in our example, QMM_Trg_Ex).
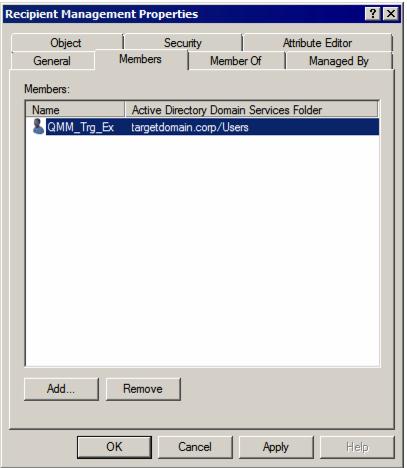
- Close the dialog boxes by clicking OK.


