Both migration and directory synchronization tasks are handled by the synchronization engine called the Directory Synchronization Agent (DSA).
Please refer to the System Requirements and Access Rights document for details about operating systems supported by the Directory Synchronization Agent. It can reside locally on the administrator’s workstation or can be installed on multiple computers in the network.
Agent Manager allows you to install and uninstall the Directory Synchronization Agents in your network and specify configuration parameters for them. You can also see which computers already have agents installed and the migration and synchronization jobs processed by each agent.
To start Agent Manager, in the Migration Manager console. select the Agent Manager command from the Tools menu.
To install the agent, in Agent Manager select Action | Install, or click the Install button on the toolbar. In the Install Agent dialog, type the name of the server to which you want to install the agent, and click OK.
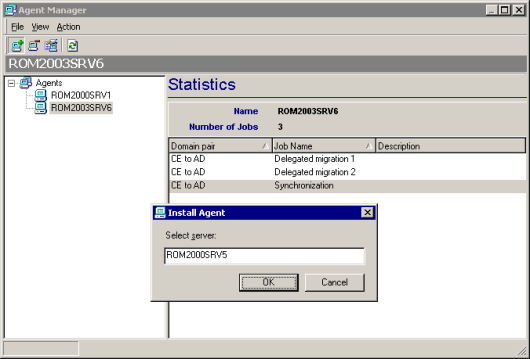
If you specify a remote server, a remote desktop connection is started and installation is performed in a terminal session. During agent installation, you are prompted for the ADAM or AD LDS instance, the credentials to access the ADAM/AD LDS instance and the project the agent will work with.
|
|
Caution: Before installing the agent, make sure that the ADAM/AD LDS port is opened on firewall for both inbound and outbound connections and the user you specify has the Log on as a service right on the server where you plan to install the agent. |
|
|
NOTE: Terminal Services must be running on the remote server to which you want to install the agent. Trust relationships must also be established between the domains where the console machine and the remote server are members. If for some reason you cannot install remotely, you can install the DSA by running the agent setup package (.msi) locally on that server. The agent setup package is located by default in the \Program Files\Quest Software\Migration Manager\Common\BIN\DeployDistr folder on the console and is also accessible through automatically created share \\<ConsoleComputer>\DSASetup\ share. |
On the specified server the Directory Synchronization AgentInstallation Wizard will start. Complete the wizard to install the DSA.
To uninstall a selected agent, select Uninstall from the Action menu or click the Uninstall button on the toolbar. You also can uninstall an agent by selecting the Uninstall option from the agent’s shortcut menu. Note that if you remove the last agent in a project, you cannot perform any migration activity until a new agent is installed.
For each Directory Synchronization Agent, you can set a number of parameters. To configure the agent, in Agent Manager, right-click the agent and select Properties.
The Preferences tab of the agent Properties dialog box displays the list of domains that take part in the current project and allows you to specify the preferred domain controllers and Global Catalog servers for each. To decrease possible delays and network traffic during migration and synchronization, for each Directory Synchronization Agent specify the domain controller and Global Catalog server located in the same site as the agent.

Click Edit on the selected domain in the list on the Preferences tab to specify the preferred DC and Global Catalog server for the domain.
Click Clear to remove the preferred DC and Global Catalog server settings for the selected domain.
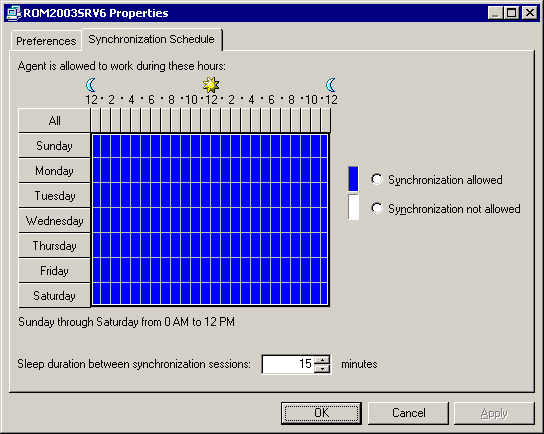
You can also specify the time periods when the agent is allowed to perform its synchronization jobs. To do this, in the agent Properties dialog box, click the Synchronization Schedule tab.
|
|
NOTE: The synchronization schedule you specify does not affect account migration. Migration jobs are processed by the Directory Synchronization Agent regardless of whether the agent is allowed to process synchronization jobs or not. |
For example, you may want to prohibit the agent from processing synchronization jobs during normal business hours. To specify the allowed and not allowed hours, select the area in the schedule map and select either the Synchronization allowed or the Synchronization not allowed option.
The directory synchronization jobs are processed by the agent in sessions. After each session completes, the agent is in an idle state for a time. The default sleep interval is 15 minutes. You can adjust this interval using the Sleep duration between synchronization sessions control.
|
|
NOTE: If an agent is running a session and the time period when the agent is not allowed to process directory synchronization jobs begins, the agent will stop processing the current session and enter an idle state until such time as it is permitted to work again. At that time, the agent will continue processing the session from the point where it stopped. You can set the preferred DC and Global Catalog server, synchronization schedule, and sleep interval for each Directory Synchronization Agent independently. |
During the Directory Synchronization Agent (DSA) installation, the credentials which used by DSA to connect to the ADAM or AD LDS instance are specified. If Migration Manager was installed using Express setup then DSA was installed automatically on the same computer as the Migration Manager Console and in this case DSA uses the auxiliary account to connect to ADAM or AD LDS instance.
Although it is not recommended to change DSA instance credentials, in some cases such as password expiration you may need to change them. To change the DSA instance credentials, take the following steps:
|
|
Caution: The following requirements must be met on each remote computer where DSA credentials are to be changed:
|
|
|
NOTE: To change the credentials for all DSA instances at once, you can right-click the Agents node in the left pane of the Agent Manager. |
The default synchronization job is set for a domain pair as soon as the domain pair is registered in Migration Manager. However, this job is not assigned to any Directory Synchronization Agent, and has only default settings that should be modified to suit your needs.
To configure the synchronization job, right-click the Synchronization node under the appropriate domain pair and select Properties from the shortcut menu.
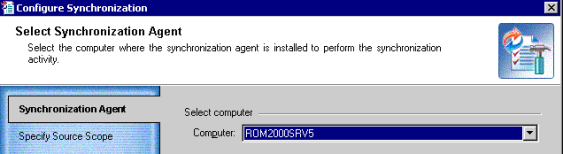
Select the synchronization agent that will process the synchronization job between the domains in the domain pair. You can select any agent that is installed. If you want to use an agent that is not yet installed, you must first install it using the Agent Manager. Refer to the Directory Synchronization Agenttopic for details.
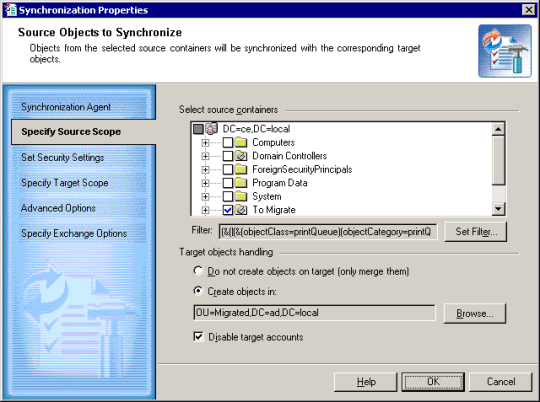
This step allows you to select the source containers for which objects should be synchronized with the corresponding target objects.
|
|
Caution: The OU hierarchy and the movement of objects between OUs are not synchronized. Both of these operations can be performed during migration sessions. |
Select the containers in the displayed source directory tree:
Set Filter—This button allows you to filter the specific objects to be synchronized from among all objects from the selected containers. For example, you might want to synchronize only users and groups and not synchronize computers, contacts, and all other objects.
Object Class—On this tab, you can select from the list the object classes that you want to be synchronized.
Exclude List—This tab allows you to explicitly select individual objects to be excluded from synchronization. Click Select, and then browse for and select the objects you want to exclude. You can also import objects to be excluded from a plain-text file by clicking Import. In the text file, specify object sAMAccountnames or distinguishedNames, one per line.
Advanced—You can specify a custom LDAP filter expression here. Type the LDAP query in the window and click OK.

Do not create objects on target (only merge them)—If this option is selected, no new objects will be created on target during synchronization. Only objects that already exist on target will be synchronized.
Create objects in—You can select whether the agent should create the objects on the target and select the container where the objects should be created. If this option is selected, all the new objects that do not exist on target will be created in the specified container. Click Browse to select the container from the target directory tree.
|
|
NOTE: If you select the Create objects in option, then for each source object for which the Directory Synchronization Agent cannot find a match in the target domain, it will create a new object in the OU you specify. If Exchange options are also configured in the directory synchronization job, the Directory Synchronization Agent may make target accounts mailbox-enabled like their corresponding source accounts. This depends on the options you set. However, if a conflict by e-mail addresses (the proxyAddresses attribute) arises when creating a mailbox for the newly-created target account, the agent will behave as follows:
|
Disable target accounts—By default the agent creates the target accounts as disabled accounts. If you want the state of the target account to be copied from the source account, clear this check box.
This step allows you to specify the security settings for the synchronization.
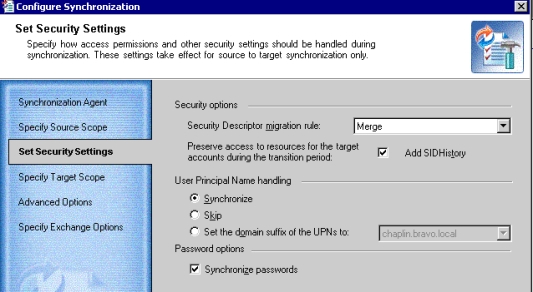
Security Descriptor migration rule—If two objects, source and target, are matched during synchronization by any matching criteria, you can select the way security descriptors of these objects will be handled.
For more information about objects matching criteria, refer to the Configuring a Domain Pair topic.
If the accounts are merged during synchronization, you have the opportunity to Merge, Replace, or Skip the security descriptors:
Add SIDHistory—Select this checkbox if you want to allow the target accounts to access the source domain resources using SIDHistory mechanism during the coexistence period. For more information on SIDHistory adding, see Adding SID History.
The User Principal Name handling section allows you specify how User Principal Names (UPNs) will be processed:
Synchronize passwords—Select this checkbox if you want to synchronize passwords for the accounts.
If one-way directory synchronization is established, the source account’s password will be applied to the target account only if it is newer than the one of the target account. No passwords will be applied from target to source accounts even if the target accounts’ passwords are newer.
In the case of two-way directory synchronization, the newer password values are synchronized to the opposite directory (that is, passwords are synchronized in both directions).
These rules apply to both initial and delta synchronization.
This step allows you to select the target directory objects that should be synchronized with the corresponding source objects. You can also select whether the agent should create the objects on the source and select the container where the objects should be created.
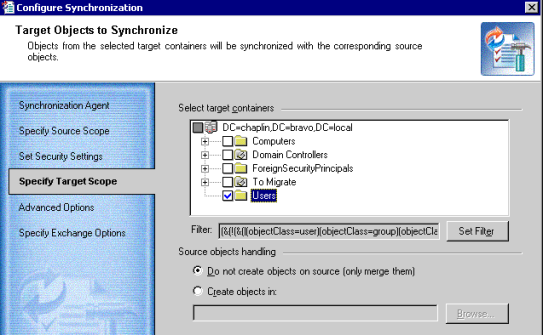
Do not create objects on source (only merge them)—If this option is selected, no new objects will be created on source during synchronization. Only the objects that already exist on source will be synchronized.
Create objects in—You can select whether the agent should create the objects on the source and select the container where the objects should be created. If this option is selected, all the new objects that do not exist on target will be created in the specified container. Click Browse to select the container from the source directory tree.
If you are planning to use a custom add-in to process the selected objects after they have been retrieved from the source domain and before they are synchronized to the target domain, select the Use custom add-in check box and browse for the .xml custom add-in file.
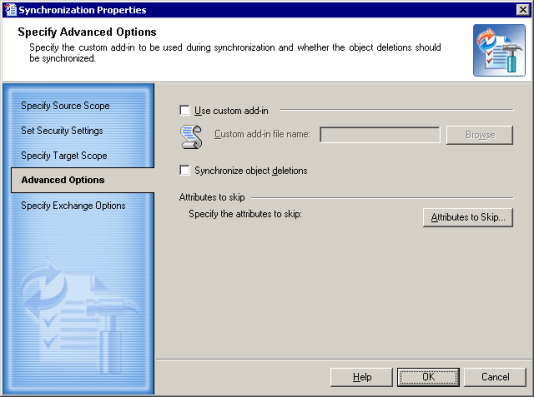
If you want object deletions to be synchronized as well, select the Synchronize object deletions check box. If an object in the source domain was deleted, the Directory Synchronization Agent will delete it from the target domain.
|
|
NOTE:
|
Select the check boxes next to the attributes you do not want to synchronize.
Use the Save Settings button if you want to use the same settings when you create another migration session. Click Load Settings to apply a set of attribute skipping options you saved earlier.
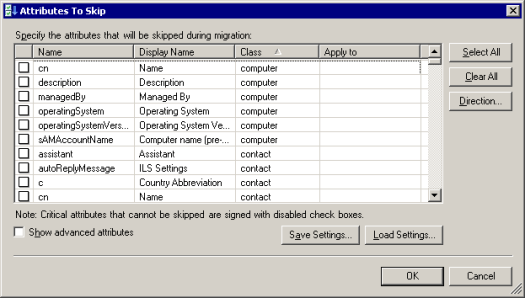
Direction—Click this button to specify the type of synchronization during which the attribute should be skipped:
Select the Show advanced attributes check box to choose from the complete list of attributes you can skip.
|
|
Caution: The Directory Synchronization Agent service attributes used by Migration Manager should never be skipped. Otherwise, Migration Manager will not be able to migrate and synchronize objects. |
If Exchange migration is planned for after directory migration, you may want to specify some options required for further Exchange messaging system synchronization.
|
|
NOTE: This step is displayed only when Exchange Server is installed in the source or target forest, or in both. |
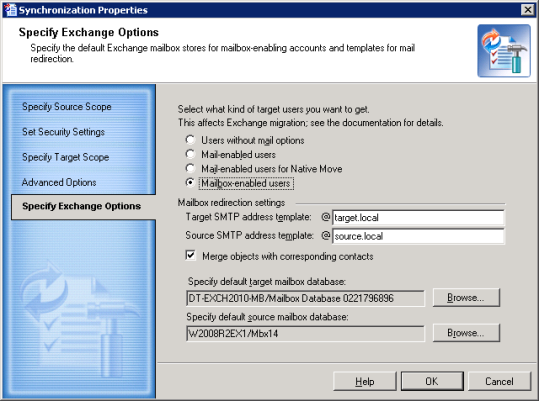
The group of options at the top lets you specify how the Directory Synchronization Agent should configure the target users' Exchange-related options:
| The Source User Was | The Target User Is |
|---|---|
| Without mail options | Without mail options |
| Mail-enabled | Without mail options |
| Mailbox-enabled | Without mail options |
|
|
NOTE: This option also affects groups and contacts. |
| The Source User Was | The Target User Is |
|---|---|
| Without mail options | Without mail options |
| Mail-enabled | Mail-enabled |
| Mailbox-enabled | Mail-enabled |
|
|
NOTE: This option also affects groups and contacts. |
| The Source User Was | The Target User Is |
|---|---|
| Without mail options | Without mail options |
| Mail-enabled | Mail-enabled |
| Mailbox-enabled | Mail-enabled user for Native Move |
|
|
NOTE: This option also affects groups and contacts. |
| The Source User Was | The Target User Is |
|---|---|
| Without mail options | Without mail options |
| Mail-enabled | Mail-enabled |
| Mailbox-enabled | Mailbox-enabled |
If you are merging source users with existing target users, one of three mail option configurations can be applied to each user:
In this case, the Directory Synchronization Agent uses the following logic to decide which configuration to apply:
|
|
NOTE: If you need to convert your existing mail-enabled users to mailbox-enabled users, select the Mailbox-enabled users option. This will work only for those users that are mailbox-enabled in the source. |
If Exchange migration is planned, use either the Mail-enabled users, Mail-enabled users for Native Move or the Mailbox-enabled users option. Your choice of option should depend on the details of the Exchange migration plans, as explained in the Exchange Migration Considerations topic.
For mail redirection purposes, the Directory Synchronization Agent adds the secondary SMTP address to the proxy addresses list of the mailbox-enabled object (the proxyAddresses attribute). You can specify the SMTP address templates to create the secondary SMTP addresses that will be applied to the source and target mailbox-enabled objects.
|
|
Caution: You should analyze your environment for SMTP namespaces and for redirection implement SMTP address templates that are NOT being used. |
To forward mail to a recipient in another Exchange organization, the Directory Synchronization Agent populates the target address property (the targetAddress attribute) of either the source or target mailbox, depending on which mailbox is currently being used, with the additional SMTP address created for redirection.
Target SMTP address template—Specify the SMTP address template for the target accounts so that the target users receive their mail during the synchronization.
Source SMTP address template—Specify the SMTP address template for the source accounts so that the source users receive their mail during the synchronization.
If contacts with the same SMTP or X500 address as the synchronized objects already exist in the opposite directory, Migration Manager can merge SMTP addresses and membership for these objects and delete the corresponding contacts. To use this functionality, select the Merge objects with corresponding contacts check box. This option is applicable if you select the Mail-enabled users, Mail-enabled users for Native Move or the Mailbox-enabled users option above.
For uninterrupted user collaboration during the migration, users in each source and target Exchange organization should see other users in their Global Address Lists. That is why two mailboxes, source and target, exist for each user. However, all mail sent to the user should arrive to the mailbox he or she is currently using, no matter which mailbox it was sent to. To achieve this, mail should be automatically forwarded to the currently-used mailbox from the other mailbox.
Direct forwarding to a recipient in another Exchange organization can be done by using the target address property of the mailbox.
Target mailbox database—Specify the mailbox database where the target users should get mailboxes. This option is required if you selected Mail-enabled users or Mailbox-enabled users above.
|
|
NOTE:
|
Source mailbox database—Specify the mailbox database where the source users should get mailboxes. Use this option only if two-way mailbox synchronization is expected and the source users did not originally have mailboxes (that is, were mail-enabled or had no mail options). This option is required if you selected Mailbox-enabled users above.
After you have configured the directory synchronization job for a pair of domains, you can start this job. To start directory synchronization between a pair of domains, complete the following steps:
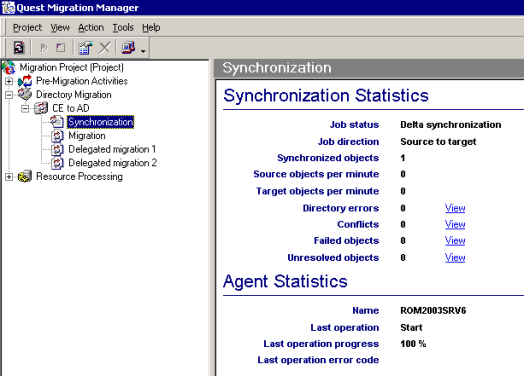
Use the Synchronization Statistics and Agent Statistics screens to track the synchronization job status and progress. For more information about viewing the directory synchronization statistics, refer to the Viewing Directory Synchronization Statisticstopic.
|
|
NOTE: The first time you start a synchronization job, the first Directory Synchronization Agent session starts and full resynchronization takes place. The job status on the Synchronization Statistics screen is displayed as Initial synchronization. All objects in source domain and also objects in target domain if two-way synchronization is performed, are enumerated during the initial sync, but only the objects from the specified source and target scopes are synchronized. After the first synchronization session is completed, only delta changes are synchronized during the subsequent sessions. |
To stop directory synchronization between a pair of domains, complete the following steps:
The following changes to the synchronization job require full directory re-synchronization:
The following changes made to the domain pair configuration also result in full directory re-synchronization:


