This section explains how to create a new domain pair in the migration project.
|
|
NOTE: Before you create a domain pair, at least one Directory Synchronization Agent should be installed in your environment. Refer to the Directory Synchronization Agent topic for more details. |
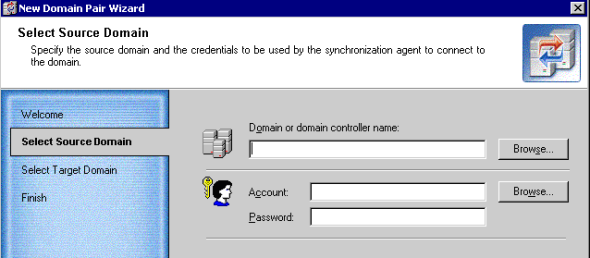
To create a domain pair, right-click the Directory Migration node and select New Source and Target Domain Pair from the shortcut menu. This will start the New Domain Pair Wizard, which will guide you through the process:
Specify or browse to the domain controller of the domain that you want to make a source for the migration.
Specify the credentials for accessing the domain controller.
|
|
NOTE: Please note that the account you specify will be used by the Directory Synchronization Agent to access the source domain objects and to perform directory migration. Specified account should be a member of Administrators group in the source domain, or in accordance with the least privilege principle a Preinstalled Service feature should be configured and enabled. |
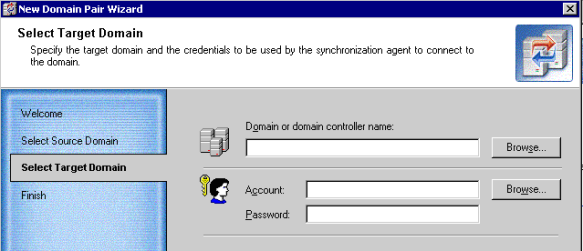
Specify or browse to the domain controller of the domain that you want to make a target of migration.
Specify the credentials for accessing the domain controller.
|
|
NOTE: Please note that the account you specify on this page will be used by the Directory Synchronization Agent for accessing the target domain objects and to perform directory migration. Specified account should be a member of Administrators group in the target domain, or in accordance with the least privilege principle a Preinstalled Service feature should be configured and enabled. |
The wizard displays the names of the source and target domains and the accounts you specified for connecting to domains.
As soon as a domain pair is created, it will be displayed in the Migration Manager console management tree as a node having two sub-nodes, Migration and Synchronization.
After you have created a domain pair, you can specify configuration parameters for the domain pair. To do this, right-click the domain pair and select Properties. The parameters you can specify are described in the related topics.
|
|
NOTE: Modifying these parameters requires full directory resynchronization. You must stop the synchronization job for the domain pair and then restart it using the Start and Re-sync option. |
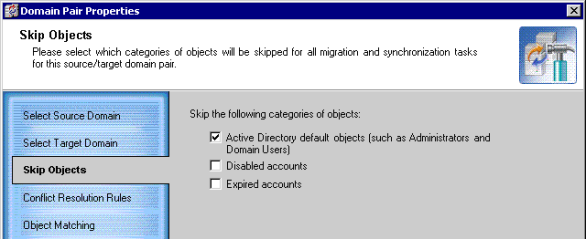
This step allows you to specify the categories of objects that will be skipped during processing for all migration and synchronization tasks. You can select to skip the following types of objects:
If you select to skip any of these objects, you will not see them and therefore will not be able to select them when you browse the source or target domain of the domain pair.
You can specify the attributes that are to be unique within the given scope (forest, domain, or container) on source and target, and the action to be performed if these attributes are not unique (i.e., two or more objects exist with the same value for a specified attribute). This is done by setting conflict resolution rules.
|
|
NOTE: The conflict resolution rules you specify affect both migration and synchronization. |

Click Add to set a new rule for automatic conflict resolution and make the appropriate settings in the New Conflict Resolution Rule dialog box, described below.
Click Edit to edit an existing conflict resolution rule.
Click Remove to remove the selected conflict resolution rule from the list.
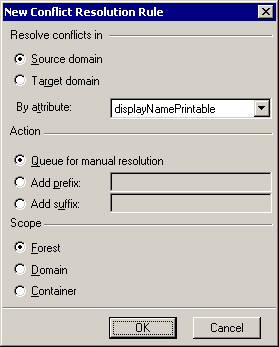
The rule consists of the following settings:
This step allows you to specify attributes for object matching during migration and synchronization.
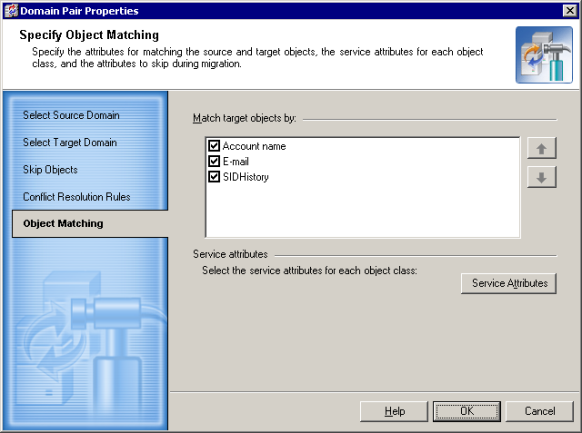
The Directory Synchronization Agent will match the source and target objects according to the attributes selected for object matching. If the agent cannot find a matching object in the target directory, a new object is created in this directory and its attributes are populated with the values of the corresponding source object.
|
|
NOTE: The object matching rules you specify affect both migration and synchronization. |
The Match target objects by dialog box displays the fixed list of attributes that can be used to match source and target objects. These attributes are:
Select the attributes you want to use for matching the source and target objects. Matching will be performed in top-down priority. To change the attribute priority, use the up and down arrow buttons.
When two objects are matched, the information about matching is written to the service attribute specified to store the matching information. See the Service Attributes section for more details.
The service attributes are used by the agent to store its internal information. Click Service Attributes on the Match target objects by dialog box to specify the attributes for each of the source and target object classes.
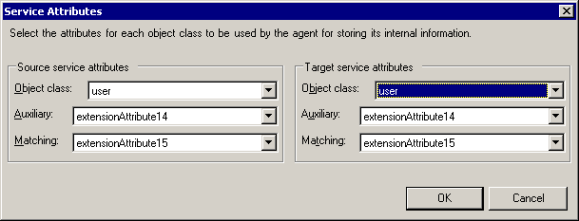
Object class—Specifies the object class for which you want to specify service attributes. In most cases you can use the default attributes.
Auxiliary—Specifies the attribute for storing information about conflict resolution and other service information. The attributes selected by default to store the auxiliary information for different object classes are listed below.
If Exchange is deployed in the forest, the following attributes are used:
| Object Class | Auxiliary Attribute |
|---|---|
|
contact |
extensionAttribute14 |
| container | adminDescription |
| group | extensionAttribute14 |
| inetOrgPerson | extensionAttribute14 |
| organizationalUnit | adminDescription |
| printQueue | adminDescription |
| user | extensionAttribute14 |
| volume | adminDescription |
If there is no Exchange in the forest, then by default the adminDescription attribute is used to store auxiliary information for all object classes.
Matching—When two objects are matched, the Global Unique Identifier (GUID) of the corresponding object is written to the service attribute selected to store information about matching. The attributes selected by default to store the matching information for different object classes are listed below.
If Exchange is deployed in the forest, the following attributes are used:
| Object Class | Auxiliary Attribute |
|---|---|
|
contact |
extensionAttribute15 |
| container | adminDisplayName |
| group | extensionAttribute15 |
| inetOrgPerson | extensionAttribute15 |
| organizationalUnit | adminDisplayName |
| printQueue | adminDisplayName |
| user | extensionAttribute15 |
| volume |
adminDisplayName |
If there is no Exchange in the forest, then by default the adminDisplayName attribute is used to store matching information for all object classes.
|
|
Caution: The service attributes must meet the following criteria:
|
Before you start your migration activities, be sure to install at least one Directory Synchronization Agent in your environment. You should also create in the migration project the pairs of source and target domains that will be involved in the migration and directory synchronization processes. Refer to the Directory Synchronization Agent and Creating a Domain Pair topics of this document for more details.
As soon as a domain pair is created, it will be displayed in the Migration Manager console management tree as a node having two sub-nodes, Migration and Synchronization.
The Synchronization node shows the template created for the directory synchronization job. The job can be further configured and started to perform object synchronization between the two domains. For more information about directory synchronization, refer to the Directory Synchronization topic.
Using the Migration node, you can create migration sessions. Each migration session is basically a group of accounts to be migrated from the source domain to the target domain. The Migration Wizard will help you migrate the selected objects within the source-target domain pair along with the objects’ properties and security settings. Also, during migration you can change, in bulk, any of the attributes of the accounts being migrated by simply importing a tab-separated list with the new values. As soon as the selected objects have been migrated to the target domain, the session is considered to be complete.
The history and configuration of the session is stored in the database and can be viewed when necessary.


