|
1 |
On the navigation panel, under Dashboards, click Storage & SAN > Storage Explorer. |
|
2 |
|
3 |
In the Summary tab, review performance in terms of key metrics. |
|
• |
Details. Displays physical details about the selected director. |
|
• |
Charts. Plot values over the time period for these metrics, if available: Ops Rate, Data Rate, % Busy, Frontend Abort, and Average Queue Depth. |
|
• |
Alarm Summary. Displays alarms on the selected director. To investigate further, click an alarm. See Assessing Storage Alarms. |
|
4 |
|
1 |
On the navigation panel, under Dashboards, click Storage & SAN > Storage Explorer. |
|
2 |
|
3 |
In the Summary tab, review performance in terms of key metrics. |
|
• |
Details. Displays physical details about the selected port. |
|
• |
Charts. Plot values over the time period for these metrics, if available: Ops Total, Bytes Read, Bytes Write, Read Latency, and Write Latency. |
|
• |
Alarm Summary. Displays alarms on the selected port.To investigate further, click an alarm. See Assessing Storage Alarms. |
|
1 |
On the navigation panel, under Dashboards, click Storage & SAN > Storage Explorer. |
|
2 |
|
3 |
In the Summary tab, review performance in terms of key metrics. |
|
• |
Details. Displays the Virtual Volumes’s status, physical details, parent device and capacity metrics. |
|
• |
Data Rate Chart. Shows the history Data Rate of the virtual volume. |
|
• |
Latency Chart. Shows the history Latency of the virtual volume.Alarm Summary. Displays alarms on the VPLEX array. |
|
• |
Alarm Summary. Displays alarms on the selected virtual volume. To investigate further, click an alarm. See Assessing Storage Alarms. |
|
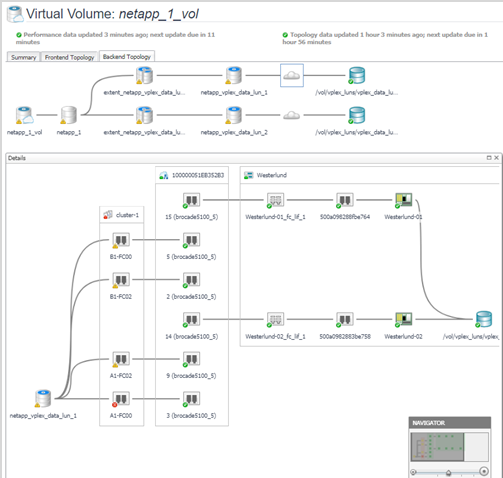
4 |
In the Frontend Topology tab, displays the dependency mapping from virtual machines to the virtual volume. Click a cloud node to display the network dependency mapping from VM disks to the virtual volume. |
|
5 |
In the Backend Topology tab, displays the dependency mapping from the virtual volume to the destination LUNs. Click a cloud node to display the network dependency mapping from the virtual volume to the destination LUNs. |
|
1 |
On the navigation panel, under Dashboards, click Storage & SAN > Storage Explorer. |
|
2 |
|
3 |
In the Summary tab, review performance in terms of key metrics. |
|
• |
Details. Displays the storage volume’s status, physical details, parent device, and size if available. |
|
• |
|
• |
Alarm Summary. Displays alarms on the selected storage volume. To investigate further, click an alarm. See Assessing Storage Alarms. |
|
4 |
In the Topology tab, displays the dependency mapping from virtual volumes to the storage volume, and the dependency mapping from the storage volume to destination LUNs. Click a cloud node to display the network dependency mapping from the storage volume to destination LUNs. |
