Tchater maintenant avec le support
Tchattez avec un ingénieur du support

DR Series Software 4.0.4 - Administration Guide

Introducing the DR Series system documentation Introducing the DR Series system Setting up the DR Series system Configuring the DR Series system settings Managing containers Managing replications Monitoring the DR Series system Using GlobalView Configuring and using Rapid NFS and Rapid CIFS Configuring and using Rapid Data Access with NetVault Backup and with vRanger Configuring and using RDA with OST
Understanding RDA with OST Guidelines Terminology Supported RDA with OST software and components Best Practices: RDA with OST and the DR Series System Setting client-side optimization Configuring an LSU Installing the RDA with OST plug-in Configuring DR Series system information using NetBackup Backing up data from a DR Series system with NetBackup Using Backup Exec with a DR Series system (Windows) Understanding the OST CLI commands Understanding RDA with OST Plug-In Diagnostic Logs Collecting diagnostics by using a Linux utility Guidelines for gathering media server information
Configuring and using VTL Configuring and Using Encryption at Rest Support, maintenance, and troubleshooting Supported Ports in a DR Series system About us

Local console connection

To configure a local console connection, you must make the following two rear chassis cables connections:
  • VGA port and your video monitor
  • USB port and your keyboard

DR4000

To make local console cable connections for the DR Series system appliance, complete the following steps.

  1. Locate the VGA monitor port and the USB ports on the back of your system. See Figure 3 for the VGA and USB port locations and complete steps 1 to 4. For the DR4100/DR6000 system, skip to step 5.
  2. Connect the video monitor to the VGA port on the back of your system (see item 1 in the DR4000 System Rear Chassis Port Locations table).
  3. Connect the USB keyboard to one of the two USB ports on the back of your system (see item 3 in DR4000 System Rear Chassis Port Locations table).
  4. You are now ready to perform initialization using the DR Series system CLI login process. For more information, see Logging in and Initializing the DR Series System.

Figure 8: DR4000 System Rear Chassis Port Locations
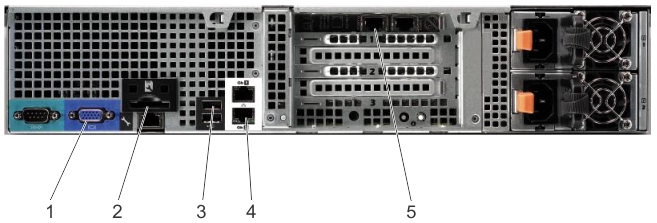
    The figure shows the DR4000 system rear chassis
port and connector locations.

    Item Indicator, Button, or Connector Icon Description
    1 Video connector Connects a VGA display to the system.
    2 iDRAC6 Enterprise port Dedicated management port for the iDRAC6 Enterprise card.
    3 USB connectors (2) Connects USB devices to the system. The ports are USB 2.0-compliant.
    4 Ethernet connectors (2) Embedded 10/100/1000 NIC connectors.
    5 Ethernet Connectors (2) on expansion card   1-GbE/10-GbE/10-GbE SFP+ Ethernet Port

DR4100/DR6000

To make local console cable connections for the DR4100 or DR6000 system appliance, complete the following steps:

NOTE: For the 1–GbE ports, these are two internal LAN on Motherboard (LOM) ports referenced in item 4 above that reside on the motherboard, and two ports on an expansion card referenced in item 5 above. If the system is using the two 10–GbE ports, these reside on an expansion card referenced in item 5 above.

  1. Locate the VGA monitor port and the USB ports on the back of your system. See Figure 3 for the VGA and USB port locations and complete steps 5 to 8.
  2. Connect the video monitor to the VGA port on the back of your system (see item 2 in the DR4100/DR6000 System Rear Chassis Port Locations table).
  3. Connect the USB keyboard to one of the two USB ports on the back of your system (see item 3 in the DR4100/DR6000 System Rear Chassis Port Locations table).

You are now ready to perform initialization using the DR Series system CLI login process. For more information, see Logging in and Initializing the DR Series System.

Figure 9: DR4100/DR6000 System Rear Chassis Port Locations

The figure shows the DR4100 system rear chassis
port and connector locations.

Item Indicator, Button, or Connector Icon Description
1 iDRAC7 Enterprise port Dedicated management port for the iDRAC7 Enterprise card (port is available only if an iDRAC7 Enterprise license is installed on your system).
2 Video connector Connects a VGA display to the system.
3 USB connectors (2) Connects USB devices to the system. The ports are USB 2.0-compliant.
4 Ethernet connectors (4) Four integrated 10/100/1000 NIC connectors, or four integrated connectors that include:
  • Two 10/100/1000 Mbps NIC connectors
  • Two 100 Mbps/1 Gbps/10 Gbps SFP+/10-GbE T connectors
5 PCIe expansion card slots (3)   Connect up to three full-height PCI Express expansion cards
6 Hard drives (2)   Provides two hot-swappable 2.5-inch hard drives

NOTE: The DR4100/DR6000 system supports up to six 1–GbE ports or up to two 10–GbE ports. For the 1–GbE ports, these are four internal LAN on Motherboard (LOM) ports referenced in item 4 above that reside on the network daughter card (NDC), and two additional ports on a PCI Express expansion card referenced in item 5 above. If the system is using the two 10–GbE ports, these ports reside on the NDC.

DR4300e/DR4300/DR6300

To make local console cable connections for the DR4300e, DR4300, or DR6300 system appliance, complete the following steps:

  1. Locate the VGA monitor port and the USB ports on the back of your system. See Figure 3 for the VGA and USB port locations and then complete steps 10 to 12.
  2. Connect the video monitor to the VGA port on the back of your system (see item 6 in the DR4300e/DR4300/DR6300 System Rear Chassis Port Locations table).
  3. Connect the USB keyboard to one of the two USB ports on the back of your system (see item 7 in the DR4300e/DR4300/DR6300 System Rear Chassis Port Locations table).
  4. You are now ready to perform initialization using the DR Series system CLI login process. For more information, see Logging in and Initializing the DR Series System.

Figure 10: DR4300e/DR4300/DR6300 System Rear Chassis Port Locations
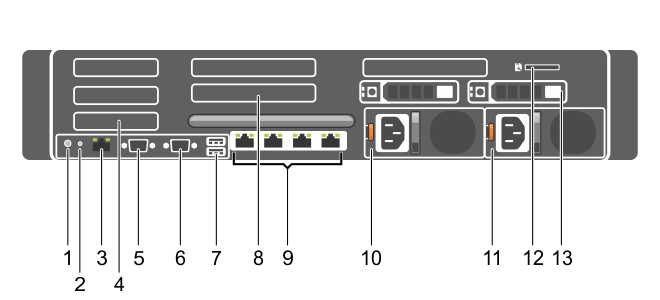
The figure
shows the DR4300 system rear chassis port and connector locations.

Item Indicator, Button, or Connector Icon Description
1 System identification button The identification buttons on the front and back panels can be used to locate a particular system within a rack. When one of these buttons is pressed, the system status indicator on the back flashes until one of the buttons is pressed again.Press the button to toggle the system ID on and off. If the system stops responding during POST, press and hold the system ID button for more than five seconds to enter BIOS progress mode. To reset iDRAC (if not disabled in F2 iDRAC setup) press and hold the button for more than 15 seconds.
2 System identification connector   Connects the optional system status indicator assembly through the optional cable management arm.
3 iDRAC8 Enterprise port Dedicated management port for the iDRAC7 Enterprise card (The port is available for use only if the iDRAC8 Enterprise license is installed on your system.)
4 PCIe expansion card slots half height (3)  

Allows you to connect up to three half-height PCI Express expansion cards.

5 Serial connector

Allows you to connect a serial device to the system.

6 Video connector Connects a VGA display to the system.
7 USB connectors (2) Connects USB devices to the system. The ports are USB 3.0-compliant.
8

PCIe expansion card slots full height (3) (Dell PowerEdge R730xd)


Allows you to connect up to three full-height PCI Express expansion cards.

9 Ethernet connectors (4)

Four integrated 10/100/1000 Mbps Network Interface Card (NIC) connectors or four integrated connectors that include:

  • Two 10/100/1000 Mbps NIC connectors

  • Two 100 Mbps/1 Gbps/10 Gbps SFP+/10 GbE T connectors

10

Power supply (PSU1)


AC

495 W, 750 W, or 1100 W

or

DC

750 W or 1100 W

11

Power supply (PSU2)


AC

495 W, 750 W, or 1100 W

or

DC

750 W or 1100 W

12 vFlash media card slot

Allows you to insert a vFlash media card.

13 Hard drives (2) (back)  

Allows up to two hot-swappable 2.5 inch hard drives.

iDRAC connection

The iDRAC connection requires a network connection between the integrated Dell Remote Access Control (iDRAC) management port on the DR Series system and another computer running the iDRAC remote console session in a supported browser. The iDRAC provides remote console redirection, power control, and the out-of-band (OOB) system management functions for the DR Series system. iDRAC connections are configured using console redirection and the iDRAC6/7 web interface. The login values you can use for making iDRAC connections are:

  • Default username: root
  • Default password: calvin
  • Default static IP address: 192.168.0.120

For information about configuring the iDRAC, see the Dell RACADM Reference Guides at support.dell.com/manuals and the topic, Accessing iDRAC6/iDRAC7 Using RACADM.

When the DR Series System splash screen is displayed, you are ready to begin initialization using the DR Series system CLI logon process. For more information, see Logging in and Initializing the DR Series System.

Accessing iDRAC6/iDRAC7 by using RACADM

You can use SSH-based or Telnet-based interfaces to access iDRAC6/iDRAC7 by using the RACADM utility. RACADM (remote access controller administration) is a command-line utility that allows you to set up and configure the integrated Dell Remote Access Control (iDRAC) interface card to provide an out-of-band management capability.

The iDRAC card contains a controller with its own processor, memory, network connection, and access to the system bus. This gives system or network administrators the capability to configure a system as if they were sitting at the local console using the power management, virtual medial access and remote console capabilities, by using a supported web browser or command line interface.

The logon values you can use for making iDRAC connections are:

  • Default username: root
  • Default password: calvin
  • Default static IP address: 192.168.0.120

For more information, see the RACADM Reference Guides for iDRAC, the Integrated Dell Remote Access Controller 6 (iDRAC6) User Guide, or the Integrated Dell Remote Access Controller 7 (iDRAC7) User Guide that are available at support.dell.com/manuals.

Logging on and initializing the DR Series system

Before you can start to use the DR Series system graphical user interface (GUI) for the first time, you must initialize the system.

The Initial System Configuration Wizard lets you configure the following network settings to complete the first-time initialization of your system:

  • IP addressing mode
  • Subnet mask address
  • Default gateway address
  • DNS suffix address
  • Primary DNS server IP address
  • (Optional) Secondary DNS server IP address
  • Host name for system

When you initialize the system you will log on to the DR Series system CLI by using a local console KVM (keyboard-video monitor) connection or an iDRAC connection. (For more information, see the topic, Local Console Connection, or iDRAC Connection.) You will then configure your system network settings by using the Initial System Configuration Wizard as described in the steps below.

To log on and initialize the DR Series system, complete the following steps:

  1. Launch a terminal emulator application (like PuTTY), and type the default IP address for the DR Series system (if you are not using iDRAC or local console).
  2. At the login as: prompt, type administrator, and press <Enter>.
  3. At the administrator@<system_name> password: prompt, type the default administrator password (St0r@ge!), and press <Enter>.

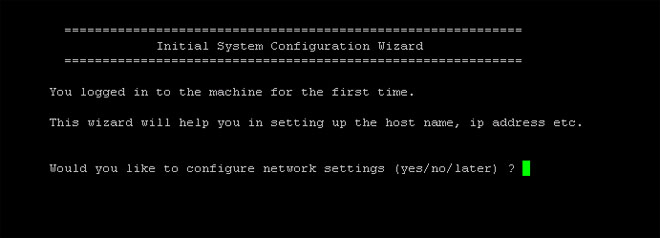
    Figure 11: Initial System Configuration Wizard Window

    The figure shows the initial system configuration
wizard window.

  4. To configure the network settings, type y (for yes), and press <Enter>.
  5. To configure the use of the default IP address that ships with the system, choose to use static IP addressing.

    To do this, at the DHCP prompt, type no (this selects static IP addressing), and press <Enter>.

    NOTE: When you select static IP addressing, you are prompted to type the static IP address (for example, you could use the default IP, 10.77.88.99) for the system, and press <Enter>. If your network supports the use of DHCP, type yes at the DHCP prompt, press <Enter>, and respond to any prompts.

  6. To configure a subnet mask address, type the subnet mask address you want to use (for example, you could use the default subnet mask address, 255.0.0.0), and press <Enter>.
  7. To configure a default gateway address, type the default gateway address you want to use (for example, 10.10.20.10), and press <Enter>.
  8. To configure a DNS Suffix, type the DNS suffix you want to use (for example, storage.local), and press <Enter>.
  9. To configure a primary DNS server IP address, type an IP address you want to use for the primary DNS server (for example, 10.10.10.10), and press <Enter>.
  10. (Optional) To configure a secondary DNS server IP address, type y (for yes), and press <Enter>.

    If you responded yes, type an IP address you want to use for the secondary DNS server (for example, 10.10.10.11), and press <Enter>.

  11. To change the default host name (for example, the serial number of the DR Series hardware appliance), type y (for yes) and press <Enter>.

    If you responded yes, type the host name you want to use, and press <Enter>. After you configure your host name response, the current system settings are displayed.

  12. To accept these settings, type y (for yes), and press <Enter>.
  13. If you want to change any of these settings, type n (for no), and press <Enter>. Modify the settings as needed, and press <Enter>.

    When completed, a successful initialization message is displayed.

  14. At the prompt, type exit and press <Enter> to end the DR Series system CLI session.

You are now ready to log in to the system using the DR Series system GUI.

NOTE: Before you log on to the system in the DR Series system GUI, make sure to register it in the local Domain Name System (DNS) for your network so that it is a DNS-resolvable entry.

NOTE: At this point, you could modify the bonding mode to use 802.3ad, if this configuration is available in your network.

Documents connexes

The document was helpful.

Sélectionner une évaluation

I easily found the information I needed.

Sélectionner une évaluation