
Synchronizing Address Book Manager
Synchronization with the Microsoft Exchange servers keeps groups and mailboxes up to date so that emails can be archived without problems. With the Address Book Manager, you can set up automatic synchronization schedules and initiate manual synchronization of various artifacts.
In this topic:
·Steps to perform a manual synchronization
·Steps to schedule automatic synchronization
Steps to perform a manual synchronization
1.Open Address Book Manager by clicking the toolbar icon 
2.The Synchronization tab opens by default.
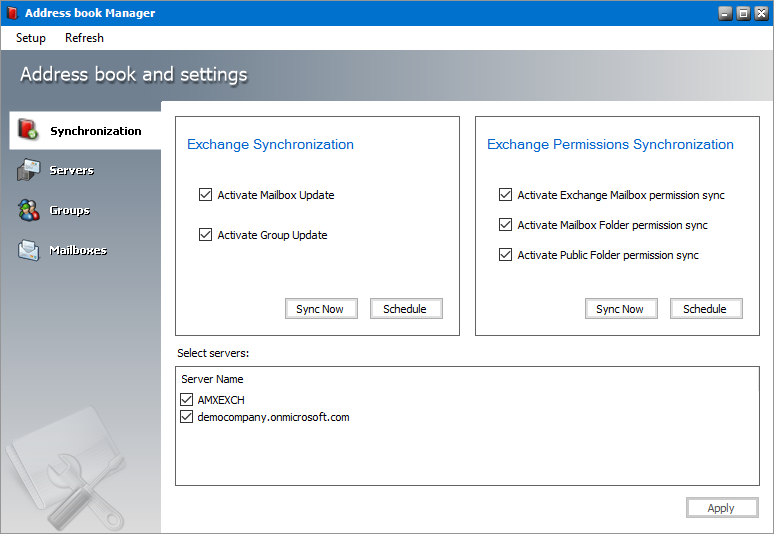
3.Select the Microsoft Exchange mailboxes, groups and permissions that you want to synchronize.
4.In the Select servers box, select the Microsoft Exchange servers with which you want to synchronize the mailboxes, groups and permissions.
5.Click Apply to confirm the settings.
6.Click Sync Now in the Microsoft Exchange Synchronization box to manually initiate the synchronization of the mailboxes and groups with the selected Microsoft Exchange servers.
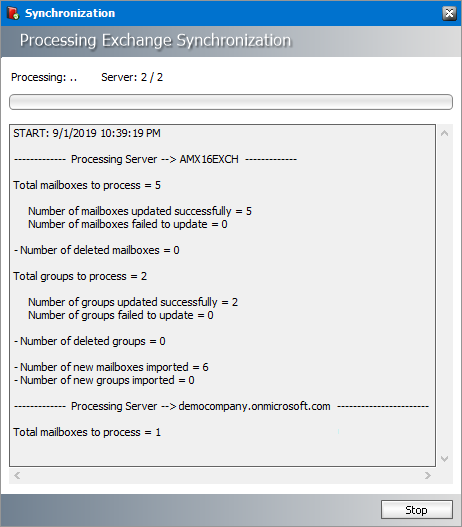
7.Click Stop to halt the synchronization process before it completes. When the process completes, click the Close button that appears. You can find the results of the synchronization process in a log file located at C:\Program Files (x86)\Metalogix\MAM4Exchange\Log\Synchronization_<timestamp>.log
8.Click Sync Now in the Microsoft Exchange Permissions Synchronization box to manually initiate the synchronization of the mailboxes and groups with the selected Microsoft Exchange servers.

9.Click Stop to halt the synchronization process before it completes. When the process completes, click the Close button that appears. You can find the results of the synchronization process in a log file located at C:\Program Files (x86)\Metalogix\MAM4Exchange\Log\Synchronization_<timestamp>.log
Steps to schedule automatic synchronization
1.Open Address Book Manager by clicking the toolbar icon
2.The Synchronization tab opens by default.
3.Select the Microsoft Exchange mailboxes, groups and permissions that you want to synchronize.
4.In the Select servers box, select the Microsoft Exchange servers with which you want to synchronize the mailboxes, groups and permissions.
5.Click Schedule in the Exchange Synchronization box. The Exchange Synchronization Scheduler dialog appears.
-or-
Click Schedule in the Exchange Permissions Synchronization box. The Exchange Permissions Synchronization Scheduler dialog appears.
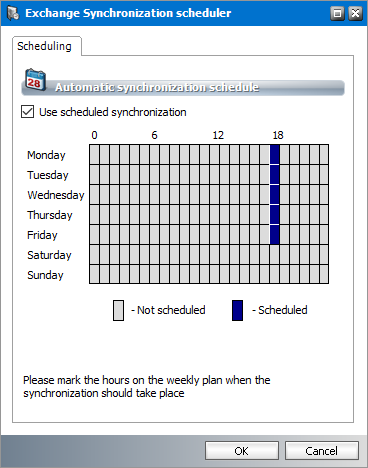
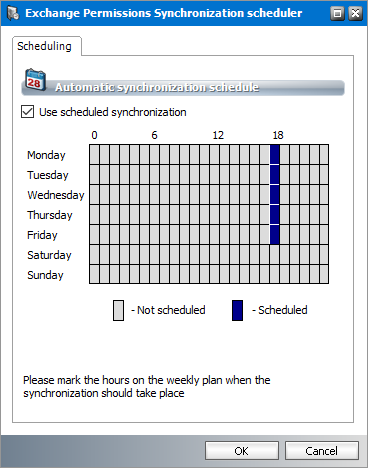
6.Select Use scheduled synchronization to activate the synchronization calendar. Each row corresponds to a day of the week. Each column corresponds to an hour of the day (24-hour clock).
7.To set up a schedule using the synchronization calendar, click the cell that corresponds to the day of the week and the hour of day when you want the scheduler to initiate a synchronization job. For example, in the figure above, the synchronization schedule is set to start at 18:00 hrs (6 pm) every weekday. The time zone of the computer where the application is running will be used to determine the time.
|
|
NOTE: If you select consecutive cells in a single row, synchronization will start automatically every hour on the hour. It will consume unnecessary processing time and not recommended. |

8.Click OK to save the schedule or Cancel to discard the setup.
9.You can find the results of the scheduled synchronization process in a log file located at C:\Program Files (x86)\Metalogix\MAM4Exchange\Log\Synchronization_<timestamp>.log
Managing Servers
The Address Book Manager provides all the necessary tools to manage Microsoft Exchange on-premise and online servers that are imported into the Address Book Manager.
In this topic:
·Managing the servers list view
Managing the servers list view
The servers list view displays the on-premise and online servers that are imported into the Address Book Manager.
Steps to view the servers list
1.Open Address Book Manager by clicking the toolbar icon
2.Click the Servers tab. The servers list view appears with a default set of columns. You can add or remove these columns.
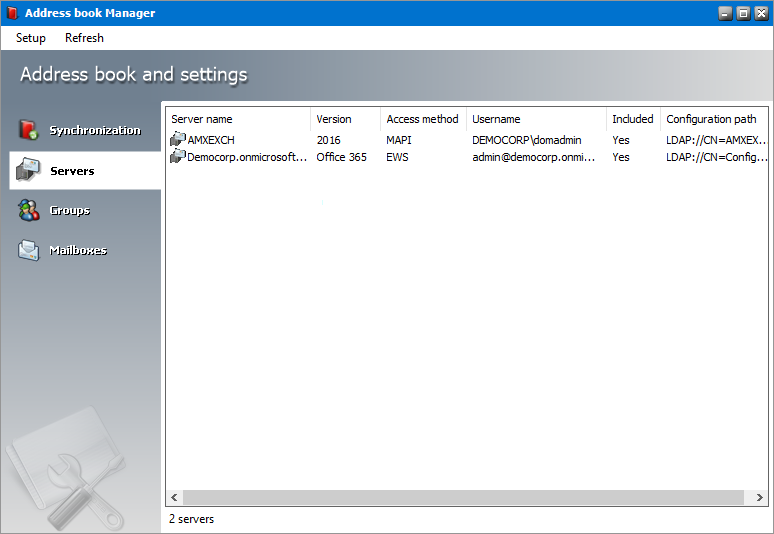
3.The columns are as follows:
a.Server name - the name of the on-premise or online Microsoft Exchange server
b.Version - the version of the Microsoft Exchange application installed on the server.
c.Access Method - How Metalogix Archive Manager for Exchange connects to the Microsoft Exchange server. The two possible values are MAPI or EWS.
d.Username - the username that is used to access the server. The format for an onpremise exchange server is <domain>\<username> and for an O365 sever it is the email address.
e.Included - Yes indicates that the server will be synchronized. No indicates that the server will not be synchronized and is also highlighted in green
f.Configuration path - LDAP Uniform Resource Locator (URL) that defines the server location.
g.Deleted - No indicates the server is active in Address Book Manager. Yes indicates that the server is logically deleted from the list of servers and is will not be used. Deleted servers are highlighted in red

h.Server DN - legacy distinguished name (DN) of the Microsoft Exchange server.
i.Server Id - a unique serial number allocated to each server in Address Book Manager.
j.Modification Date - the most recent date when the server was synchronized.
Steps to add or remove server list columns
1.Right-click to open the context menu and click Add/Remove columns...
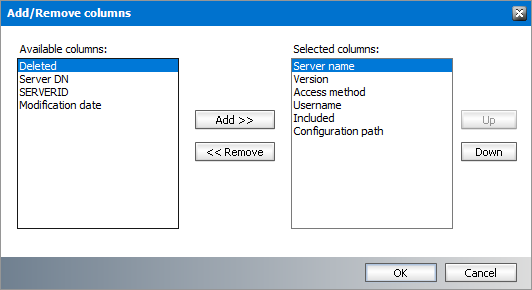
2.To add a column to the display:
a.Select the column from the Available columns list box.
b.Click Add to move the column to the Selected columns list box.
c.Use the Up and Down buttons to column the new column. The topmost column in the Selected columns list box corresponds to the first column in the list view.
d.Click OK to close the dialog box and view the revised set of columns in the list view.
3.To remove a column from the list view:
a.Select the column from the Selected columns list box.
b.Click Remove to move the column to the Available columns list box.
c.Click OK to close the dialog box and view the revised set of columns in the list view.
Steps to refresh the list view
1.Right-click to open the context menu and select Refresh. All servers in the list will be refreshed.
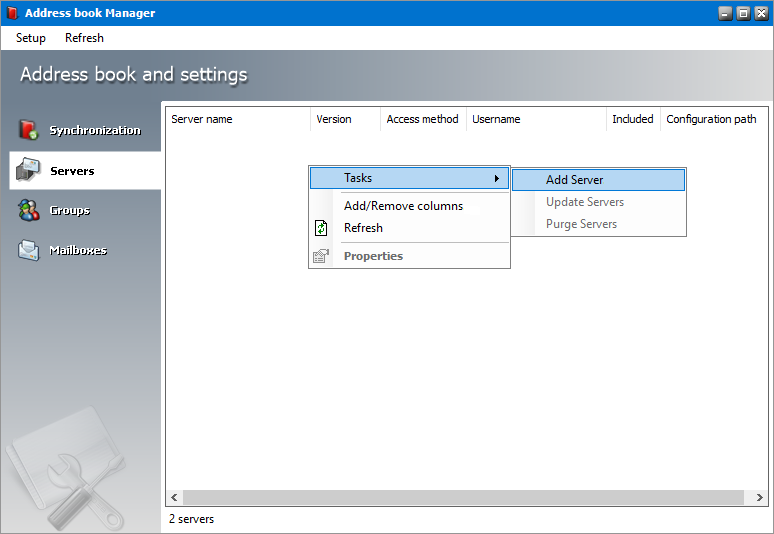
The Servers section of the Address Book Manager provides a set of tasks to add, update, remove and repair Microsoft Exchange servers. Each of these tasks are described below.
Adding a new on-premise or online Microsoft Exchange server
1.Right-click inside the list view and from the context menu point to Tasks and select Add Server... to initiate the import process.
2.For detailed steps about importing on-premise servers see Steps to add on-premise Microsoft Exchange servers.
3.For detailed steps about importing online servers see Steps to add online Microsoft Exchange servers.
Updating Microsoft Exchange servers
1.Select a server from the server list view.
2.Right-click to open the context menu. Point to Tasks to open the sub-menu and select Update Servers.
3.When the selected server is updated successfully, a confirmation message is displayed.
|
|
NOTE: If the superuser is changed, you must update the servers so that the superuser information is updated. |
Removing Microsoft Exchange servers from the list
1.Select a server from the server list view that you want to remove.
2.Right-click to open the context menu. Point to Tasks to open the sub-menu and select Purge Servers.
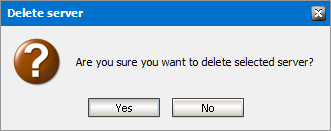
3.Click Yes to confirm that you want to remove the selected server from the Address Book Manager. Click No to cancel the operation.
Repairing the MAPI profile
1.Select a server from the server list view that you want to remove.
2.Right-click to open the context menu. Point to Tasks to open the sub-menu and select Repair MAPI Profile.
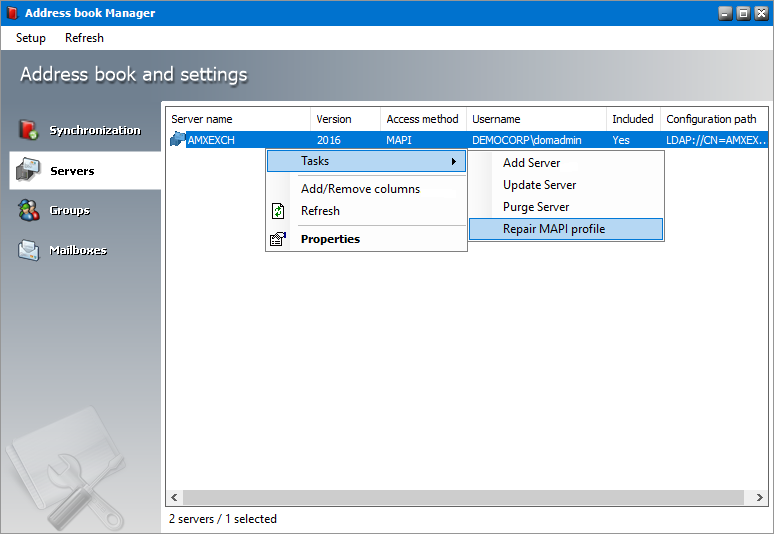
3.The MAPI profile will be updated.
Microsoft Exchange Servers can be either on-premise servers or online Office 365 servers. The properties of each Microsoft Exchange server added to the Address Book Manager can be managed through the Properties dialog box. They are grouped by tabs and each property group is explained in detail below.
For on-premise servers:
For online Office 365 servers:
·Steps to add additional service accounts
4For on-premise servers
1.Select an on-premise server from the server list.
2.Right-click to open the context menu and click Properties. The Properties dialog for the selected server appears and the General tab is displayed by default.
3.Click the General tab if not already selected.

4.This section provides generic information about the server. The properties are as follows:
a.Server name - Read-only. The name of the on-premise or online Microsoft Exchange server.
b.Version - Read-only. The version of the Microsoft Exchange application installed on the server.
c.Access Method - Choose how Metalogix Archive Manager for Exchange connects to the Microsoft Exchange server. The two access methods available are MAPI or EWS.

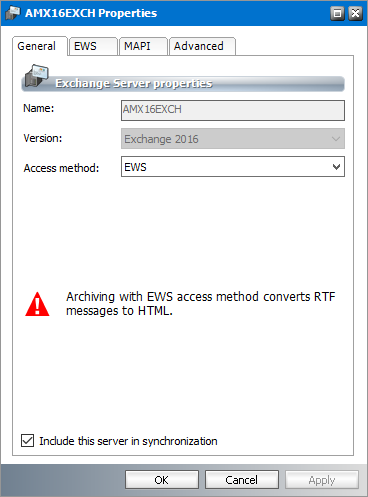
d.Include this server in synchronization - When this check box is checked, the server is included in the synchronization process. When this check box is unchecked, the server will not be synchronized and appears in the list view highlighted in green
5.Click OK to save changes and close the dialog. Click Cancel to reject any changes and close the dialog.
1.Select an on-premise server from the server list.
2.Right-click to open the context menu and click Properties. The Properties dialog for the selected server appears.
3.Click the EWS tab.
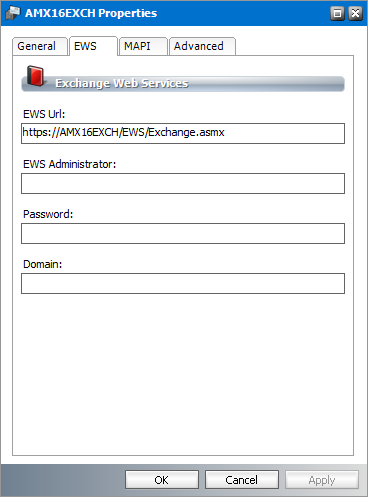
The properties are as follows:
a.EWS Url - https://<Microsoft-Exchange-server-IP-Address-or-Name>/EWS/Microsoft Exchange.asmx
b.EWS Administrator - user name of an EWS administrator who must have impersonation permissions. This is usually the super-user.
c.Password - password of the EWS Administrator.
d.Domain - domain of the given user.
4.Click OK to save changes and close the dialog. Click Cancel to reject any changes and close the dialog.
|
|
NOTE: EWS Limitations 1.EWS does not support the RTF format for email messages. RTF messages are converted to HTML when messages are archived and retrieved. If HTML messages are saved as .MSG files in Unicode format, Outlook will remove embedded images and use the RTF format to display the message. As a result, images are available as attachments and not embedded in the body. 2.Shortcuts are not created for several message types The message types listed below are not replaced with a shortcut when the messages are archived. A copy of the original message is stored in the archive and retrieved when needed. ·IPM.Post ·IPM.Schedule.Meeting.Request ·IPM.Schedule.Meeting.Canceled ·IPM.Schedule.Meeting.Resp.Pos ·IPM.Schedule.Meeting.Resp.Tent ·IPM.Schedule.Meeting.Resp.Neg 3.Voting summary cannot be retrieved for archived voting responses Emails can be created in Outlook using the Voting option that allows respondents to cast a vote. If the original email message that contains the voting poll is archived and retrieved with EWS, the poll results are not available through the sent items message Tracking. If the response emails from votes are archived and retrieved, the voting poll summary is not available when you click the View voting response info button. |
1.Select an on-premise server from the server list.
2.Right-click to open the context menu and click Properties. The Properties dialog for the selected server appears.
3.Click the MAPI tab.
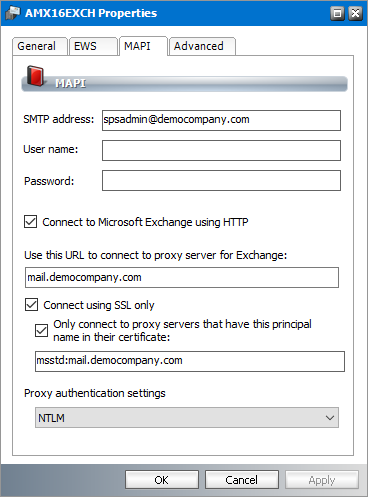
The properties in this section are as follows:
a.SMTP address - email address of the superuser that is automatically imported from the Exchange server settings.
b.User name - user name of the superuser for MAPI communication.
c.Password - password of the superuser for MAPI communication.
d.Connect to Microsoft Exchange using HTTP - If selected, the Exchange server connection will use the HTTP protocol.
e.Proxy server URL - Address of the proxy server if applicable.
f.Connect using SSL only - If selected, the connection will be encrypted using SSL.
g.Only connect to proxy servers that have this principal name in their certificate - specify the Certificate Principal Name to connect to proxy servers if certificate mapping is used in the Active Directory.
h.Proxy authentication settings - authentication protocol for the proxy server if a proxy server is used.
5.Click OK to save changes and close the dialog. Click Cancel to reject any changes and close the dialog.
This section displays properties that define the configuration path and server distinguished name
1.Select an on-premise server from the server list.
2.Right-click to open the context menu and click Properties. The Properties dialog for the selected server appears.
3.Click the Advanced tab.
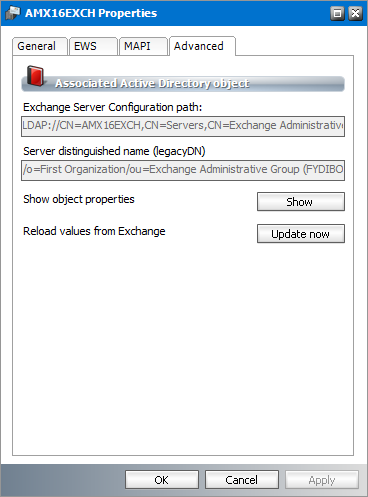
4.Click Update now to refresh server property values.
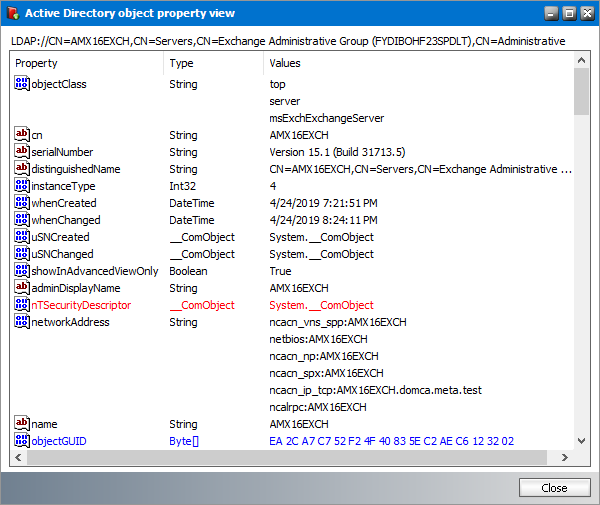
5.Click the Show button to display more information about the Microsoft Exchange server.
6.Click Close to close the dialog.
4For on-line Office 365 servers
1.Select an on-line server from the server list.
2.Right-click to open the context menu and click Properties. The Properties dialog for the selected server appears and the General tab is displayed by default.
3.Click the General tab if not already selected.
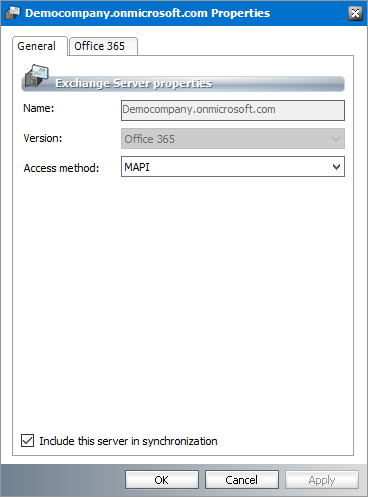
4.This section provides generic information about the server. The properties are as follows:
a.Server name - Read-only. The name of the on-premise or online Microsoft Exchange server.
b.Version - Read-only. The version of the Microsoft Exchange application installed on the server.
c.Access Method - Choose how Metalogix Archive Manager for Exchange connects to the Microsoft Exchange server. The two possible values are MAPI or EWS. If access method is EWS, all RTF messages will be converted to HTML when messages are archived.
d.Include this server in synchronization - When this check box is checked, the server is included in the synchronization process. When this check box is unchecked, the server will not be synchronized and appears in the list view highlighted in green
5.Click OK to save changes and close the dialog. Click Cancel to reject any changes and close the dialog.
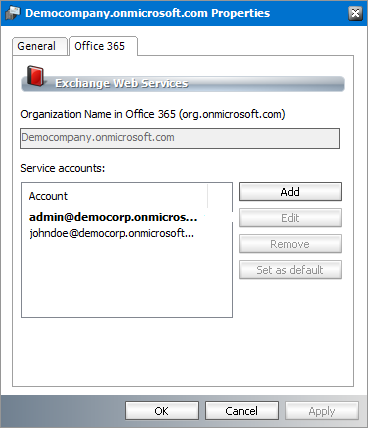
This section displays properties that define the server name and service accounts.
1.Select an online server from the server list.
2.Right-click to open the context menu and click Properties. The Properties dialog for the selected server appears.
3.Click the O365 tab.
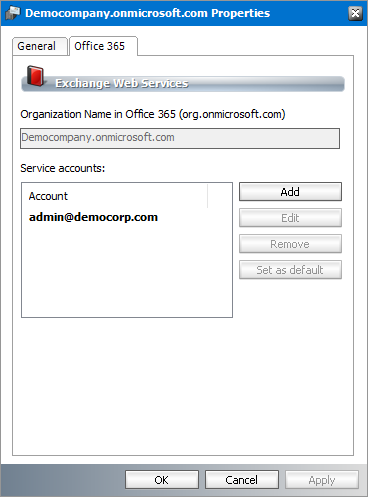
4.The properties in this section are as follows:
a.Organization Name in Office 365 - name of the imported online Exchange server.
b.Service Accounts - list of user names authorized to archive emails from the O365 server.
Steps to add additional service accounts
1.From the O365 tab of any online server Properties dialog, click Add. The Service account wizard opens.
2.Enter the service account properties as described below:
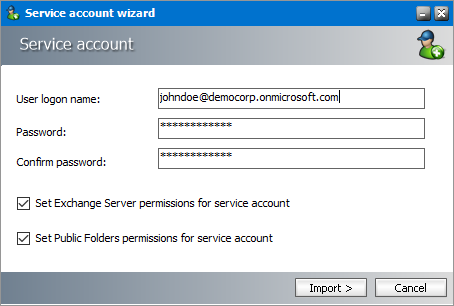
The properties are as follows:
a.User logon name - O365 user name.
b.Password - password of the O365 user account.
c.Confirm password - re-enter the password entered in the Password field.
d.Set Exchange server permissions for service account - select the check box to grant elevated rights to the service account on the selected O365 Exchange Server.
e.Set Public Folder permissions for service account - select the check box to grant OWNER permission to the Public folders.
3.Click Import to add the new service account to O365 service Accounts list.
4.Click OK to save changes and close the dialog. Click Cancel to reject any changes and close the dialog.
|
|
NOTES: |
Managing Groups
The Address Book Manager provides all the necessary tools to manage groups that are imported from Microsoft Exchange servers or created by the administrator.
In this topic:
·Managing the Groups list view
·Adding members to a user-defined group
·Removing members from a user-defined group
The groups list view displays the groups that are imported from Microsoft Exchange servers or created by the administrator.
Steps to view the groups list
1.Open Address Book Manager by clicking the toolbar icon
2.Click the Groups tab. The groups list view appears with a default set of columns. You can add or remove columns. User-defined groups are highlighted in green 
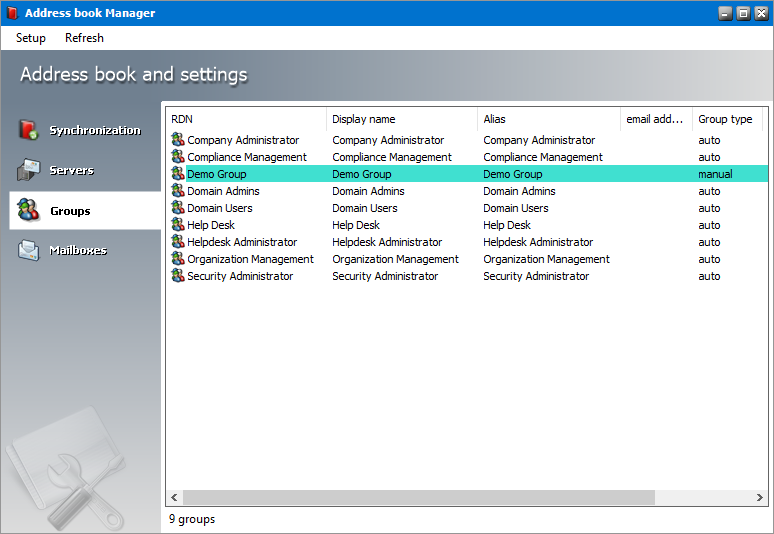
3.The columns are as follows:
a.RDN - Distinguished name of the recipient.
b.Display Name - Display name of the recipient.
c.Alias - Alias of the recipient.
d.Email Address - Email address of the recipient.
e.Group Type - indicates the source of the group. Valid value are auto if the group was imported from an on-Premise Exchange server, and manual if the group was created manually.
f.Domain Name - the domain where the group belongs.
g.GUID - Unique identifier of this mailbox in the Microsoft Exchange server.
h.LDAP Path - Active Directory specification of the mailbox recipient.
i.Deleted - Yes indicates the mailbox is deleted. No indicates the mailbox is active.
j.Creation Date - the date when the mailbox was imported into Address Book Manager.
k.Deleted Date - the date when a mailbox update fails to find the Active Directory object specified by the LDAP path, and the mailbox is marked as deleted by the system.
l.Modification Date - the most recent date when the mailbox was modified.
m.Reference Update - if the value is Yes, then only mailbox members without subgroups should be imported during the next synchronization.
n.Auto create groups - if the value is Yes, then existing subgroups of the corresponding group including its member mailboxes should be imported during the next synchronization.
o.Auto create mailboxes - if the value is Yes, then the root group should be imported along with its root mailbox members only during the next synchronization. No subgroups or subgroup members will be imported.
p.GID - a unique serial number allocated to each group in Address Book Manager.
Steps to add or remove groups list columns
1.Right-click to open the context menu and click Add/Remove columns...
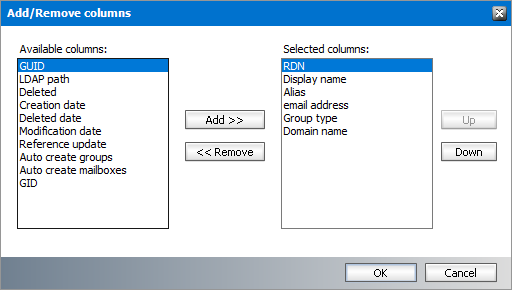
2.To add a column to the display:
a.Select the column from the Available columns list box.
b.Click Add to move the column to the Selected columns list box.
c.Use the Up and Down buttons to column the new column. The topmost column in the Selected columns list box corresponds to the first column in the list view.
d.Click OK to close the dialog box and view the revised set of columns in the list view.
3.To remove a column from the list view:
a.Select the column from the Selected columns list box.
b.Click Remove to move the column to the Available columns list box.
c.Click OK to close the dialog box and view the revised set of columns in the list view.
Steps to refresh the list view
1.Right-click to open the context menu and select Refresh. All groups in the list will be refreshed.
The Groups section of the Address Book Manager provides a set of tasks to add and remove groups. Each of these tasks are described below.
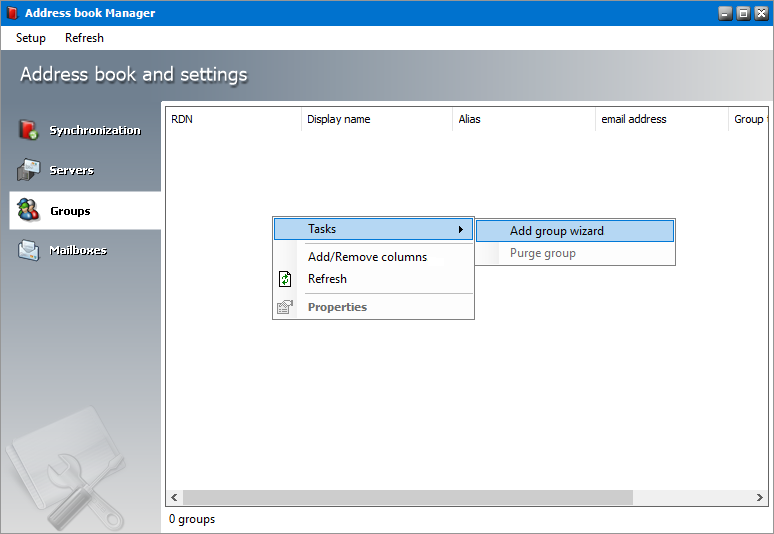
Adding groups
1.Right-click inside the list view and from the context menu point to Tasks and select Add group wizard... to initiate the import process.
2.For detailed steps about importing on-premise groups see Steps to import groups from on-premise Microsoft Exchange servers.
3.For detailed steps about importing online groups see Steps to add groups from online Microsoft Exchange servers.
4.For detailed steps to create user-defined groups see Steps to create user-defined groups.
The properties of each group added to the Address Book Manager can be managed through the Properties dialog box. They are grouped by tabs and each property group is explained in detail below.
General properties
1.Select a group from the groups list.
2.Right-click to open the context menu and click Properties. The Properties dialog for the selected group appears and the General tab is displayed by default.
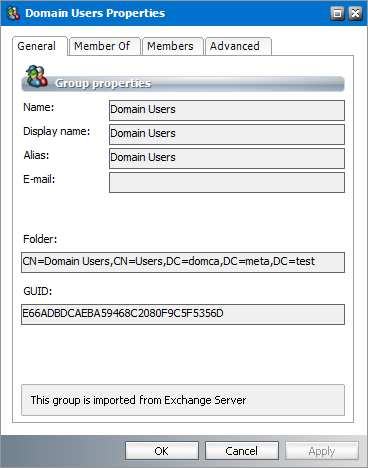
3.The properties in this section are read-only. Their descriptions are as follows:
a.Name - Name of the group.
b.Display Name - Display name of the recipient.
c.Alias - Alias of the recipient.
d.Email - the email of the group if applicable, otherwise it is blank.
e.Folder - Distinguished name of the group in the Active Directory.
f.GUID - Unique identifier of this group in the Microsoft Exchange server.
Member Of
1.Select a group from the groups list.
2.Right-click to open the context menu and click Properties. The Properties dialog for the selected group appears.
3.Click the Member Of tab. If the selected group is a sub-group of other parent groups, a list of the parent groups appears in the Member of list box.
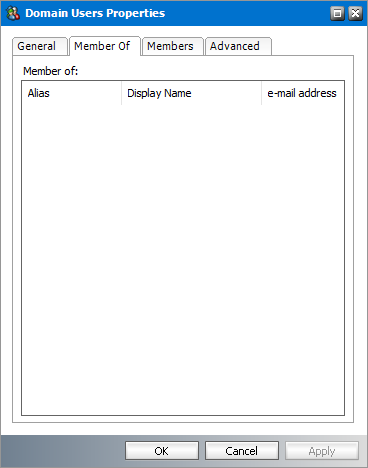
4.To view the properties of a parent group, right click on a selected group and click Properties. The Properties dialog of the group appears.
Members
1.Select a group from the groups list.
2.Right-click to open the context menu and click Properties. The Properties dialog for the selected group appears.
3.Click the Members tab. If the selected group has mailboxes or other groups, they appear in the List of Members list box.
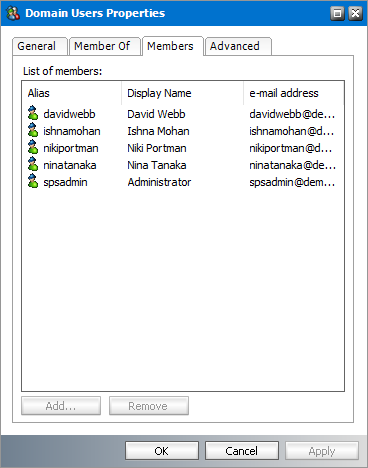
4.To view the properties of a mailbox or member group, right click on a selected mailbox or group and click Properties. The Properties dialog of the mailbox or group appears.
Advanced
1.Select a group from the groups list.
2.Right-click to open the context menu and click Properties. The Properties dialog for the selected group appears.
3.Click the Advanced tab.
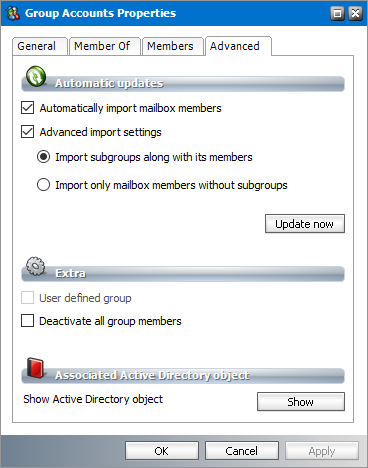
Automatic Updates
These settings will be applied when the group is updated manually or synchronized in future with the Microsoft Exchange server automatically. The properties in this section are as follows.
a.Automatically import mailbox members - check this box to import all Active Directory accounts with a mailbox that are members of this group.
b.Advanced import settings - check this box if you intend to import subgroups and subgroup mailbox members. You can activate this setting only if you select the Automatically import mailbox members setting.
c.Import subgroups along with members - check this box to import existing subgroups of the selected group including its member mailboxes. This is the default setting.
d.Import only mailbox members without subgroups - check this box to import only member mailboxes from subgroups. These mailboxes will be added to mailboxes in the parent group in the Address Book Manager.
Click Update Now if you want to synchronize the group with the Microsoft Exchange server.
Extra
a.User defined group - read only property. When checked, it indicates that this group was created manually and not imported from a Microsoft Exchange server.
b.Deactivate all group members - check this box to deactivate mailboxes of users in the group. Members in sub-groups will not be deactivated. This check box is not available for user-defined groups that are created in the Address Book Manager. When a group member is deactivated the following rules apply:
·Archive Manager will deactivate the user's mailbox even though the user is a member of another group where the member is still active.
·Archive Manager will temporarily activate a user's mailbox if the user is a member of two or more groups where the member was deactivated and the member is subsequently activated in any one of those groups.
·Archive Manager will deactivate a user's mailbox when mailboxes are synchronized if the user is a deactivated member of any group.
This property is used when users registered with an Archive Server in one location needs access permissions to archived content of users registered with an Archive Server in another location. Consider an example where Susan Bennet in location 1 needs access to archived content of a large number of users in location 2. As a global administrator you would create a group in the Active Directory and add the users from location 2 to this group. Then you would import this group to the Address Book Manager in location 1. You can now grant permissions to Susan Bennet with the Mailbox Rights Manager to access the archived content of the group members from location 2. However, you must deactivate these group members by selecting the Deactivate all group members check box so that the primary archive server for these members remains as location 2.
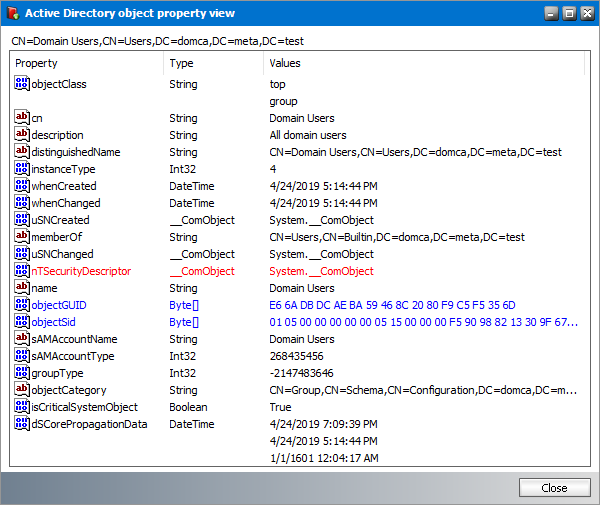
Associated Active Directory Object
a.Click the Show button to display more information about the group from the Microsoft Exchange server.
|
|
NOTE: The Show Active Directory object and the Show button are not available for a user-defined group. |
4.Click OK to save any changes. Click Cancel to discard any changes and close the properties dialog.
Adding members to a user-defined group
1.Select a user-defined group from the groups list. User-defined groups are highlighted in green
2.Right-click to open the context menu and click Properties. The Properties dialog for the selected group appears.
3.Click the Members tab. If the selected group has mailboxes or other groups, they appear in the List of Members list box.
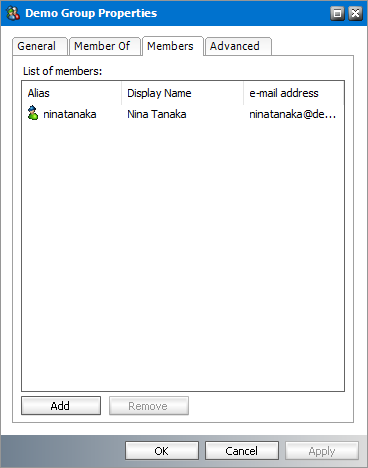
4.Click Add. The Select Mailbox dialog appears.
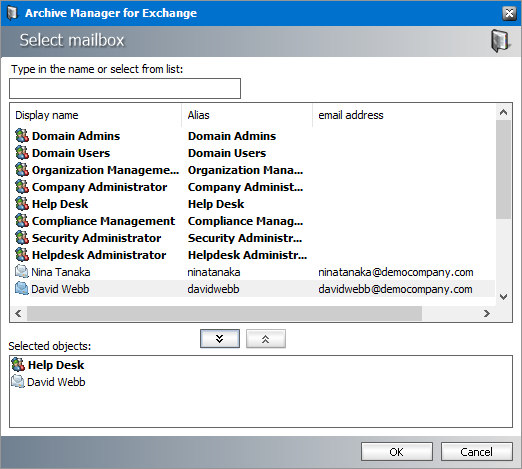
5.Select one or more groups or mailboxes. You can hold down the Ctrl or Shift keys to select multiple mailboxes and groups.
6.Click 

7.Click OK to add the selected members to the group or click Cancel to discard the changes.
Removing members from a user-defined group
1.Select a user-defined group from the groups list. User-defined groups are highlighted in green
2.Right-click to open the context menu and click Properties. The Properties dialog for the selected group appears.
3.Click the Members tab. If the selected group has mailboxes or other groups, they appear in the List of Members list box.
4.Select one or more members to remove. You can hold down the Ctrl or Shift keys to select multiple members.
5.Click Remove. A confirmation dialog appears.
6.Click Yes in the confirmation dialog to remove the member. Click No to retain the member.
Managing Mailboxes
The Address Book Manager provides all the necessary tools to manage Microsoft Exchange on-premise and online mailboxes that are imported into the Address Book Manager.
In this topic:
·Managing the Mailboxes list view
Managing the Mailboxes list view
The servers list view displays the on-premise and online servers that are imported into the Address Book Manager.
|
|
NOTE: In the mailboxes list there are mailboxes with names like public_<name-of-Microsoft-Exchange-server>. These mailboxes are the public folder from the respective Microsoft Exchange server because Address Book Manager considers a public folders as a profile. These mailboxes are always highlighted in blue Mailboxes which are deactivated are highlighted in light blue |
 , so you can distinguish them faster. Some features accessible for mailboxes are not applicable for these folders.
Steps to view the servers list
1.Open Address Book Manager by clicking the toolbar icon
2.Click the Mailboxes tab. The mailbox list view appears with a default set of columns. You can add or remove these columns.
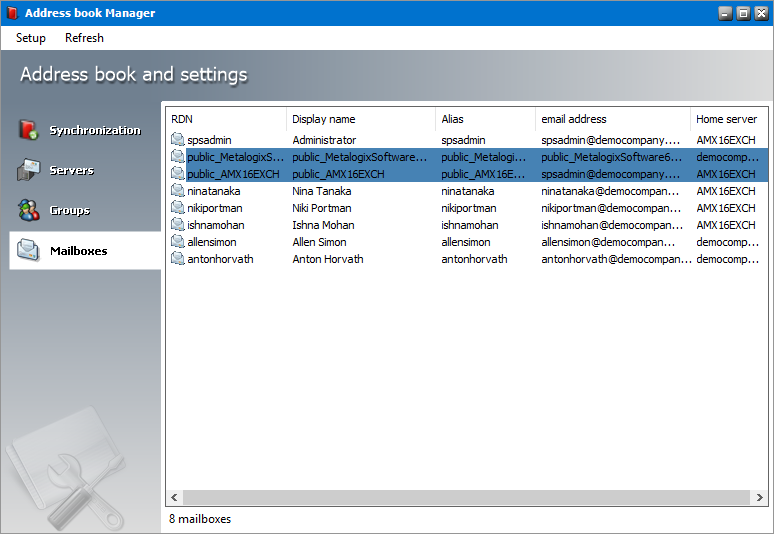
3.The columns are as follows:
a.RDN - Distinguished name of the recipient.
b.Display Name - Display name of the recipient.
c.Alias - Alias of the recipient.
d.Email Address - Email address of the recipient.
e.Home Server - Name of the Microsoft Exchange server that contains the mailbox.
f.GUID - Unique identifier of this mailbox in the Microsoft Exchange server.
g.LDAP Path - Active Directory specification of the mailbox recipient.
h.Logon Name - User name used to access the mailbox
i.Deleted - Yes indicates the mailbox is deleted. No indicates the mailbox is active.
j.Creation Date - the date when the mailbox was imported into Address Book Manager.
k.Deleted Date - the date when a mailbox update fails to find the Active Directory object specified by the LDAP path, and the mailbox is marked as deleted by the system.
l.Modification Date - the most recent date when the mailbox was modified.
m.Mailbox DN - Distinguished name of the mailbox.
n.Mailbox Limit - Maximum number of emails that the mailbox can receive.
o.Locked - Most recent date when the mailbox was locked.
p.Activated - Most recent date when the mailbox was activated.
q.Mailbox Type - Indicates the type of the mailbox. Possible values are Normal or Journal.
r.MBXID - a unique serial number allocated to each mailbox in Address Book Manager.
s.Legal Hold - Yes indicates there is a litigation hold on the mailbox, and modifications to archived emails are not permitted. No indicates there is no litigation hold.
t.Addresses - Collection of email aliases of the recipient.
Steps to add or remove mailbox list columns
1.Right-click to open the context menu and click Add/Remove columns...
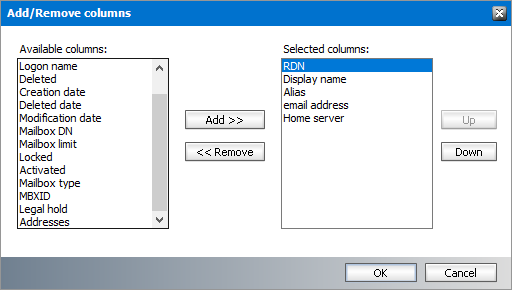
2.To add a column to the display:
a.Select the column from the Available columns list box.
b.Click Add to move the column to the Selected columns list box.
c.Use the Up and Down buttons to position the new column. The topmost column in the Selected columns list box corresponds to the first column in the list view.
d.Click OK to close the dialog box and view the revised set of columns in the list view.
3.To remove a column from the list view:
a.Select the column from the Selected columns list box.
b.Click Remove to move the column to the Available columns list box.
c.Click OK to close the dialog box and view the revised set of columns in the list view.
Steps to refresh the list view
1.Right-click to open the context menu and select Refresh List.
The Mailboxes section of the Address Book Manager provides a set of tasks to import, activate, deactivate, migrate, remove, synchronize and update mailboxes. Each of these tasks are described below.
Importing mailboxes
1.Right-click inside the list view and from the context menu point to Tasks and select Import mailbox wizard... to initiate the import process.
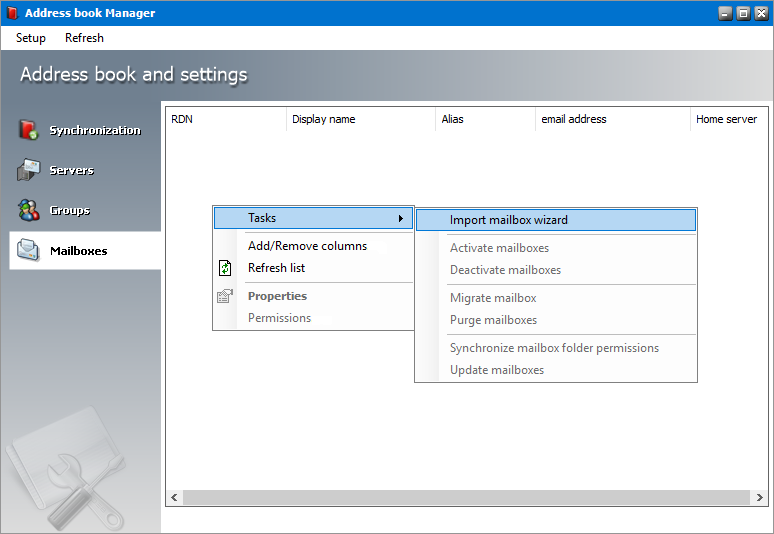
2.For detailed steps about importing on-premise servers see Steps to import mailboxes from on-premise Microsoft Exchange servers.
3.For detailed steps about importing online servers see Steps to import mailboxes from online Microsoft Exchange servers.
Activating a mailbox
1.Select a mailbox from the mailboxes list view that was previously deactivated and appear highlighted in light blue 
2.Right-click to open the context menu. Point to Tasks to open the sub-menu and select Activate mailbox.
3.The mailbox is activated, and it is no longer highlighted.
Deactivating a mailbox
1.Select a mailbox from the mailboxes list view that is not highlighted in any color.
2.Right-click to open the context menu. Point to Tasks to open the sub-menu and select Deactivate mailbox.
3.The mailbox is deactivated and appears in the list view with a different icon and is highlighted in light blue
|
|
NOTE: Deactivated mailboxes cannot be archived or restored. |
Migrating a mailbox
1.Select a mailbox from the mailboxes list view.
2.Right-click to open the context menu. Point to Tasks to open the sub-menu and select Migrate mailbox.
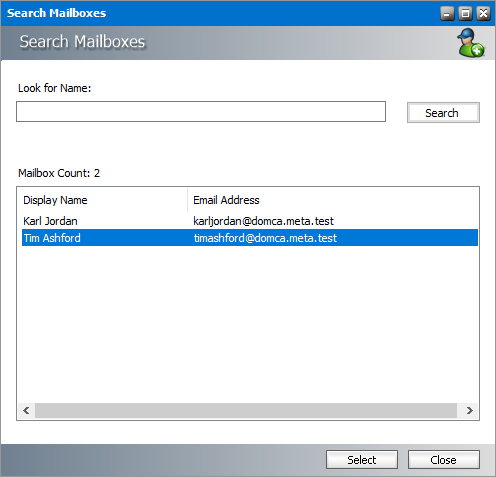
3.Click Search to return the list of all mailboxes that are not in Address Book Manager but are available in the Microsoft Exchange servers. To reduce the list of mailboxes, you can specify a search term in the Look for Name search box. Only the initial letters of the mailbox Display Name can be specified, and wildcards are not supported. The search term is case-insensitive.
4.Select the target mailbox from the result set.
5.Click Select. A confirmation dialog appears.
6.Click Yes to continue. The source mailbox will be merged with the target mailbox and removed from Address Book Manager. The target mailbox will be imported into Address Book Manager, and all the archived emails that belonged to the source mailbox will now belong to the imported mailbox. You can click No to cancel the migration.
Removing a mailbox
1.Select a mailbox from the mailboxes list view.
2.Right-click to open the context menu. Point to Tasks to open the sub-menu and select Purge mailbox.
3.The mailbox is removed from the Address Book Manager.
|
|
NOTE: You cannot remove a mailbox if it contains at least one email that has been archived. Mailboxes that are highlighted in blue |
Synchronizing mailbox permissions
1.Select a mailbox from the mailboxes list view.
2.Right-click to open the context menu. Point to Tasks to open the sub-menu and select Synchronize mailbox folder permissions.
3.The mailbox folders will be synchronized, and a confirmation dialog appears that indicates the number of folders that were successfully synchronized and the number of folders that could not be synchronized.
|
|
NOTE: Mailboxes that are highlighted in blue |
Updating a mailbox
1.Select a server from the server list view.
2.Right-click to open the context menu. Point to Tasks to open the sub-menu and select Update mailbox.
3.When the selected mailbox is updated successfully, a confirmation message is displayed.
The properties of each mailbox added to the Address Book Manager can be managed through the Properties dialog box. They are grouped by tabs and each property group is explained in detail below.
General properties
1.Select a mailbox from the mailboxes list.
2.Right-click to open the context menu and click Properties. The Properties dialog for the selected mailbox appears and the General tab is displayed by default.
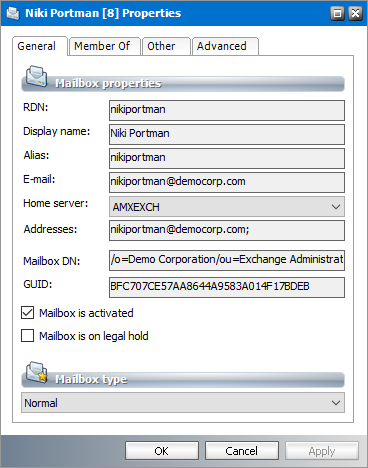
3.The properties in this section are as follows:
a.RDN - Distinguished name of the recipient.
b.Display Name - Display name of the recipient.
c.Alias - Alias of the recipient.
d.Email Address - Email address of the recipient.
e.Home Server - Name of the Microsoft Exchange server that contains the mailbox. You can click the drop down and select another Exchange Server as the Home Server. For example, if the user's mailbox is migrated from an on-premise Exchange server to an online Office 365 Exchange server, you can change the Home Server to the Office 365 server only if the server was imported into the Address Book Manager. When you change the Home Server, you must synchronize the Address Book Manager. For more information see Synchronizing Address Book Manager.
f.Addresses - Collection of email aliases of the recipient.
g.Mailbox DN - Distinguished name of the mailbox.
h.GUID - Unique identifier of this mailbox in the Microsoft Exchange server.
i.Mailbox is activated - When checked the mailbox is fully operation. Uncheck this check box to deactivate the mailbox. The mailbox can also be deactivated by selecting Deactivate mailbox from the mailbox context menu Tasks.
j.Mailbox is on legal hold - When checked, the mailbox is on litigation hold and modifications to archived emails are not permitted. When unchecked, the mailbox is not on legal hold.
k.Mailbox type - The type of mailbox. Valid values are Normal and Journal.
4.Click OK to save any changes. Click Cancel to discard any changes and close the properties dialog.
Member Of
1.Select a mailbox from the mailboxes list.
2.Right-click to open the context menu and click Properties. The Properties dialog for the selected mailbox appears.
3.Click the Member Of tab. A list of groups appears in the Member of list box.
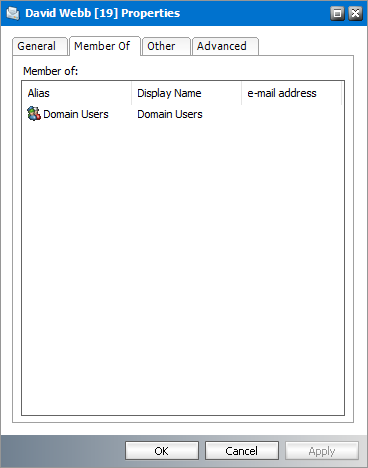
4.To view the properties of a group, right click on a selected group and click Properties. The Properties dialog of the group appears.
5.Click OK to save any changes. Click Cancel to discard any changes and close the properties dialog.
Other properties
1.Select a mailbox from the mailboxes list.
2.Right-click to open the context menu and click Properties. The Properties dialog for the selected mailbox appears.
3.Click the Others tab.
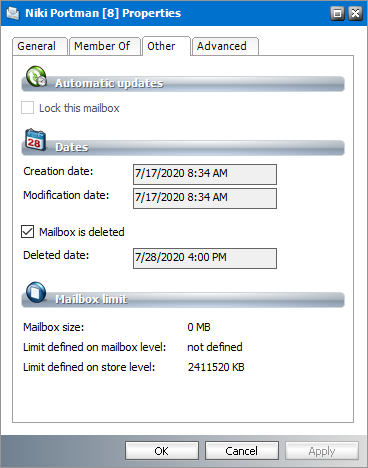
4.The properties in this section are as follows:
a.Lock this mailbox - When checked, the mailbox is set to read-only and the mailbox cannot not be updated or synchronized.
b.Creation date - the date when the mailbox was imported into Address Book Manager.
c.Modification date - the most recent date when the mailbox was modified
d.Mailbox is deleted - if the check box is checked, the mailbox is marked as deleted. When you click Apply or OK, the Deleted Date field will indicate the current date and the mailbox is indicated with the 
e.Deleted date - the date when the system marks the mailbox as deleted.
f.Mailbox size - size of the mailbox including all its folders as defined in the Microsoft Exchange server.
g.Limit defined on mailbox level - the limit (in KB) set on the mailbox in the Microsoft Exchange server.
h.Limit defined on store level - the storage limit (in KB) set on the mailbox in the Microsoft Exchange server. The Limit defined on mailbox level has a higher priority.
5.Click OK to save any changes. Click Cancel to discard any changes and close the properties dialog.
Advanced properties
1.Select a mailbox from the mailboxes list.
2.Right-click to open the context menu and click Properties. The Properties dialog for the selected mailbox appears.
3.Click the Advanced tab.
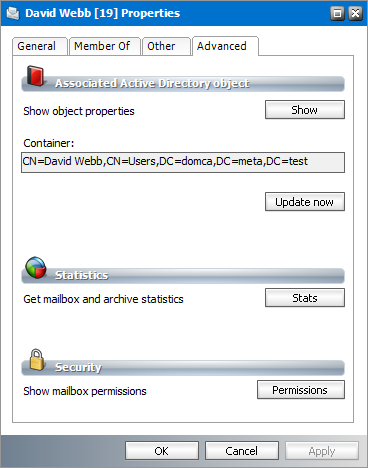
4.The properties in this section are as follows:
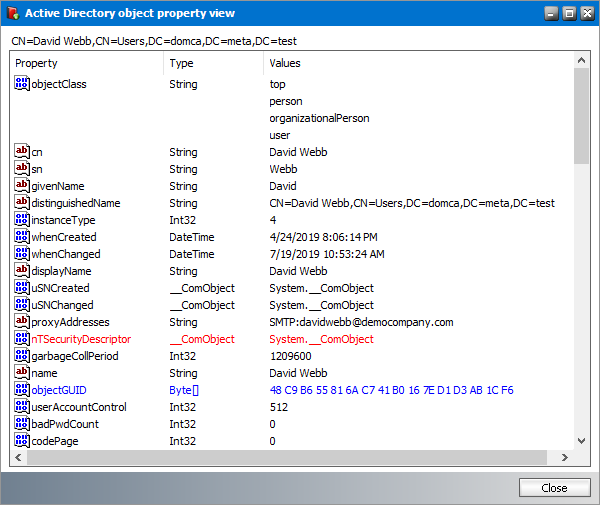
a.Show object properties - Click the Show button to display more information about the mailbox from the Microsoft Exchange server
b.Container - displays the distinguished name of the LDAP container. Click Update now to update the mailbox properties immediately.
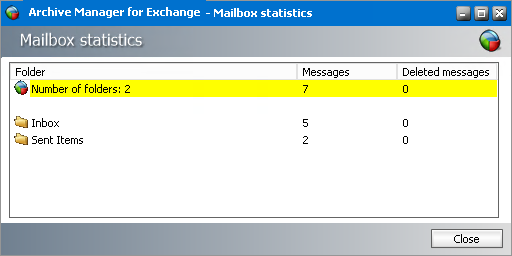
c.Get mailbox and archive statistics - Click Stats to open the Mailbox statistics window where you can check the number of archived or deleted messages in the mailbox folders
d.Show mailbox permissions - Click Permissions to manage the mailbox permission rights. The same settings are accessible also from Tools > Mailbox Rights Manager. For detailed information see the section Mailbox Rights Manager.
5.Click OK to save any changes. Click Cancel to discard any changes and close the properties dialog.
For detailed information about managing permissions for a mailbox, see Mailbox Rights Manager.