
Address Book Manager
Active Directory forest and domains store information about Microsoft Exchange servers, mailboxes, and other Microsoft Exchange-related objects in your organization. The Address Book Manager helps you to manage the Microsoft Exchange servers, mailboxes and groups which are imported into Address Book Manager and keep them in synch to facilitate email archiving. You can schedule automatic synchronization to keep the Metalogix Archive Manager for Exchange database up to date and synchronized with the Active Directory.
In this topic:
·Steps to open the Address Book Manager
·About the Address Book Manager
·Importing Microsoft Exchange Servers
·Synchronizing Address Book Manager
Steps to open the Address Book Manager
1.Log in to the Metalogix Archive Manager for Exchange console.
2.From the Tools menu, click Address Book Manager
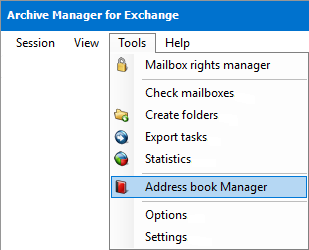
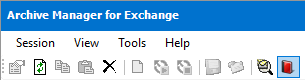
or, click the Address Book Manager icon from the toolbar.
3.If no Microsoft Exchange servers, mailboxes or groups are available in the Address Book Manager, the Address Book Setup wizard appears. Otherwise the Address Book Manager window opens.
About the Address Book Manager
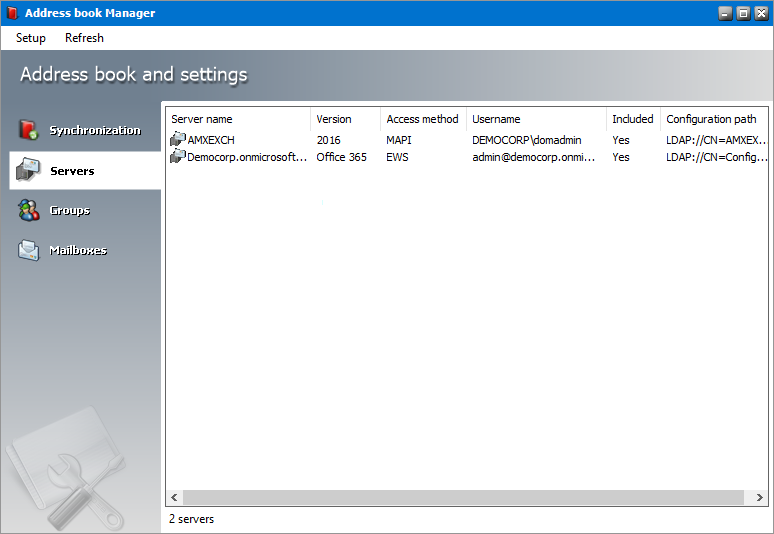
The Address Book Manager window provides two menu options:
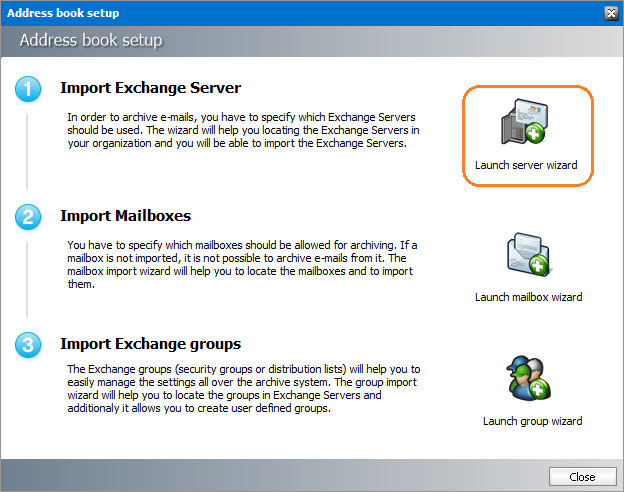
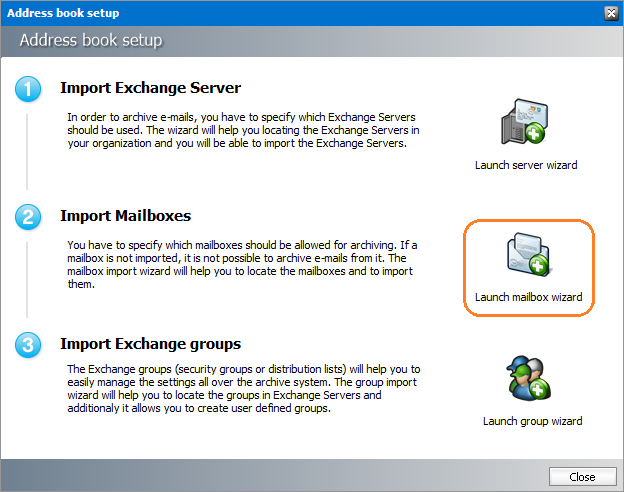
Setup - starts the Address Book Setup wizard that provides a step-by-step guide to add Microsoft Exchange servers, mailboxes and groups. If no Microsoft Exchange servers, mailboxes or groups are available in the Address Book Manager, the Address Book Setup wizard appears by default when you open the Address Book Manager.
Refresh - reloads information about Microsoft Exchange servers, mailboxes and groups based on the available configuration settings.
The management of Microsoft Exchange servers, mailboxes, groups and synchronization settings are organized by tabs in the Address Book Manager window.
·Synchronization for manual or automatic synchronization of mailboxes, groups and permissions with the Active Directory of available servers.
·Servers for adding, removing and managing Microsoft Exchange servers.
·Groups for importing groups, creating user-defined groups and managing group features.
·Mailboxes for importing new mailboxes and managing mailboxes.
Importing Microsoft Exchange Servers
In this topic:
·Options for importing Microsoft Exchange servers
·Steps to add on-premise Microsoft Exchange servers
·Steps to add online Microsoft Exchange servers
·Steps to verify the imported Microsoft Exchange servers
Options for importing Microsoft Exchange servers
Microsoft Exchange Servers can be added to the Address Book Manager in one of two ways:
·Option 1 - By using the Address Book Setup Wizard.
1.Open the Address Book Manager.
2.From the Setup menu, click Setup Wizard. The Address book setup wizard appears.
3.Click the Launch server wizard to initiate the import process.
·Option 2 - By starting a task from the Servers tab of the Address Book Manager.
1.Open the Address Book Manager.
2.Click the Servers tab.
3.Right-click inside the list view and from the context menu point to Tasks and select Add Server... to initiate the import process.
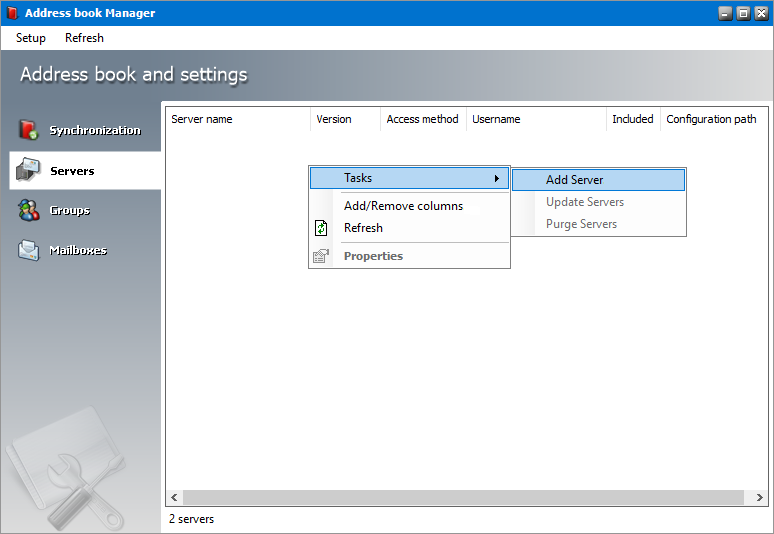
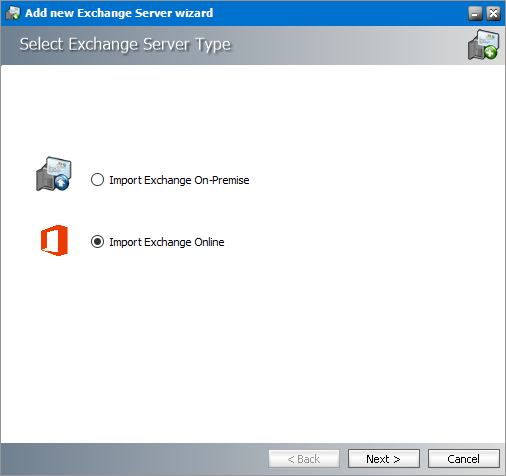
Whichever method you choose, the Select Exchange Server Type window opens.
Steps to add on-premise Microsoft Exchange servers
1.In the Select Exchange Server Type window, select Import Exchange On-Premise.
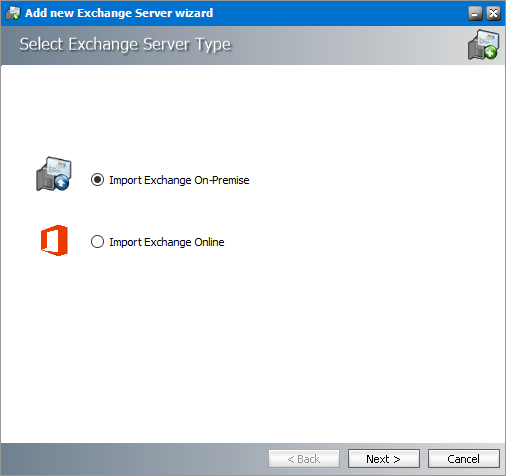
2.Click Next. A list of Microsoft Exchange Servers appear that are accessible within your trusted domain.
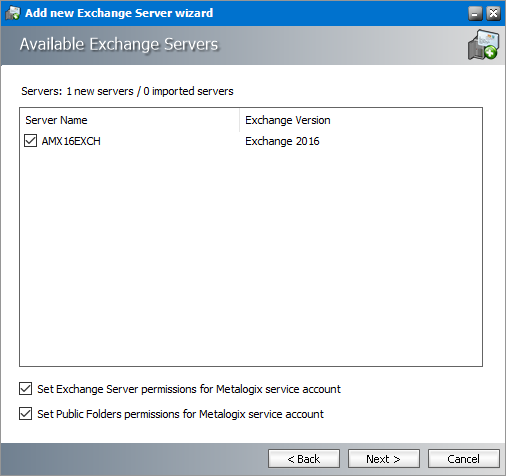
Select the servers that contain the mailboxes and folders you want to archive and then select the check boxes to set the permissions as described below:
a.Set Exchange server permissions for Metalogix service account - grants elevated rights to the superuser on each of the selected Microsoft Exchange Servers.
b.Set Public Folder permissions for Metalogix service account - grants OWNER permission to the Public folders.
3.Click Next. The Superuser's mailbox SMTP address window opens.
4.In the Superuser's mailbox SMTP address field, enter the email address of the superuser if not already filled in. You can change the email from the server Properties window.
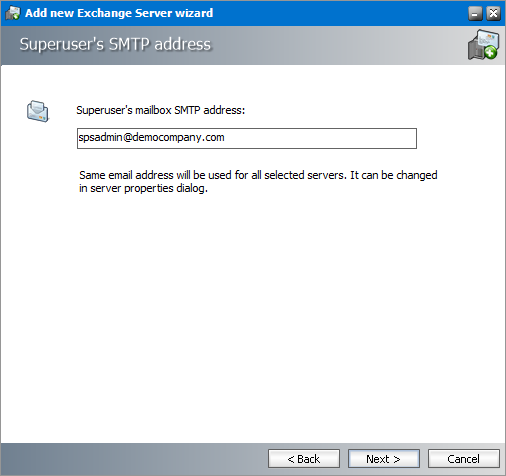
5.Click Next. The Summary window opens that lists the on-premise servers that will be added.
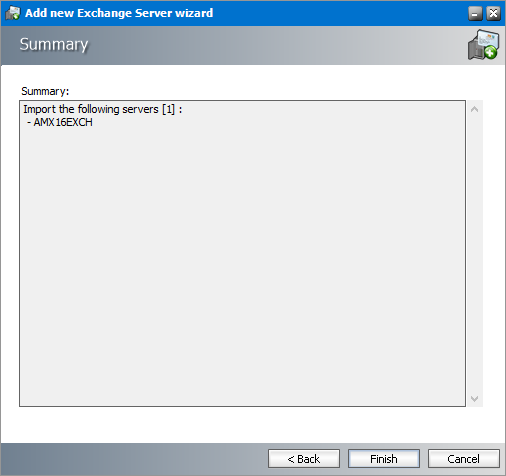
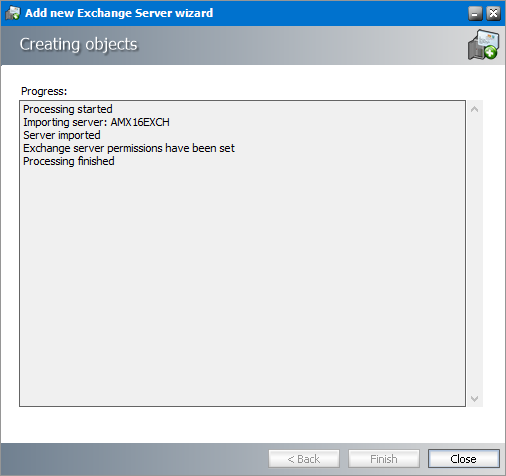
6.Click Finish to start the import process. The Creating objects window opens. You can click Back to select more servers to add or remove some of the selected servers.
7.When the import process has completed, click Close.
Steps to add online Microsoft Exchange servers
1.In the Select Exchange Server Type window, select Import Exchange Online.
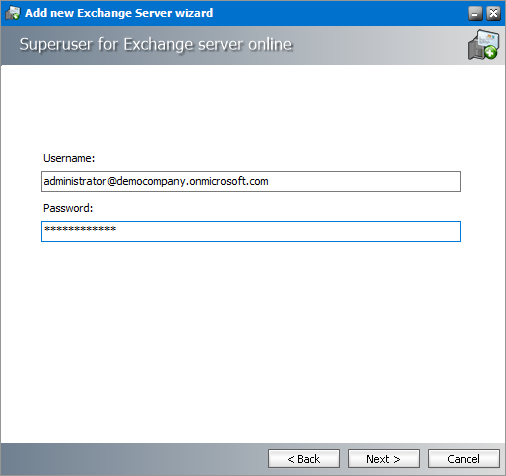
2.Click Next. The Service account for O365 Exchange server import window opens.
3.Enter the administrator credentials for the Microsoft Exchange online server.
4.Click Next. The Available Exchange Servers window opens. Select the desired Office 365 instance. You can click Back to select more servers to add or remove some of the selected servers.
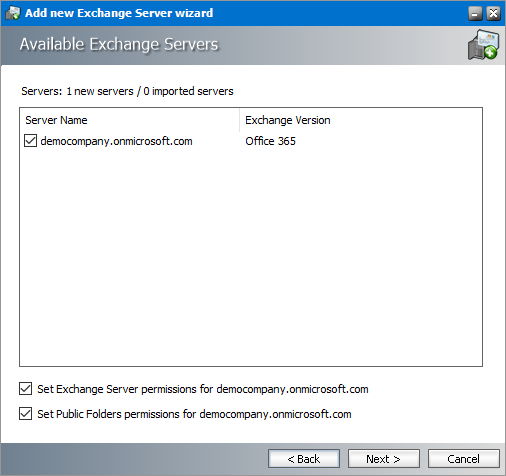
Select the servers that contain the mailboxes and folders you want to archive and then select the check boxes to set the permissions as described below:
c.Set Exchange server permissions for <Exchange server online superuser> - grants elevated rights to the Exchange serve online superuser on each of the selected servers.
d.Set Public Folder permissions for <Exchange server online superuser> - grants OWNER permission for the Public folders to the Exchange serve online superuser.
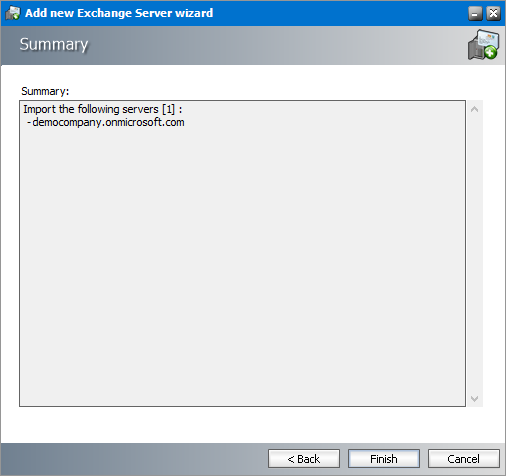
5.Click Next. The Summary window opens that lists the online Microsoft Exchange servers that will be added.
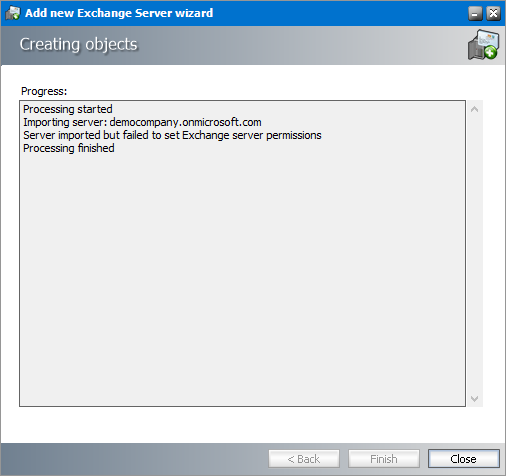
6.Click Finish to start the import process. The Creating object window opens.
7.When the import process has completed, click Close.
Steps to verify the imported Microsoft Exchange servers
1.Open the Address Book Manager
2.Click the Servers tab and verify the imported servers in the list view.
Importing Mailboxes
In this topic:
·Options for importing mailboxes
·Steps to import mailboxes from on-premise Microsoft Exchange servers
·Steps to import mailboxes from online Microsoft Exchange servers
·Steps to verify the imported mailboxes
Options for importing mailboxes
Microsoft Exchange server mailboxes can be added to the Address Book Manager in one of two ways:
·By using the Address Book Setup Wizard.
1.Open the Address Book Manager.
2.From the Setup menu, click Setup Wizard. The Address book Setup wizard appears.
3.Click the Launch mailbox wizard to initiate the import process.
·By using the Mailboxes tab of the Address Book Manager.
1.Open the Address Book Manager.
2.Click the Mailboxes tab.
3.Right-click inside the list view and from the context menu point to Tasks and select Import mailbox wizard... to initiate the import process.
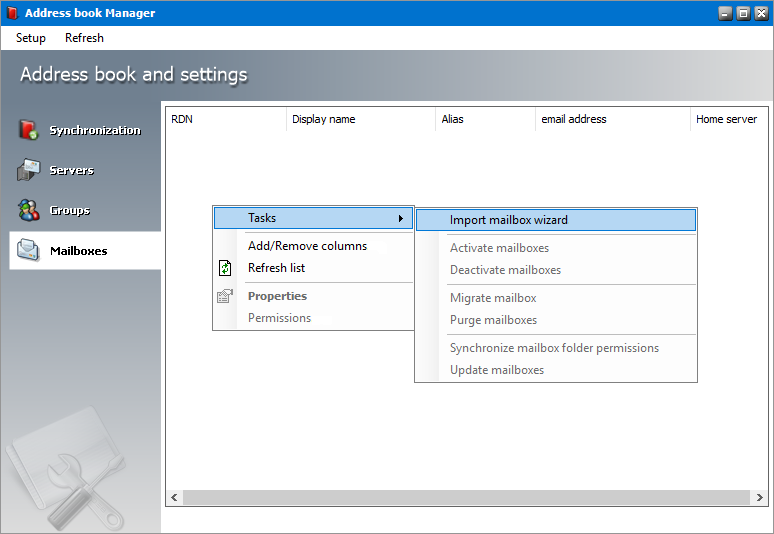
Whichever method you choose, the Import mailbox wizard window opens.
Steps to import mailboxes from an on-premise Microsoft Exchange Server
1.In the Select Exchange Server Type window, select Import from Exchange On-Premise.
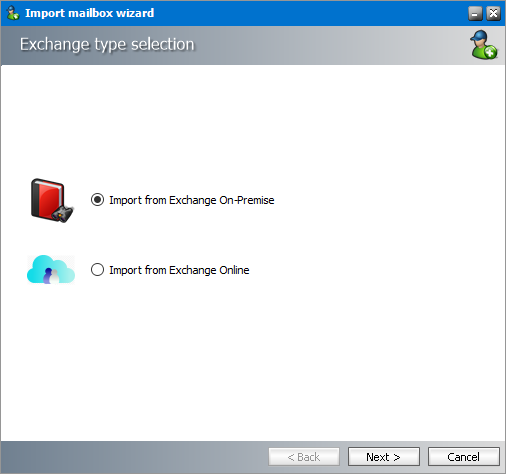
2.Click Next. The Mailboxes - search and select mailboxes to import window opens.
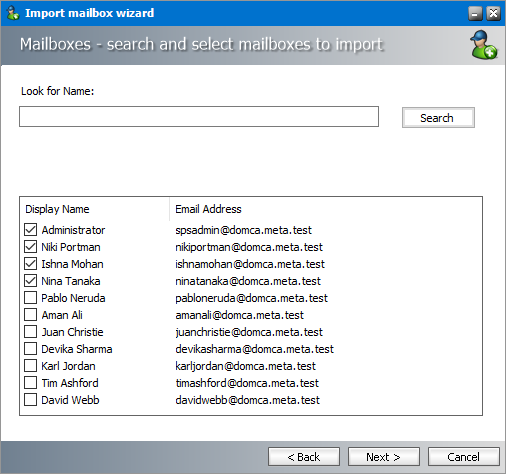
3.Click Search to return the list of all mailboxes across all on-premise servers available to the Address Book Manager. To reduce the list of mailboxes, you can specify a search term in the Look for Name search box. Only the initial letters of the mailbox Display Name can be specified, and wildcards are not supported. The search term is case-insensitive. For example, if you enter ni as the search term and click Search, the mailboxes that start with the letters ni will be returned in the search results list.
4.Select one or more mailboxes that you want to import.
|
|
NOTE: Mailboxes that are highlighted indicate that they already exist in the Address Book Manager. The list summary above the list of mailboxes will indicate how many mailboxes that you select are new, and how many already exist. If you select pre-exisiting mailboxes, they will be updated during the import process. |

5. Click Next. The Summary window opens that lists the mailboxes from the on-premise Microsoft Exchange servers that will be imported.
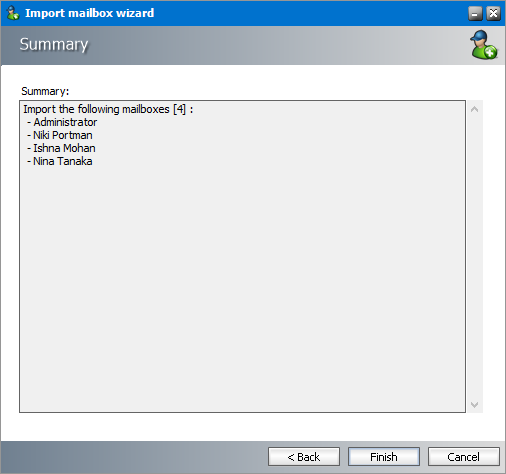
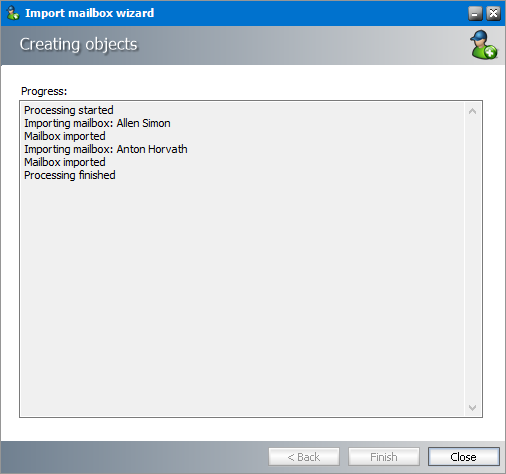
6.Click Finish to start the import process. The Creating Object window opens. You can click Back to select more mailboxes to add or remove some of the selected mailboxes.
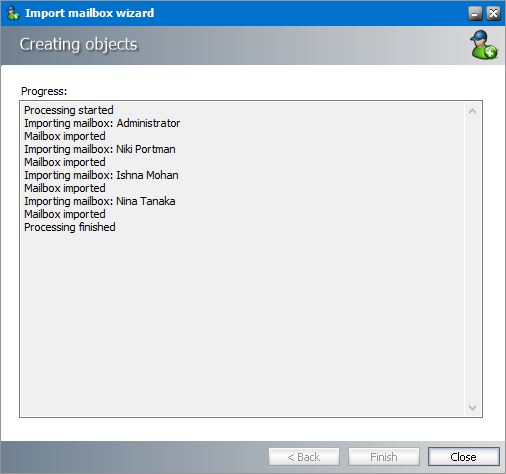
7.When the import process has completed, click Close.
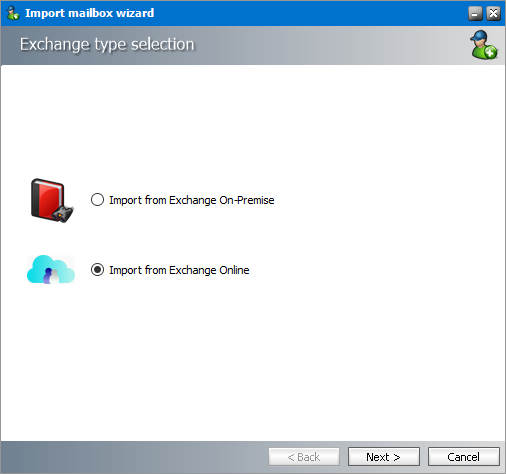
Steps to import mailboxes from an online Microsoft Exchange Server
1.In the Select Exchange Server Type window, select Import from Exchange Online.
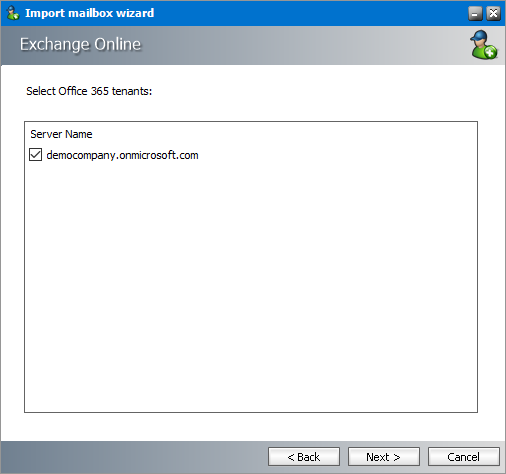
2.Click Next. The Exchange Online window opens. Select the desired Office 365 instance.
3.Click Next. The Mailboxes - search and select mailboxes to import window opens.

4.Click Search to return the list of all mailboxes across all on-premise servers available to the Address Book Manager. To reduce the list of mailboxes, you can specify a search term in the Look for Name search box. Only the initial letters of the mailbox Display Name can be specified, and wildcards are not supported. The search term is case-insensitive. For example, if you enter A as the search term and click Search, the mailboxes that start with the letter A will be returned in the search results list.
5.Select one or more mailboxes that you want to import.
|
|
NOTE: Mailboxes that are highlighted indicate that they already exist in the Address Book Manager. The list summary above the list of mailboxes will indicate how many mailboxes that you select are new, and how many already exist. If you select pre-exisiting mailboxes, they will be updated during the import process. |
6.Click Next. The Summary window opens that lists the online Microsoft Exchange servers that will be added.
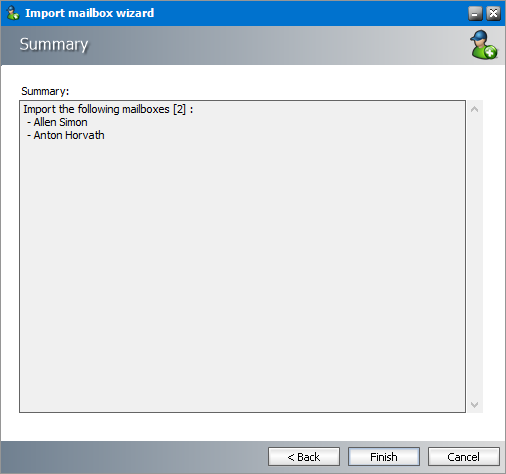
7.Click Finish to start the import process. The Creating Object window opens. You can click Back to select more mailboxes to add or remove some of the selected mailboxes.
8.When the import process has completed, click Close.
Steps to verify the imported mailboxes
1.Open the Address Book Manager
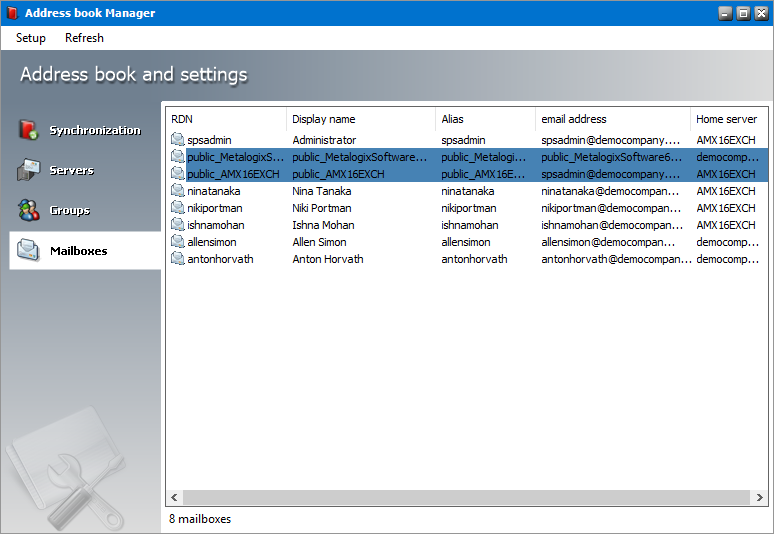
2.Click the Mailboxes tab and verify the imported mailboxes in the list view.
|
|
NOTE: In the mailboxes list you will also see mailboxes names public_<name-of-Microsoft-Exchange-server>. These mailboxes are the public folders from the respective Microsoft Exchange server because Address Book Manager considers a public folder as a profile. These mailboxes are always highlighted in blue Imported mailboxes must be added to a group in Address Book Manager to activate automatic archiving with scheduled jobs. If you do not add mailboxes to a group you can archive them manually. For more information about adding mailboxes to groups see Adding members to a user defined Archive Manager group. |
 , so you can distinguish them faster.
Importing or Creating Groups
Groups activate you to schedule archiving jobs. There must be at least one group (either imported from Active Directory or a user-defined group) if you plan to schedule archiving jobs. User-defined groups are not Active Directory groups.
In this topic:
·Steps to import groups from on-premise Microsoft Exchange servers
·Steps to import groups from online Microsoft Exchange servers
·Steps to create user-defined groups
·Steps to verify the imported groups
Microsoft Exchange server groups can be added to the Address Book Manager in one of two ways:
·By using the Address Book Setup Wizard.
1.Open the Address Book Manager.
2.From the Setup menu, click Setup Wizard. The Address book Setup wizard appears.
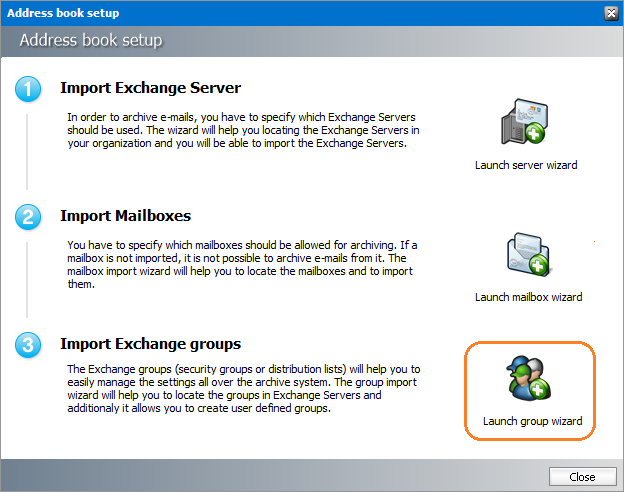
3.Click the Launch group wizard to initiate the import process.
·By using the Groups tab of the Address Book Manager.
1.Open the Address Book Manager.
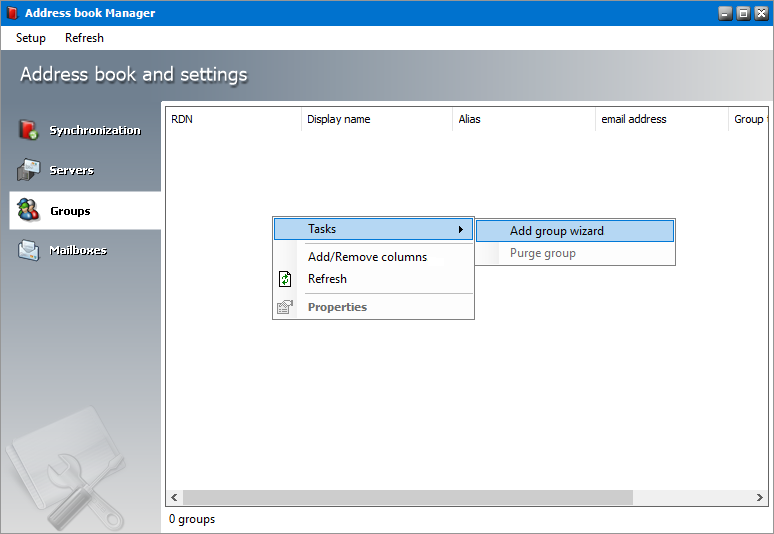
2.Click the Groups tab.
3.Right-click inside the list view and from the context menu point to Tasks and select Add group wizard... to initiate the import process.
Whichever method you choose, the Import group wizard window opens.
Steps to import groups from an on-premise Microsoft Exchange Server
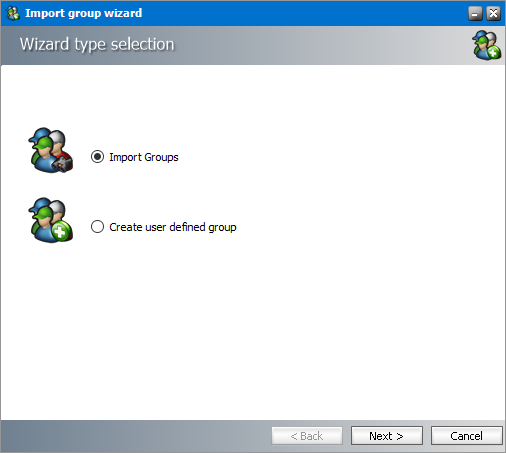
1.In the Import group wizard window, select Import Groups.
2.Click Next. The Exchange type selection window opens. Select Import form Exchange On-Premise.

3.Click Next. The Groups - search and select groups to import window opens.
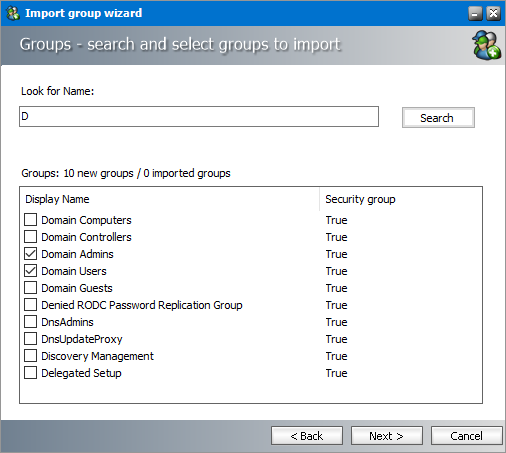
4.Click Search to return the list of all groups across all on-premise servers available to the Address Book Manager. To reduce the list of groups, you can specify a search term in the Look for Name search box. Only the initial letters of the groups Display Name can be specified, and wildcards are not supported. The search term is case-insensitive. For example, if you enter D as the search term and click Search, the groups that start with the letter D will be returned in the search results list.
5.Select one or more groups that you want to import.
|
|
NOTE: Groups that are highlighted indicate that they already exist in the Address Book Manager. The list summary above the list of groups will indicate how many groups that you select are new, and how many already exist. If you select preexisting groups, all new mailboxes will also be imported. |
6.Click Next. The Group settings - default values window opens.
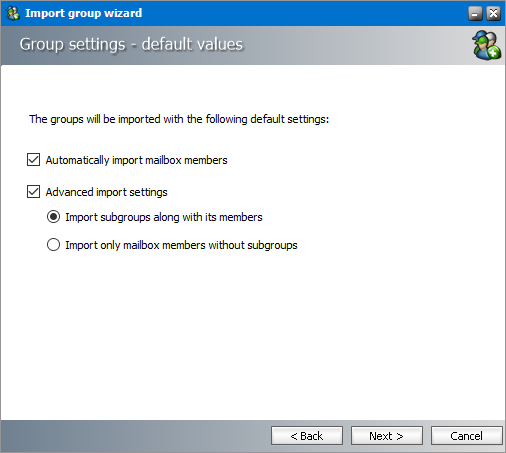
7.Specify the settings which will be applied when the groups are imported now or synchronized in future with the Address Book Manager automatically or manually. The settings are described below:
a.Automatically import mailbox members - check this box to import all Active Directory accounts with a mailbox that are members of this group.
b.Advanced import settings - check this box if you intend to import subgroups and subgroup mailbox members. You can activate this setting only if you select the Automatically import mailbox members setting.
c.Import subgroups along with members - check this box to import existing subgroups of selected groups including its member mailboxes. This is the default setting.
d.Import only mailbox members without subgroups - check this box to import only member mailboxes from subgroups. These mailboxes will be added to mailboxes in the parent group in the Address Book Manager.
8.Click Next. The Summary window opens that lists the groups that will be added.
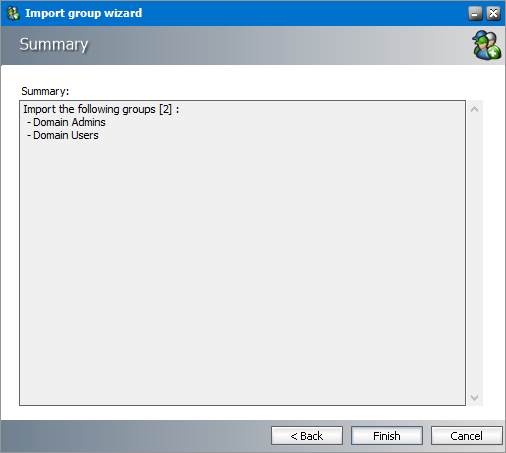
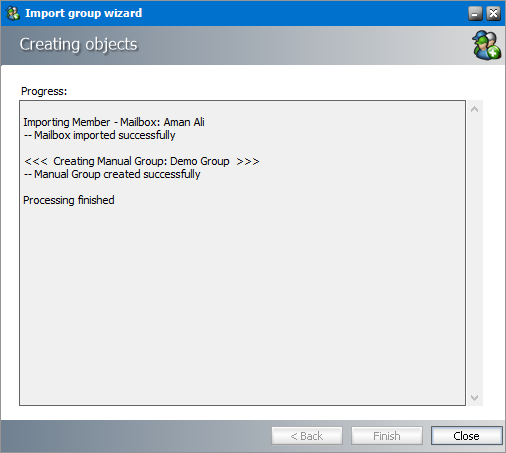
9.Click Finish to start the import process. The Creating Object window opens.

10.When the import process has completed, click Close.
Steps to import groups from an online Microsoft Exchange Server
1.In the Import group wizard window, select Import Groups.
2.Click Next. In the Exchange Type selection window, select Import from Exchange Online.

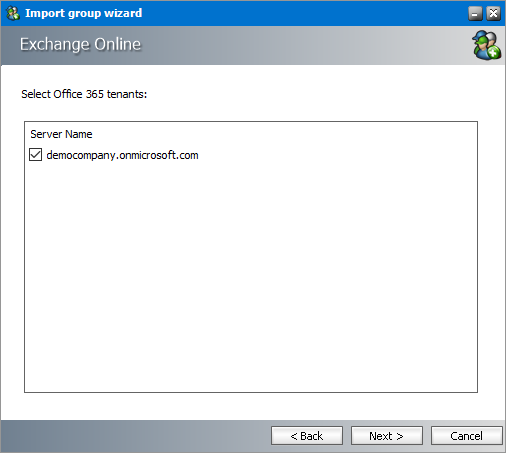
3.Click Next. The Exchange Online window opens. Select the desired online Microsoft Exchange server.
4.Click Next. The Groups - search and select groups to import window opens.
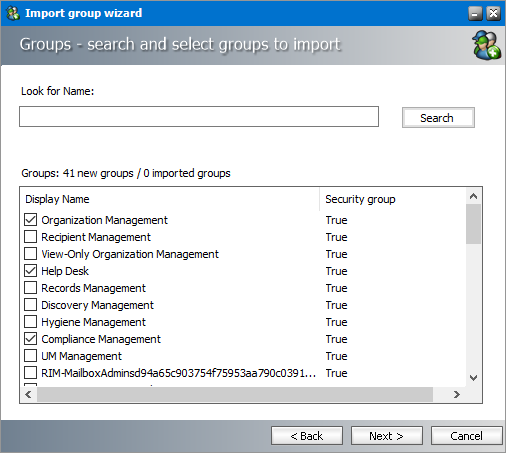
5.Click Search to return the list of all groups across all online servers available to the Address Book Manager. To reduce the list of groups, you can specify a search term in the Look for Name search box. Only the initial letters of the group Display Name can be specified and wildcards are not supported. The search term is case-insensitive.
|
|
NOTE: Groups that are highlighted indicate that they already exist in the Address Book Manager. The list summary above the list of groups will indicate how many groups that you select are new, and how many already exist. If you select pre-existing groups, all new mailboxes in those groups will also be imported. |
6.Select the groups that you want to import.
7.Click Next. The Group settings - default values window opens
8.Specify the settings which will be applied when the groups are imported now or synchronized in future with the Address Book Manager automatically or manually. The settings are described below:
a.Automatically import mailbox members - check this box to import all Active Directory accounts with a mailbox that are members of this group.
b.Advanced import settings - check this box if you intend to import subgroups and subgroup mailbox members. You can activate this setting only if you select the Automatically import mailbox members setting.
c.Import subgroups along with members - check this box to import existing subgroups of selected groups including its member mailboxes. This is the default setting.
d.Import only mailbox members without subgroups - check this box to import only member mailboxes from subgroups. These mailboxes will be added to mailboxes in the parent group in the Address Book Manager.
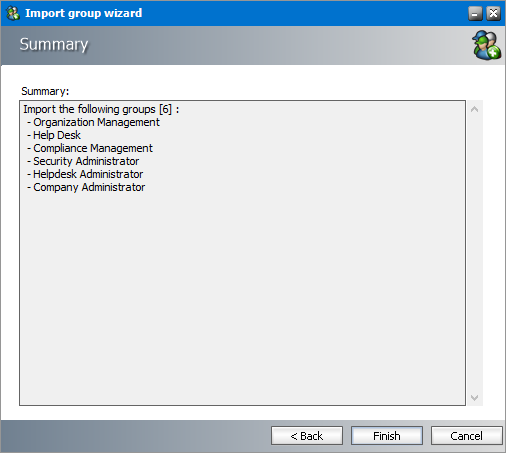
9.Click Next. The Summary window opens that lists the groups that will be added.
10.Click Finish to start the import process. The Creating objects window opens. You can click Back to select more groups to add or remove some of the selected groups.
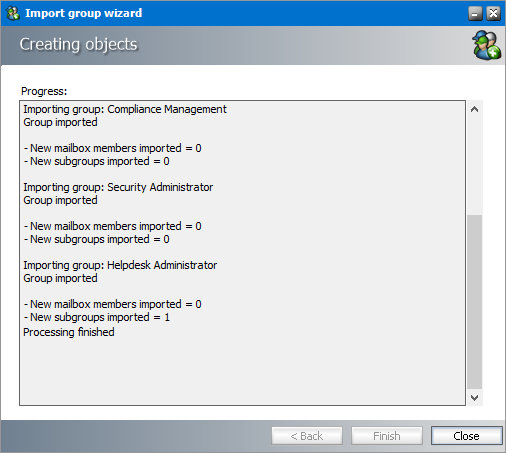
11.When the import process has completed, click Close.
Steps to create user-defined groups
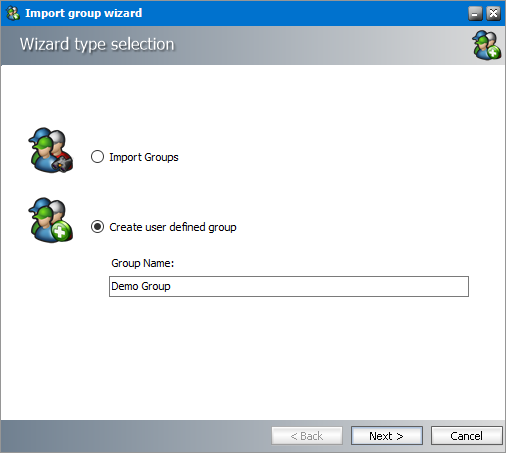
1.In the Import group wizard window, select Create user defined group. Enter a name for the group in the Group Name field.
2.Click Next. The User Defined Group - Add members to group window opens. By default, the on-premise Microsoft Exchange server is the source for the list of mailboxes and groups that can be added to the user-defined group. To use O365 Exchange servers as a source for mailboxes and groups, select Exchange Online.
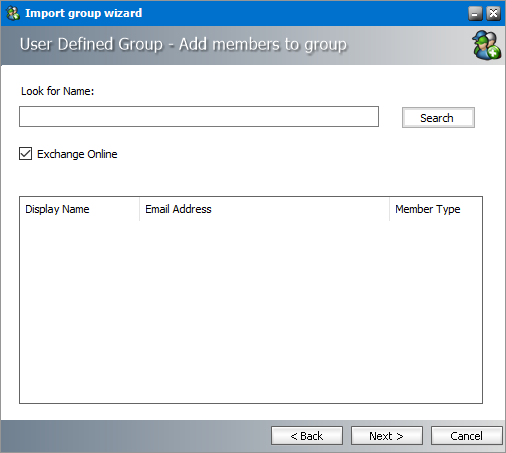
3.Click Search to return the list of all mailboxes and groups. To reduce the list of mailboxes and groups, you can specify a search term in the Look for Name search box. Only the initial letters of the mailbox or group Display Name can be specified and wildcards are not supported. The search term is case-insensitive.
|
|
NOTE: If the Exchange Online check box is checked, only the online Microsoft Exchange servers will be used as the source. If the Exchange Online check box is unchecked, only on-premise Microsoft Exchange servers will be used as the source. Mailboxes and groups that are highlighted indicate that they already exist in the Address Book Manager. The list summary above the list of groups will indicate how many mailboxes and groups are available. |
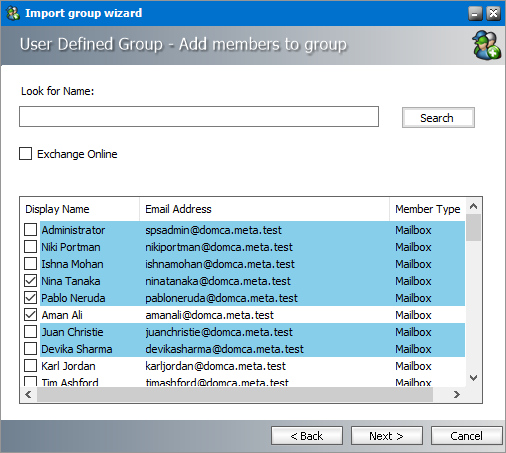
4.Select one or more mailboxes and groups that want to add to the user-defined group. If you select one or more groups, all mailboxes in that group will also be add to the user-defined group during the import process.
5.Click Next. The Summary window opens that indicates the user-defined group that will be created.
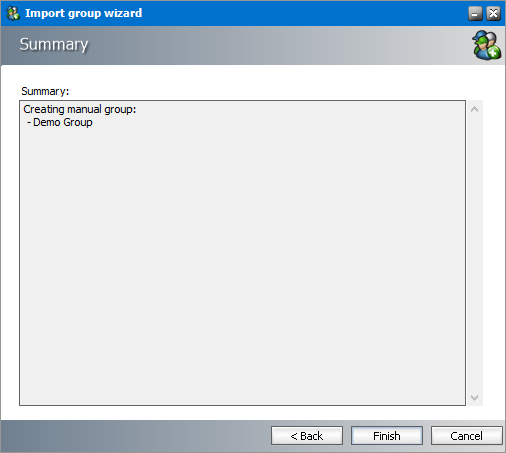
6.Click Finish to start the group creation process. The Creating Object window opens. You can click Back to revise your selection of mailboxes and groups.
7.When the import process has completed, click Close.
Steps to verify the imported groups
1.Open the Address Book Manager
2.Click the Groups tab and verify that the imported Active Directory and user-defined groups appear in the list view as expected. User-defined groups are highlighted in green 
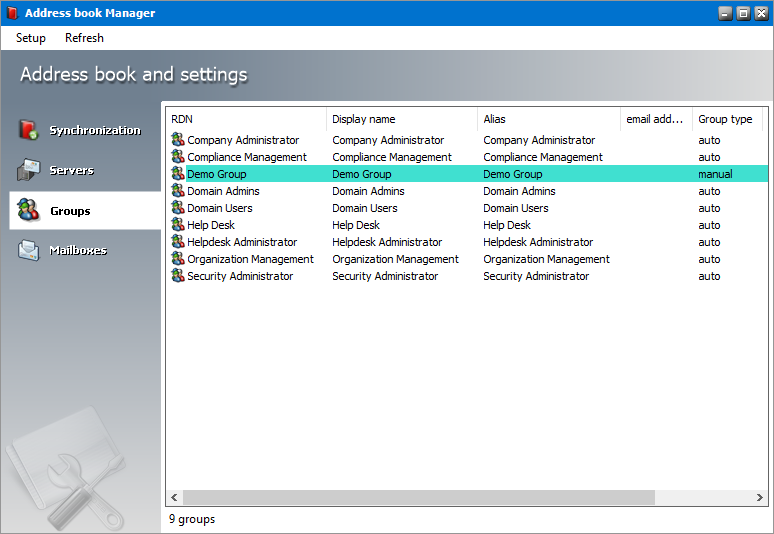
3.Select a group and right-click to open the context menu. Click Properties. The Properties window of the selected group appears.
4.Click the Members tab and verify that the list of mailboxes were imported as expected.