To aid in performance, having multiple journal mailboxes are recommended. How they are set up is up to you. Some recommendations would be to group the journal messages by role, department or even region.
Ensure the journal mailboxes are set up and functioning prior to setting up Archive Manager (AM). They do have not have to be enabled at this time but should know they they will collect mail as per your journal rules.
Prerequisites
- Journal Mailboxes and Rules already set up and confirmed worked
- You will need the installation media that is the same version of what you have installed on your primary server
- If you have a hotfix installed, see Additional Details
- The password for your ArchiveMgr_Service and ArchiveMgr_Journal accounts
- A second server with the Archive Manager prerequisites installed based on our documentation
Setup
To configure Archive Manager (AM) to process the multiple journal mailboxes do the following (these steps assume that you have the mailboxes setup at this point and that the ArchiveMgr_ESM and ArchiveMgr_Journal service accounts have the correct permissions as per our documentation):
- Log into the AM administration page | Click Data Loaders
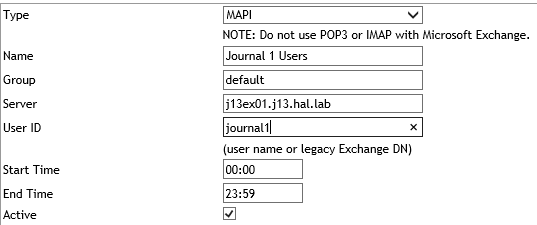
- Create a MAPI Data Loader for each Journal Mailbox that has been created
- When setting up the Data Loader you will need to provide a group name for each one you set up. This is very important as the group is where each data loader will be run from.
- For example, the group "Default" will run on the original AM server. The Data Loaders you want to run on the newly create server(s) will have to have a different group name. This is very important as this group name will be selected during the install on the other server(s)
- As for the other fields, make sure they match your environment and journal mailbox names.
- AM Server 1 config example
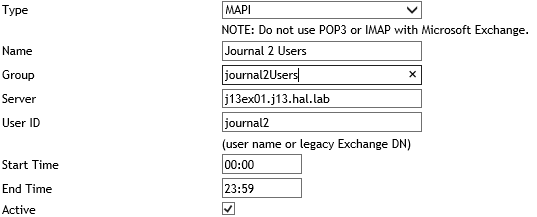
- AM Server 2 config example
- This will automatically create new Data Loader Group
3. Next you will need to create a File System Data Loader for the second server. In the below example the path is the default Export directory path when you install Archive Manager. If you change this path, please make sure it is updated here as well. Also note that the Group name here has to be the same as the above example for AM Server
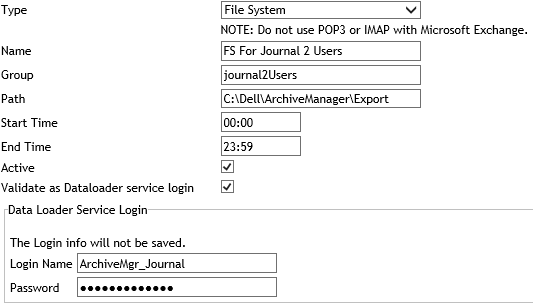
Note: On this screen it will ask for a user name and password, please use the same user account that your Archive Manager Exchange Store Service is running as (in most cases it will be the ArchiveMgr_Journal account)
Now we are ready to install AM on the second server (Please follow our documentation to have the prerequisites installed as they are the same for the secondary servers)
- Make sure that Outlook 2010/2013 is installed as MAPI/CDO does not always work in these scenarios
- Run the Installer
- Ensure you choose the same SQL server and AM database as your original install
- NOTE: If you get an error stating there is a newer version of AM already installed, please ensure you are using the same version of the installed version. For example, if you are using 5.3, you need use the 5.3 installer on second server as well. If you have applied any hotfixes, please see the Additional Notes section of the article for more information.
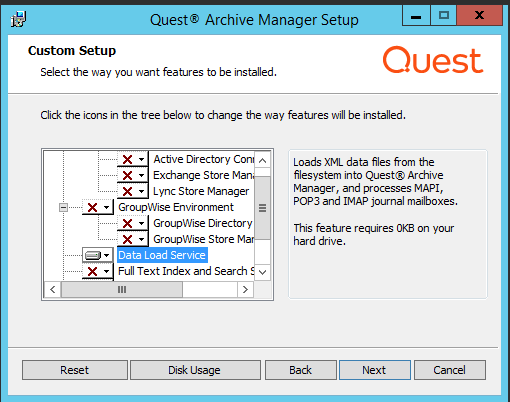
- When you get to the "Custom Setup" page, only choose the "Data Loader Service" and set all other options to unavailable
- Finish the rest of the install with defaults
- Run the Configuration Console (it will automatically load if you left the defaults in the installer)
- Click Next | Browse to your license file and click install | Click Next
- Enter password for the ArchiveMgr_Service and ArchiveMgr_Journal accounts | Click Next
- Leave the defaults for General Settings | Click Next
- Choose the new Data Loader group you created in Step 2 | Click Next
- Leave defaults for Storage Location | Click Next
- Leave defaults for Advanced settings | Click Next
- Click Finish
- Start the Archive Manager Data Loader Service from the services snap-in
- Confirm mail is now being archived from the new Journal mailboxes