
Upgrading to Evolve 2016.2 or Older
If you are upgrading from a version earlier than Evolve 4.0, please first ensure you have completed the steps in the Database Migration Guide, and then follow the appropriate steps listed below in order to complete the migration process and have your Sites running the new version.
|
|
If you have any custom themes, you must copy all of the lines below and paste it in all theme files for every Evolve site that you are deploying. @cwDiagramEditorIconColor: #b7b7b7; //v4.0 Adding this text to the end of the theme files will upgrade the theme files for the new version If you are using a custom logo, it is important to note that the new dimensions for the top left logo are 146px x 30px. |

Upgrading Custom Themes / Less Variables
This section applies to users that have customised their Evolve theme. You can skip this section if you are using the default Evolve theme and have not made any changes of your own.
Failure to Update – Theme Errors
Failure to update your custom theme with Evolve 4’s new LESS variables will result in an error.
Merging Changes Into Custom Theme
To ensure that Evolve 4.0’s pages appear as they should, you must copy the new variables into your custom theme files. These variables are listed on the next page.
New Variables in 4.0
The following variables are new to Evolve 4.0:
Global search
|
Variable |
Default Value |
|
@cwGlobalSearchFocusColor |
@cwMenuLeftMainNavigationBackgroundColorActive |
|
@cwGlobalSearchTextColor |
@cwMenuLeftMainNavigationTextColor |
|
@cwGlobalSearchBackgroundColor |
@cwMenuLeftMainNavigationBackgroundColor |
|
@cwGlobalSearchResultsTextColor |
@cwFontTextColor |
|
@cwGlobalSearchResultsBackgroundColor |
whitesmoke |
Top Bar
|
Variable |
Default Value |
|
@cwTopBarHeight |
40px |
|
@cwTopBarBackgroundColor |
#ECEFF1 |
|
@cwTopBarProfileLinkColor |
@cwColor2 |
|
@cwTopBarProfileLinkHoverColor |
@cwColor2Shade |
|
|
|
Login Page
|
Variable |
Default Value |
|
@cwLoginTextColor |
@cwTextColor |
|
@cwLoginLabelColor |
@cwColor2 |
|
@cwLoginTextBoxBorderColor |
#CFD8DC |
|
@cwLoginTextBoxFocusBorderColor |
@cwColor2 |
|
@cwSiteSelectionTextBackground |
@cwColor2 |
|
@cwLoadingIconColor |
@cwAccentColor |
Theme File Labelling Convention
Evolve’s LESS variables are named using camelCase whereby the first letter of each word is capitalized – except for the first letter of the whole string. Evolve version numbers are commented out next to any variables that relate to specific Evolve versions. I.e: //v4.0
Custom Logos
The dimensions of custom logos have been changed, they are now:
Image 1
logo.png
146 x 30 px
Image 2
logo-m.png
112 x 30px
Upgrading from Evolve 2.2, 2.3, 2.3.1, 3.0 or 3.1
There are no changed configuration options required for your upgrade, but you must still do the following:
• Run the Server Configurator to complete the upgrade.
•Upgrade Your Database so it works with the new version.
•Update each of your Sites so they work with the new version.
Evolve eModeler
Evolve 3.1 introduces eModeler. To ensure that this new feature is enabled for use across your Sites, see Enable BP modeler.
Upgrading from Evolve 2.1
If you are upgrading from Evolve 2.1, quite a lot has changed in terms of Site configuration and setup.
As such, there are a series of steps you should follow in order to complete the upgrade process.
Instructions for upgrading from Evolve 2.1
|
|
These instructions assume you have already upgraded the Evolve application on the web server in accordance with the Installation Guide. |
Upgrading your database to support CW Suite / Evolve 2016 and above
Upgrading your database to support CW Suite / Evolve 2016 and above
These instructions explain how to update your database for new releases of CWSuite and Evolve.
|
|
IMPORTANT: Before beginning the upgrade process you must make sure that your database user has DBA permissions. |
Step 1 - Backup and Preparation
•It is recommended that you back up your database prior to following these steps.
Step 2 - Ensure you have installed your new version of CW Suite
•Follow the install guide for CW Suite until the step to upgrade your database.
Step 3 - Upgrade the Database
1. Run Command Prompt as an administrator and navigate to the 'bin' directory where CW Suite is installed.
2. Type the following: ValidateRepository.exe -connection:YourConnectionName -username:YourUserName password:YourPassword -upgradedb

3.The Validate Repository tool will do various checks and will display the results of these checks as well as a prompt to commence the upgrade.
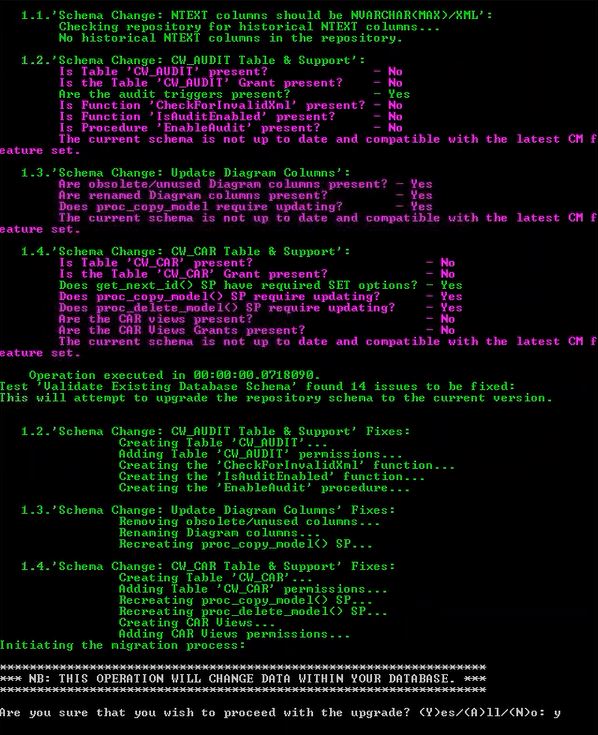
If your user does not have DBA permissions you will see the following message:

If you see this message you should not proceed with the database upgrade.
Step 4 - Continue with you install instructions for Evolve as required
•Install Evolve following the information detailed in the installation guide.
Upgrading to Evolve 2.3 from Evolve 2.1
Upgrading to Evolve 2.3 from Evolve 2.1
If you are upgrading from Evolve 2.1 there are several steps you must follow to ensure your Sites are updated to run with the new version.
There are also some changes to file paths and the URLs your Sites can be accessed via that you should understand.
If you previously used Workflow in Evolve, please read this important message:
Important message for Workflow users
The mechanism for providing workflow capabilities within Evolve has changed completely in this release.
While any workflows you may have previously configured will still work in Evolve 2.3, all existing Tasks and Notifications will be lost.
If you need assistance preserving existing Tasks and Notifications, please contact the erwin Support Team.
Steps for Updating Sites
|
|
These instructions assume you have already upgraded the Evolve application on the web server machine in accordance with the Installation Guide. |
To ensure a smooth transition to the new version, follow the steps below:
1. Understand multiple Sites, the new URLs, file paths and directories
Learn about the URLs, file paths and directories used in Evolve 2.3.
2. Run the Server Configuration utility
Use the Server Configuration utility to ensure your Evolve IIS Site is configured correctly.
3. Update and publish existing Sites
For each existing Site you want to use in Evolve 2.3, ensure you follow the instructions for Updating an existing Site.
4. Learn how to create and configure a new Site
Now Evolve supports multiple Sites, learn how to Create a Site.
Update an Existing Site
Update an Existing Site
These instructions explain how to update an existing Site and configure the settings so it can be published in the latest version. These steps should be followed for each existing Site you want to publish in the new version of Evolve.
These instructions assume you have already upgraded the Evolve application on your server, and used the Server Configuration tool to configure it.
As long as the model containing your Site is in your repository, when you launch Evolve Designer the Model and its Site should be listed so you can open the Site in the designer application.
|
|
There is a new warning message displayed when publishing a Site if your model has more than one template diagram for a Rule and Category combination. We strongly recommend that if you see this message you revisit your model to eliminate duplicate diagram templates for the same Rule and Category, otherwise you could have issues displaying diagrams in your Site. |
Step 1 - Check existing custom data and files
Custom Site content
Check that any custom Site content you may have is in the correct location in the Evolve/Site directory.
This is in your Site\bin\webDesigner\custom\<customization-name> directory.
See URLs, file paths and directory structures.
Custom logos
If you use custom logos in your Evolve Site or Sites, the configuration required to use them has changed. Please read these instructions on how to use custom logos on your Site to ensure they continue to work after upgrading.
Custom Workflow Emails
If you have customized the default Email templates for Workflow, ensure they are copied to the Site\bin\SMTP\Email Templates directory.
Step 2 - Update the Site's Meta Model
To update the meta model:
1. In Evolve Designer open your Site
2. Click the Update Meta Model button
The Model is updated with the latest required meta data.
3. Save your Site, the close and re-open Evolve Designer when prompted.
Step 3 - Update Diagram Designer layouts
1. Ensure Evolve Object Types are displayed in Object Explorer by using the Show/Hide Object Typesbutton in Evolve Designer
2. In Object Explorer, view the CW Diagram Designer objects in your model
3. Edit the properties of each object and set the Freeze Level to ‘Unfrozen’
4. In Diagram Designer, open each layout and click the Run tab.
Step 4 - Update the Site settings
To update the Site settings:
1. Open the Site in Evolve Designer
2. Select the top-level Site node
3. Check the following settings and edit where necessary:
|
Setting |
Description |
|
Server Language |
Choose the language of the Site if you want to override the global Evolve setting. |
|
Server Theme |
Choose the theme of the Site if you want to override the global Evolve setting. |
Note: These are the basic settings required to publish your Site. For the full configuration reference, see: Configuration Reference.
4. Select the Deployments > [server name] > Model node (showing the Scriptname of the Model your Site is in)
5. Complete the following fields:
|
Setting |
Description |
|
Site URL Name |
Specify the name of this Model Site as it appears in the URL, such as http://<server-name>/<evolve-IIS-site-name>/[sites|statics]/<site-url-name>/ |
|
Site Display Name |
Enter the name of your site. This is only displayed on the top-level Evolve Sites page. |
|
Deploy Custom Site |
If you publish using custom content, select the custom site reference here. |
|
AD Group for Social Users |
Only used if the Evolve Authentication Method is set to Active Directory. Specify the name of the Active Directory group you want to use for Evolve Social users. |
|
AD Group for Contributor Users |
Only used if the Evolve Authentication Method is set to Active Directory. Specify the name of the Active Directory group you want to use for Evolve Contributor users. |
|
AD Default Social Role Name |
Only used if the Evolve Authentication Method is set to Active Directory. Specify the default Role you want newly-created Evolve Social users to be given. |
|
AD Default Contributor Role Name |
Only used if the Evolve Authentication Method is set to Active Directory. Specify the default Role you want newly-created Evolve Contributor users to be given. |
|
Display Model in Evolve |
Applies to Dynamic Sites only. Use this option to specify if this Model Site is available or disabled in Evolve. |
Note: These are the basic settings required to publish your Site. For the full configuration reference, see: Configuration Reference.
6. Save the Site.
The settings are updated.
Step 6 - Publish your Site
Now the Site and IIS are configured, you must publish your site so that all the required files are generated and placed in the correct location on the web server.
To publish your Site:
In Evolve Designer, click Dynamic Site or Static Site in the Publish area on the Home menu.
Accessing a Dynamic Site
Dynamic Sites are published at the following URL:
http://<server-name>/<evolve-IIS-site-name>/sites/<site-url-name>/
Accessing a Static Site
Static Sites are published at the following URL:
http://<server-name>/<evolve-IIS-site-name>/statics/<site-url-name>/