
Shared mailbox over quota rollover
If a mailbox is over quota, a new one can be created automatically and any remaining data for this transformation is ingested into the new mailbox.
The new mailbox has a _1 suffix added, eg John.doe_1@domain.com. Additional rollovers for this container will be _2, _3 and so on.
There is a button in the user interface so that an operator can perform this action:
This is an additional possibility in a migration. Previously an over quota shared mailbox could be converted to a normal mailbox, but that consumes an additional Microsoft license. By creating a new, shared mailbox additional licenses are not consumed. It is also shown to be faster ingesting into this type of mailbox compared with moving data from a primary mailbox to a secondary/personal archive mailbox.
Re-exporting a PST for a certain user
When migrating to PST, you might encounter corrupt PST files and need to re-export items for a certain user. Heres how to do it:
1.On the Stage 1 (Sync Data) page, expand the line that contains JC PST mappings.
2.Right-click on the Primary Smtp Address of the mapping that contains PSTs you want to view/re-import and select Show list of PSTs. A window opens showing associated PSTs.
3.Select the desired item(s) and click the Enable For Re-Export button.
|
|
NOTE: If you notice corrupt PST files that you want to re-export, but Stage 2 is complete, youll need to manually reset the workflow before you can re-export the PST files. |

Additional information
In step 2 above, when the window opens and displays the users PSTs, youll notice the windows URL includes the user, item database ID, and container mapping ID.
Limitations
A maximum of 10 PST files are processed (deleted/reset) for a Journal Explosion re-export. If needed, you can re-export remaining files after the first batch of 10 are ingested.
Adding Sender-Recipient SMTP addresses
Manually add an active Sender-Recipient SMTP address
1.Go to Configuration.
2.Select Journal Transformation User Management page.
3.From the Select Journal Transformation Name drop down, select All or the required Journal Transformation Container Mapping.
4.Click Add toolbar button.
5.In the Enable Users for Journal Transformation pop out window, select the required active Sender-Recipient SMTP and click Save & Close button.
The selected Sender-Recipient SMTP address is now enabled for use in Journal Transformation and is added to the User Mappings screen.
Add Sender-Recipient SMTP address using .csv file
A .csv file can be used to add users for Journal Transformation.
The .csv file requires the format to be: OriginalSMTPAddress,PrimarySMTPAddress(optional)
1.Go to Configuration
2.Select the Journal Transformation User Management page
3.From the Select Journal Transformation Name drop down, select All or the required Journal Transformation Container Mapping
4.Click Import from CSV toolbar button
5.Click Browse and select your .csv file
6.Ensure the option, Update existing user mappings is NOT selected
7.Click Import
The selected Sender-Recipient SMTP address is now enabled for use in Journal Transformation and is added to the User Mappings screen.
Manually enable an active address for import
To manually enable a Sender-Recipient SMTP address:
1.In the User Mappings screen, Select the required Sender-Recipient SMTP address
2.Ensure the selected Sender-Recipient SMTP address status is:
a.Has Mailbox = Yes
b.Is Ready for Import = Ready
c.Enabled for Import = No
d.Is Deleted = No
3.Then click the Enable for Import toolbar button
4.Ensure the Enabled for Import status changes to Yes (Enabled) for the selected Sender-Recipient SMTP address
Monitor progress of an Enabled for Import Sender-Recipient SMTP address
To monitor the progress of the Enabled Sender-Recipient SMTP address Journal Transformation mapping:
1.Go to Manage & Operations > Stage 1
2.Select the required Journal Transformation container mapping
3.Expand the Journal Transformation container mapping to view the enabled Sender-Recipient SMTP sub-containers.
Troubleshooting
Sender-Recipient SMTP address does not appear
If the required Sender-Recipient SMTP does not appear in the Enable Users for Journal Transformation pop out window when you attempt to add a user for Journal Transformation.
You will need to confirm the SMTP address is correct and that the Stage1 Journal Transformation mapping has completed exporting/identifying sender-recipient SMTP addresses. As only exploded sender-recipient SMTP addresses appear.
If you are adding a Sender-Recipient SMTP using csv file, ensure the file is formatted correctly and contains valid Sender-Recipient SMTP address.
If the export has completed for all Journal Transformation Container Mapping. Further investigation of the logs and database will be required by Archive Shuttle.
CSV Import Fails
Check the WebUI log for the tenant and you will see the UI activity, example below:
2020-02-10 14:41:43Z|11405|chs-as-01| 53|TRACE| ReadUsersFromFile|File [E:\WebHotel\cola\UI\App_data\UploadTemp\2d4adde5-a376-4664-88a3-0d34e9cb8711.csv] was processed, [1] lines were read with total of [0] user mappings
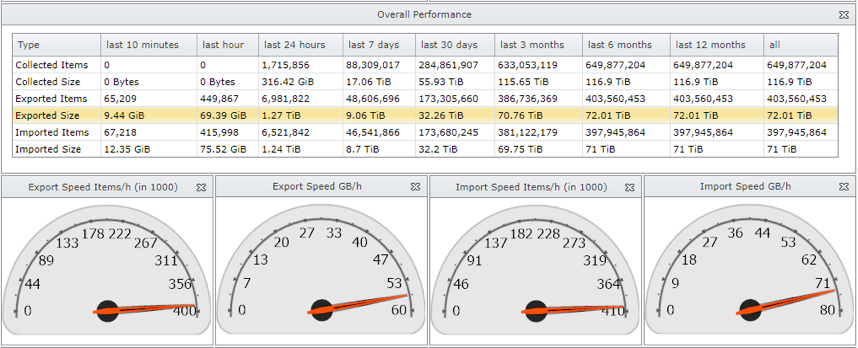
Monitoring a migration
Its important to monitor Archive Shuttle during a migration. This article gives advice on the things to monitor.
Active systems
Archive Shuttle works best at scale. Migrating a few hundred items is not what it is intended to do. Fully utilized systems ensure that all aspects of the system, the workflow and processes are busy.
Progress & Performance
Take a look at the Progress & Performance screen in the user interface.
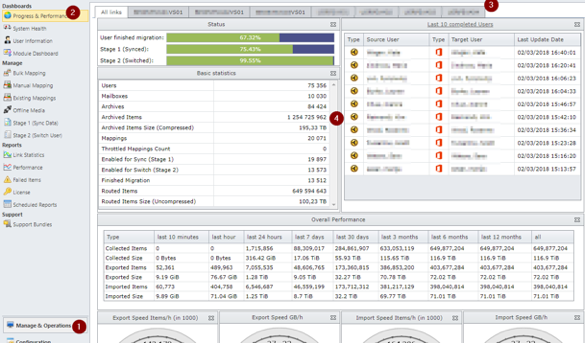
This dashboard is modular, meaning you can re-arrange widgets, remove ones which arent needed and store that layout to use later. The page can be configured to automatically refresh (for example every 60 seconds).
The dashboard gives a great overview of the overall health of your migration.
In the graphic above we ask the question whether there is any potential issue with the highlighted statistics.
Red box
Overall things look healthy, however export is slightly slower than import. This means that eventually the system will run out of work to do.
Green box
Collection of archived item metadata is currently not happening. That could be completely normal.
Blue box
This again is showing that import is currently faster than export, and that may mean that the system will run out of work to do.
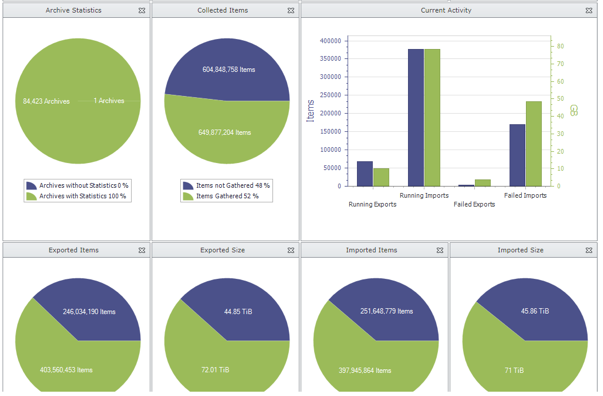
Lower down on the Progress & Performance page are more indicators about the overall health of the migration.
Stage 1
Stage 1 does all the heavy lifting in a migration, and if Stage 2 is not enabled, Stage 1 will continue topping up the migration (with any additional archived items from the source environment).
Conditional formatting is applied to results:
·Containers with no items are shaded blue
·Containers with rows in red are potential issues
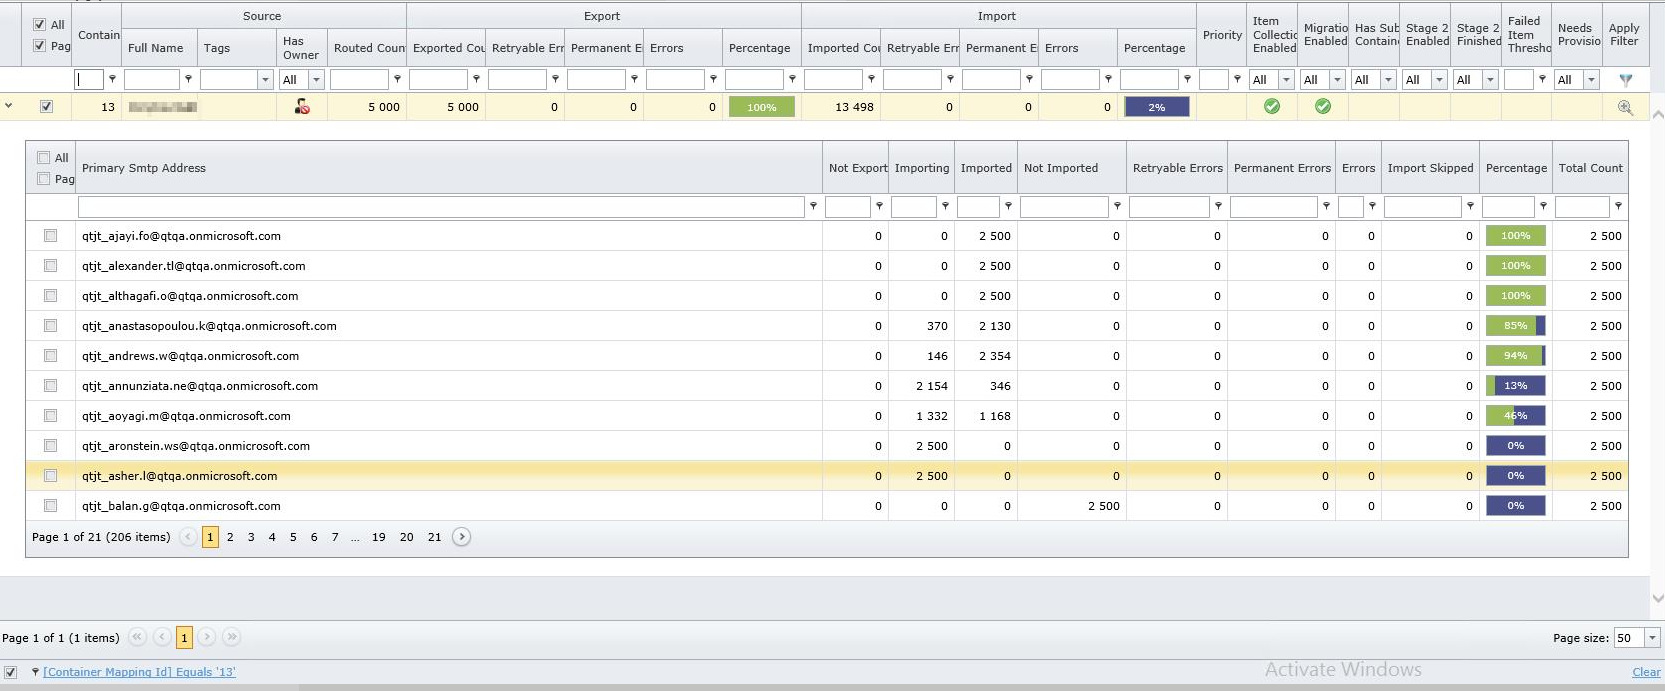
More examples of the Stage 1 page showing a journal migration in progress:
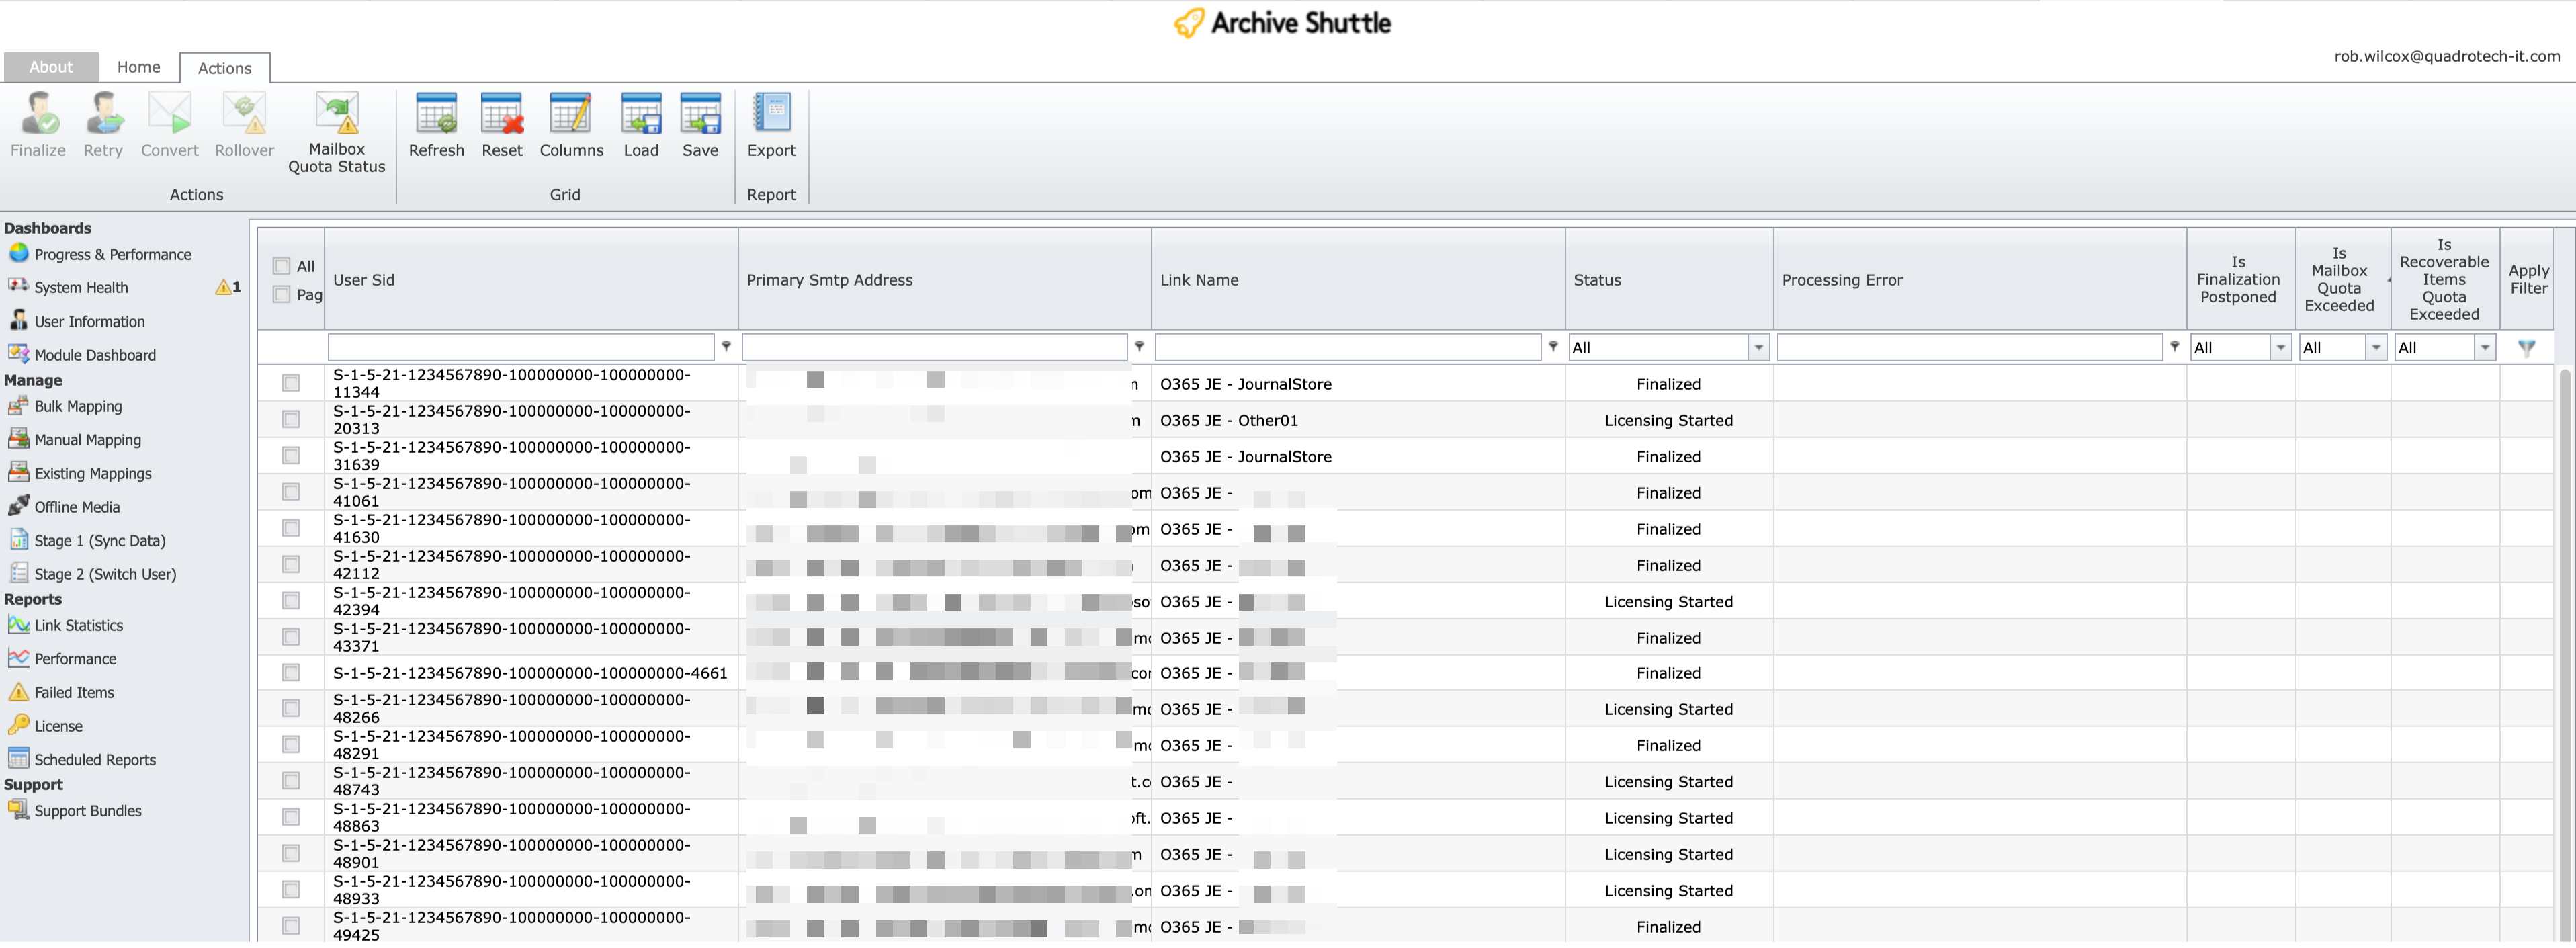
Office 365 Mailbox Quota Status
On this page, regular mappings in which Office 365 is the target is displayed. To access the Mailbox Quota Status page:
1.Go to Stage 1 (Sync Data).
2.Click the Office 365 tab.
3.Click Mailbox Quota Status.
The page can be sorted by the quota used, and it is worth checking the recoverable items folder quota as well as the regular mailbox quota.
If the mailbox quota is reached for an Office 365 target mailbox, the migration will be disabled automatically. All mappings will be disabled if the quota is exceeded. You can check the threshold for quota by going to System Configuration > Office 365 Module > Mailbox Quota Exceeding Threshold (%) (the default quota value is 95%). This is indicated with a red check mark in the Is Quota Exceeded column in the grid. You can see if a migration has been disabled by going to the Stage 1 (Sync Data) page, and viewing the Migration Enabled column in the grid.
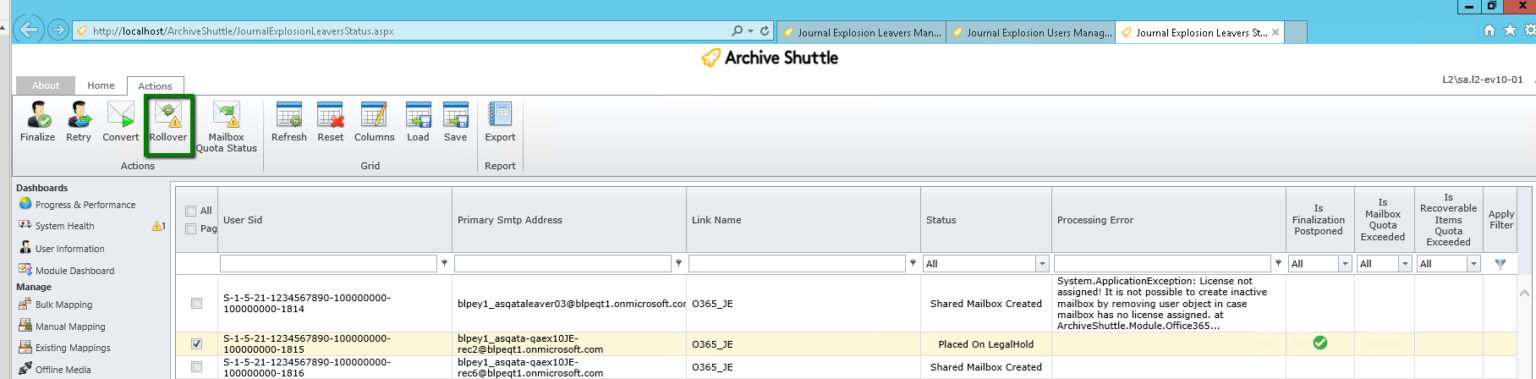
Leaver status
From the User Management page, you can access the remediation page.
Here you can see the status of any remediation activities which have taken place on user mappings.
Remediation status
If youre processing leavers, then reviewing the leaver provisioning status page is essential. You can access it from here:
Again this page can be sorted and filtered to try to pick out any problematic users.
Base system
Monitor the base or basic Journal Commander System will ensure fundamental operational activity. One of the ways to proactively monitor the system itself is to use the HealthCheck API.