Tchater maintenant avec le support
Tchattez avec un ingénieur du support

Recovery Manager for AD Forest Edition 10.2.1 - User Guide

Overview Getting started
Permissions required to use Recovery Manager for Active Directory Recovery Manager Console Getting and using help Configuring Windows Firewall Using Computer Collections Managing Recovery Manager for Active Directory configuration Licensing
Backing up data
Permissions required for the Backup operation Managing Backup Agent Using a least-privileged user account to back up data Using Managed Service Accounts Active Directory backups vs Windows System State backups Creating BMR and Active Directory backups Using the Backup Wizard Retrying backup creation Enabling backup encryption Backing up AD LDS (ADAM) Backing up cross-domain group membership Backing up distributed file system (DFS) data Backup scheduling Setting performance options Setting advanced backup options Using Forest Recovery Agent Unpacking backups Using e-mail notification Viewing backup creation results
Restoring data
Getting started with Active Directory recovery Managing deleted or recycled objects Restoring backed up Active Directory components Integration with Change Auditor for Active Directory Using granular online restore Restoring AD LDS (ADAM) Selectively restoring Active Directory object attributes Restoring objects in an application directory partition Restoring object quotas Restoring cross-domain group membership Performing a restore without having administrator privileges Reports about objects and operations Using complete offline restore Offline restore implications Restoring SYSVOL authoritatively Performing a granular restore of SYSVOL Recovering Group Policy Restoring data from third-party backups Using the Extract Wizard Restoring passwords and SID history
Full Replication Consolidating backup registration data Monitoring Recovery Manager for Active Directory Recovering an Active Directory forest
Forest recovery overview Deploying Recovery Manager for Active Directory Forest Edition (Disaster Recovery Edition) Permissions required to use Forest Recovery Console Forest Recovery Console Managing a recovery project Recovery methods Phased recovery Managing Forest Recovery Agent Rebooting domain controllers manually Resetting DSRM Administrator Password Purging Kerberos Tickets Managing the Global Catalog servers Managing FSMO roles Manage DNS Client Settings Configuring Windows Firewall Developing a custom forest recovery plan Backing up domain controllers Assigning a preferred DNS server during recovery Handling DNS servers during recovery Forest recovery approaches Deciding which backups to use Running custom scripts while recovering a forest Overview of steps to recover a forest Viewing forest recovery progress Viewing recovery plan Viewing a report about forest recovery or verify settings operation Handling failed domain controllers Adding a domain controller to a running recovery operation Selectively recovering domains in a forest Recovering SYSVOL Deleting domains during recovery Resuming an interrupted forest recovery Recovering read-only domain controllers (RODCs) Checking forest health Collecting diagnostic data for technical support
Using Management Shell Creating virtual test environments Using Recovery Manager for Active Directory web portal Appendices
Frequently asked questions Best practices for using Computer Collections Technical characteristics Best practices for creating backups Best practices for creating backups for forest recovery Best practices for recovering a forest Descriptions of recovery or verification steps Ports Used by Recovery Manager for Active Directory Forest Edition (Disaster Recovery Edition) Backup Wizard Online Restore Wizard Online Restore Wizard for AD LDS (ADAM) Group Policy Restore Wizard Repair Wizard Extract Wizard Events generated by Recovery Manager for Active Directory

Step 6: Enable network adapters

After the virtual test environment has been successfully created, the Active Directory Virtual Console automatically displays a dialog box that prompts you to enable network adapters in the created test environment. In that dialog box, click Enable if you want to enable the network adapters now or click Cancel if you want to enable them manually later.


Using Recovery Manager for Active Directory web portal


About Recovery Manager Portal

The Recovery Manager Portal implements a Web interface that allows you to do the following:

  • Access the search and restore functionality of RMAD via a Web browser.

  • Delegate permissions to restore or undelete Active Directory objects to specific users or groups in your Active Directory forest.

  • Monitor the health of RMAD instances deployed in your environment.

  • View a history of backups created by a specific RMAD instance.

Resources/Images/10_UG_portal working scheme.png

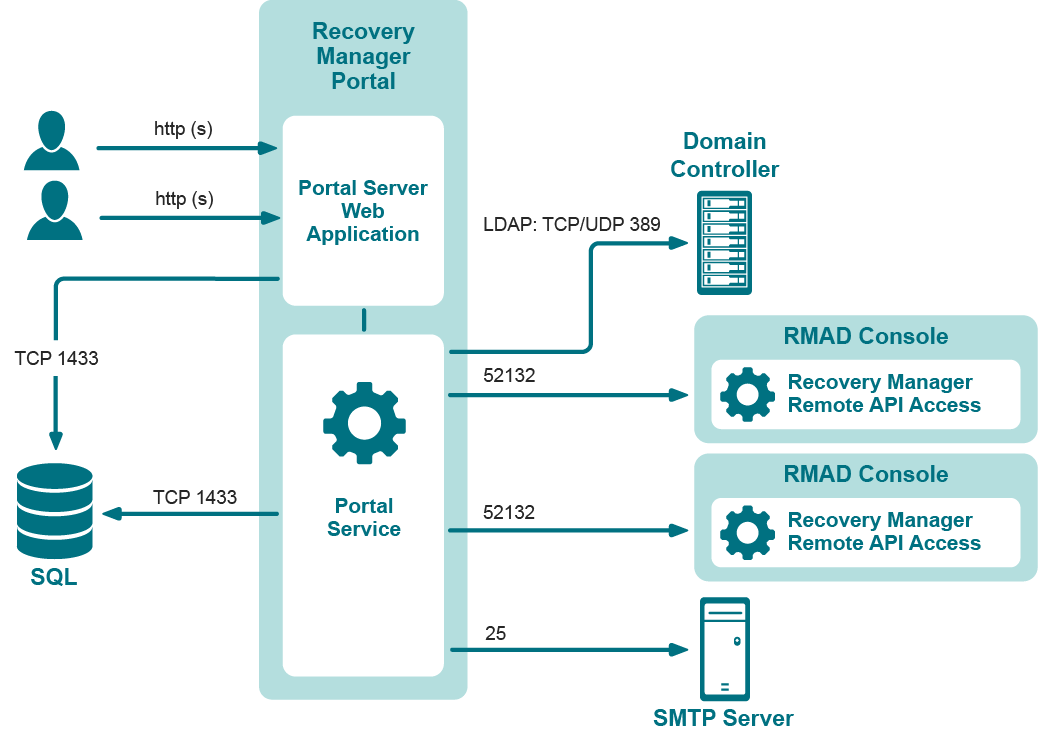
The Recovery Manager Portal enables intranet users to use a Web browser to access the search and restore functionality provided by RMAD. Through the Recovery Manager Portal, the users can search for and restore objects from the unpacked Active Directory backups created with RMAD. You can configure the Recovery Manager Portal to work with multiple instances of RMAD.

To access a RMAD instance, the Recovery Manager Portal requires a service called the Recovery Manager Remote API Access. This service is supplied with RMAD and must be installed and running on each computer hosting the RMAD instances whose Active Directory backups you want to make available to the Recovery Manager Portal users.


Installing Recovery Manager Portal

You can install the Recovery Manager Portal on any domain-joined computer, including the one where RMAD is installed. To install the Recovery Manager Portal, you can use a domain user account, MSA, or gMSA account that is a member of the local Administrators group on the target computer.

NOTE

In case of MSA or gMSA account, Recovery Manager Portal supports only Windows authentication to access the SQL Server databases. If you specify MSA/gMSA when the SQL Server authentication option is selected on Specify SQL Server Access Account step of the setup wizard, the Recovery Manager Portal will not be installed because RMAD cannot securely store encrypted access credentials for SQL Server in the gMSA / MSA part, so this scenario is not supported. In this case, you will not receive any errors.

For more details about account requirements and limitations related to Recovery Manager Portal, see the Install or uninstall Recovery Manager Portal section in Permissions required to use Recovery Manager for Active Directory.

For details on how to create a gMSA account, see Using Managed Service Accounts.

To install the Recovery Manager Portal
  1. Ensure the computer on which you plan to install the Recovery Manager Portal meets the system requirements in the RMAD Release Notes.

  2. Run the RecoveryManagerPortal.exe file supplied with the RMAD installation package.

  3. If you specify the MSA or gMSA account, add the $ character at the end of the account name (e.g. domain\computername$) and leave the Password field blank in the Access Web site using section of the installation wizard.

  4. Follow the steps in the wizard to complete the portal installation.

    Take note of the Web site and virtual directory you specify in the wizard, because they make up the URL at which users can access the Recovery Manager Portal, as follows: http://WebSite/VirtualDirectory

  5. After you complete the Setup Wizard, finalize the installation by logging off and then logging back on to the Recovery Manager Computer.

Once you have installed the Recovery Manager Portal, you need to configure it for working with the RMAD instances deployed in your environment. For details, see Configuring portal for working with Recovery Manager for Active Directory.


Documents connexes

The document was helpful.

Sélectionner une évaluation

I easily found the information I needed.

Sélectionner une évaluation