General tab for Active Directory backups
The General tab enables you to filter Active Directory® backups displayed in the details pane of the Recovery Manager Console (snap-in).
-
Filter backups view. Select this check box to activate the backups filtering. You can filter backups based on backups sources or dates. Leave this check box cleared to have RMAD display all registered backups in the details pane.
-
Backup sources. This option allows you to filter backups based on backup sources. For example, you can have RMAD display only backups taken from the specified domain controller.
Domain controller. Provides a space for you to type the name of a domain controller. RMAD will display only backups taken from that domain controller.
Domain. Provides a space for you to type the name of a domain. RMAD will display only backups taken from domain controllers that belong to that domain.
Site. Provides a space for you to type the name of a site. RMAD will display only backups taken from domain controllers located in that site.
- Backup dates. This option allows you to filter backups based on backup dates.
From. Select this check box to see backups that were taken starting with a specific date. To specify the date, use the list next to the check box.
To. Select this check box to see backups that were taken up to a specific date. To specify the date, use the list next to the check box.
General tab for Bare Metal backups
| NOTE |
This option requires Recovery Manager for Active Directory Disaster Recovery Edition. Contact your account representative for more information. |
The General tab enables you to filter the Bare Metal backups displayed in the details pane of the Recovery Manager Console (snap-in).
-
Filter backups view. Select this check box to activate the backups filtering. You can filter backups based on backups sources or dates. Leave this check box cleared to have RMAD display all registered backups in the details pane.
-
Backup sources. This option allows you to filter backups based on backup sources. For example, you can have RMAD display only backups taken from the specified Bare Metal instance.
Host. Provides a space for you to type the name of a computer. RMAD will display only backups taken from Bare Metal instances hosted by that computer.
Instance. Provides a space for you to type the name of an Bare Metal instance. RMAD will display only backups taken from that Bare Metal instance.
Site. Provides a space for you to type the name of a site. RMAD will display only backups taken from Bare Metal instances located in that site.
- Backup dates. This option allows you to filter backups based on backup dates.
From. Select this check box to see backups that were taken starting with a specific date. To specify the date, use the list next to the check box.
To. Select this check box to see backups that were taken till a specific date. To specify the date, use the list next to the check box.
To filter backups
-
Select the Filter backups view check box.
-
Do the following:
To filter by backup sources, fill in the corresponding fields under Backup sources.
To filter by backup creation dates, specify the dates under Backups dates.
General tab for Active Directory LDS (ADAM) backups
The General tab enables you to filter the AD LDS (ADAM) backups displayed in the details pane of the Recovery Manager Console (snap-in).
-
Filter backups view. Select this check box to activate the backups filtering. You can filter backups based on backups sources or dates. Leave this check box cleared to have RMAD display all registered backups in the details pane.
-
Backup sources. This option allows you to filter backups based on backup sources. For example, you can have RMAD display only backups taken from the specified AD LDS (ADAM) instance.
Host. Provides a space for you to type the name of a computer. RMAD will display only backups taken from AD LDS (ADAM) instances hosted by that computer.
Instance. Provides a space for you to type the name of an AD LDS (ADAM) instance. RMAD will display only backups taken from that AD LDS (ADAM) instance.
Site. Provides a space for you to type the name of a site. RMAD will display only backups taken from AD LDS (ADAM) instances located in that site.
- Backup dates. This option allows you to filter backups based on backup dates.
From. Select this check box to see backups that were taken starting with a specific date. To specify the date, use the list next to the check box.
To. Select this check box to see backups that were taken till a specific date. To specify the date, use the list next to the check box.
To filter backups
-
Select the Filter backups view check box.
-
Do the following:
To filter by backup sources, fill in the corresponding fields under Backup sources.
To filter by backup creation dates, specify the dates under Backups dates.
Integrity checks for Active Directory and AD LDS (ADAM) backups
To perform an integrity check
When a backup is created, a checksum is calculated for the backup file and saved in the backup file when the backup is registered. An integrity check recalculates the checksum and compares it to the checksum stored in the backup file.
NOTE: Regular BMR backups don't have checksum enabled by default. Only Secure Server BMR backups have checksum enabled by default.
The Checksum calculation is enabled by modifying the registry: HKEY_LOCAL_MACHINE\SOFTWARE\WOW6432Node\Quest\Recovery Manager for Active Directory\Options\
create a new DWORD key ChecksumCalculationMode
The various values for enable/disable Checksum Calculation are:

-
In the Recovery Manager for Active Directory console, click the Backups node then click the Active Directory, Bare Metal, or AD LDS (ADAM) node.
-
Click a backup you want to check the integrity on.
-
An automatic integrity check will be performed on the import.
-
The following statuses can be displayed after the integrity check has finished:
Status Description Passed The newly calculated checksum value matches the previously calculated checksum stored in the backups file. Unknown The integrity check was not performed. Running The integrity check is in progress. Failed The backup is not accessible (wrong credentials) or may have been moved from the path. No Checksum The previously calculated checksum could not be read. This could be due to the backup being created by a previous version of the product. The backup also may have been damaged in such a way that the checksum was also affected. Corrupted The newly calculated checksum value does not match the previously calculated checksum stored in the backup file.
NOTE: Integrity checks are recorded as a Windows Eventlog event on the console during the integrity check. The events can be found in Applications and Services Log | Recovery Manager for Active Directory. If Email is configured, then email notifications are sent for integrity checks that are performed either after creating a backup (controlled by the Run an integrity check after creating a backup setting); or after creating a scheduled backup for the previous N sessions (controlled by the Check the integrity of previously created backups after a scheduled backup setting). The integrity check results are combined with the backup creation results and sent as a single message. If the Send notification upon errors or warnings only setting is selected, then an notification will only be sent if the integrity check report contains the results Backup file is corrupted or Integrity check failed. If all integrity checks are successful, no email notification will be sent.
-
To manually perform an integrity check on any backup already in the Active Directory, Bare Metal, or AD LDS (ADAM) nodes:
-
Click a backup you want to perform the integrity check on.
-
Right click and select Check Integrity.
-
One of the statuses above will be displayed after running the manual integrity check.
The following backup types are supported for integrity check after the backup registration:
Active Directory backups (.bkf)
AD LDS (ADAM) backups (.bkf)
Offline Active Directory Database files (.dit) are ignored.

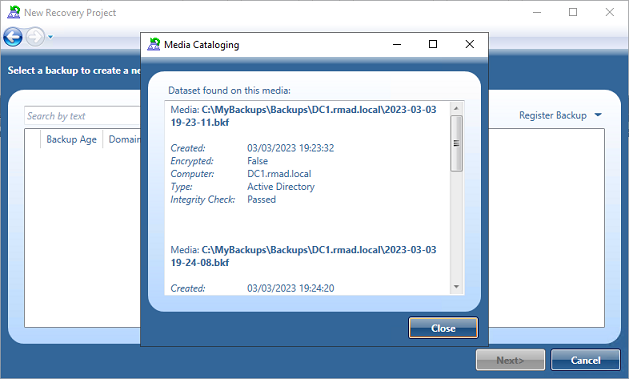
The registering of backups from New Recovery Project dialog in Forest Recovery Console, will automatically execute an integrity check when backups are registered using Register Active Directory Backup…, Register BMR Backup… and Register Backups in Folder… options.
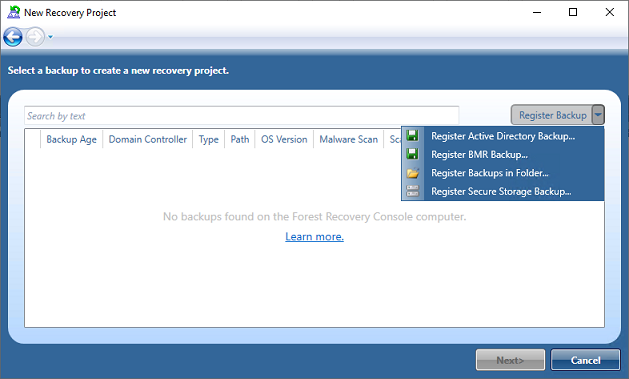
The result of the integrity check is available in the Media Cataloging dialog box.
Registering backups from Select Backup dialog in Forest Recovery Console automatically execute an integrity check for both Active Directory Backup and BMR Backup selection.
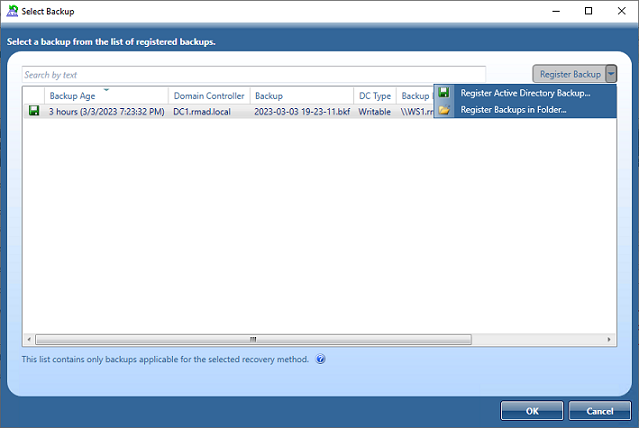
The result of the integrity check is available in the Media Cataloging dialog box.

Automatic execution of backup integrity checks from the RMAD Console and Forest Recovery Console can be configured in the registry:
HKEY_LOCAL_MACHINE\SOFTWARE\WOW6432Node\Quest\Recovery Manager for Active Directory\Options
IntegrityCheckOnBkfRegistration (REG_DWORD), can be 0 or 1 (default), allows to run integrity check for AD and ADAM (AD LDS) backups at registration.
IntegrityCheckOnBmrRegistration (REG_DWORD), can be 0 (default) or 1, allows to run integrity check for BMR backups at registration.
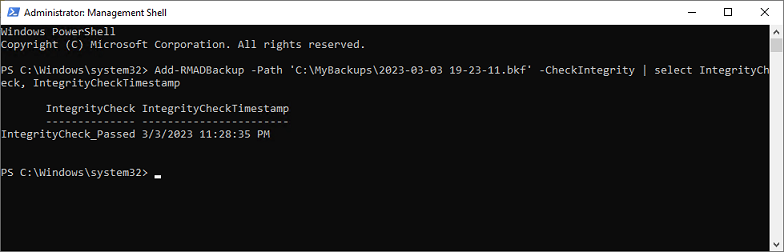
The registering of backups can be done via PowerShell® as a parameter has been added to the Add-RMADBackup cmdlet to allow an integrity check to be performed after the backup has been registered in the Active Directory database.
Add-RMADBackup -Path 'C:\MyBackups\2023-03-03 19-23-11.bkf' -CheckIntegrity
The result of the integrity check is available directly in PowerShell or can be viewed in the RMAD Console:
NOTE: IntegrityCheckOnBkfRegistration and IntegrityCheckOnBmrRegistration registry settings do not affect the integrity check with Add-RMADBackup cmdlet.