
Advanced tab
The Advanced tab is used to configure a number of advanced backup settings.
On this tab, you can use the following elements:
-
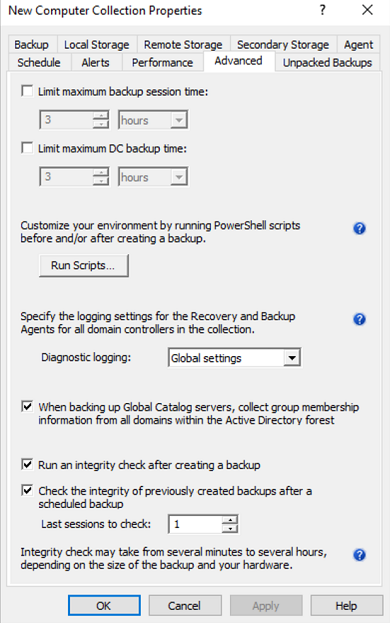
Limit maximum backup session time: - This option limits the maximum backup session time.
-
Limit maximum DC backup time: - This option limits the maximum backup session time for a single domain controller.
-
Run Scripts - This option allows you to customize your environment by running PowerShell® scripts before and/or after creating a backup. Custom scripts can be launched either on the Recovery Manager for Active Directory Console machine or on the domain controller side.
-
Diagnostic Logging: - Specify the logging setting for the Recovery Manager and Backup Agents for all domain controllers in the collection.
-
When backing up Global Catalog servers, collect group membership information from all domains within the Active Directory forest - Set by default, this option will collect group membership information from all domains within the Active Directory forest when backing up servers containing the Global Catalog.
-
Run an integrity check after creating a backup - Set by default, this option performs an integrity check when a backup has been completed.
| IMPORTANT |
When this option is disabled you are at risk of having corrupted backups preventing viable restores when critically needed. |
- Check the integrity of previously created backups after a scheduled backup - Select this option to perform integrity checks of previously created scheduled backups. You can also check previous backups ranging from 1 to 100 sessions (1 is the default).
Advanced Scripts
-
Run Scripts
In the Run PowerShell® Scripts dialog, the following options can be specified:
-
Run the script before starting the backup - Launches specified PowerShell® scripts before the backup creation process is started.
-
Stop the backup if the script fails - Stops the backup process if the script cannot be run without errors.
-
Run the script after backup creation is complete - Launches specified PowerShell® scripts after backup is created.
-
Mark the backup as unsuccessful if the script fails - If the script fails, the backup process will be shown as failed with error in the RMAD console.
-
Upload Script - Using this option you can upload an existing PowerShell® script file (.ps1). After the script is uploaded, the contents of the script will be displayed in the dialog and you can edit it if necessary.
-
Use the following account to run scripts and Select Account - Here you can select an account under which the scripts will be running. For the "Console scripts", by default, the account under which the console is launched will be used. For the "DC scripts", there is no default value, and the user has to select an account. Otherwise, the settings will not be saved.
-

| NOTE |
If the script is run on a domain controller, we strongly recommend using an account with the minimum rights required only to perform the actions specified in the script. |
Recovery Manager for Active Directory provides an option to set the maximum timeout during which a script can run (the default value is 60 seconds). To change this value, edit HKEY_LOCAL_MACHINE\SOFTWARE\WOW6432Node\Quest\Recovery Manager for Active Directory\Options\ and create or modify DWORD registry value called ScriptExecTimeoutInSeconds and set it to the required value.
Failed script can lead to both Warning and Error results. It depends on the specified settings:
| Option Name | Scenario 1 | Scenario 2 | Scenario 3 | Scenario 4 |
|---|---|---|---|---|
| Run the script before starting the backup | ✔ | ✔ | ||
| Stop the backup if the script fails | ✖ | ✔ | ||
| Run the script after backup creation is complete | ✔ | ✔ | ||
| Mark the backup as unsuccessful if the script fails | ✖ | ✔ | ||
| Result | Warning | Error | Warning | Error |
Script security
Running scripts can be dangerous - especially on a domain controller. Recovery Manager includes the following security measures for scripts:
-
Scripts are stored in the Recovery Manager database in an encrypted form.
-
Scripts are sent from the Recovery Manager console to the Backup Agent using a secure RPC channel.
-
Scripts are run in memory and no temporary files are created on the disk. When running scripts, the -EncodedCommand parameter of PowerShell.exe is used.
-
For scripts run on the domain controller, specifying a custom account under which the script will run is required. Using an account with minimum rights is recommended.
-
All scripts have a timeout when running. If the timeout is exceeded, the script will be forcibly stopped.
-
The result of the script running is recorded in the Windows Event Log.
Advanced Logging
-
Diagnostic logging - Specify the logging setting for the Recovery Manager and Backup Agents for all domain controllers in the collection.
The following options are available:
-
Global settings - Use the default logging settings from the Recovery Manager Console root node: Recovery Manager for Active Directory->Settings…>Logging.
-
Enable - If you select this option, extended logging will be enabled for all domain controllers within the collection during the backup operation.
-
Disable - If you select this option, the log will contain only Warnings and Error messages.
The log files will be created in the %ProgramData%\Quest\Recovery Manager for Active Directory\Logs folder:
-
Agent side (domain controller): ErdAgent.log
-
Recovery Console: ErdServer.log
-
-
Creating a new set of log files - Specify the creation of new logs for Recovery Manager and Backup Agents for all controllers in the collection.
Edit the following:
HKEY_LOCAL_MACHINE\SOFTWARE\Quest\Recovery Manager for Active Directory\DiagnosticsModify or create REG_SZ registry value called
LogRotationIntervalThe following options are available:
-
Never- Never create new logs -
Daily- Create new logs daily. -
Weekly- Create new logs weekly. -
Monthly- Create new logs monthly.
-
Advanced Integrity Check
By default Run an integrity check after creating a backup is enabled on new computer collections, with Check the Integrity of previously created backups after a scheduled backup is disabled.
Disabling Run an integrity check after creating a backup disables the Integrity check performed on manual backups.
Scheduled Computer Collections with Run an integrity check after creating a backup enabled and Check the Integrity of previously created backups after a scheduled backup disabled, will perform integrity checks only on new backups but not on previous backups.
Scheduled Computer Collections with Check the Integrity of previously created backups after a scheduled backup enabled, and Run an integrity check after creating a backup disabled, then only previous backups will have an integrity checked performed, based on the last backup session(s) as defined by the user (default 1).
Registry settings
For Backups manually registered in the RMAD, or Forest Recovery console, the integrity check after backup registration is controlled by the following registry settings on the RMAD console machine:
\HKEY_LOCAL_MACHINE\SOFTWARE\WOW6432Node\Quest\Recovery Manager for Active Directory\Options
DWORD Value: 1 enabled or 0 disabledIntegrityCheckOnBkfRegistration (enabled by default)IntegrityCheckOnBmrRegistration (disabled by default)
FR console register backup
In Forest Recovery, when backups are imported, an integrity check is performed.
Results of integrity check on import of backup in Forest Recovery.

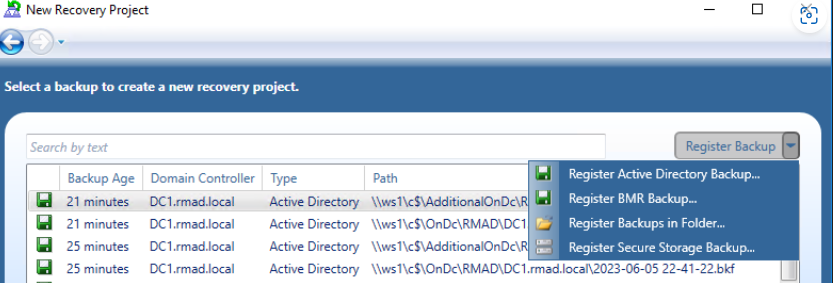
RMAD Console register backup
In this example we will register a backup for Active Directory. To register a backup in the RMAD console select Backups | Active Directory then right click and select Register Backup. There are three options, Register Backup File…, Register Backups in Folder…, and Register Offline Active Directory Database… for you to choose. Select the Register Backup File… to open the browser.

In the browser window browse to the location of the backup files and select the files to import.
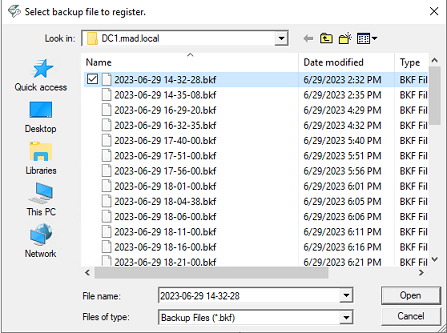
The selected backup file will automatically have an integrity check performed on import.

Default Computer collection advanced settings
The default for Run an integrity check after creating a backup enabled is enabled and Check the Integrity of previously created backups after a scheduled backup is disabled.
With both options enabled, Integrity check is done for all backups including backups from previous sessions.
After an Integrity check is performed the timestamp for Last Integrity Check column is updated and found in the Console for each backup, including backups on Secure Storage.

Disabling Run an integrity check after creating a backup disables the Integrity check performed for manual backups, including backups sent to Secure Storage.
| NOTE |
Integrity check can be time-consuming for backups given the amount or size of backups. Integrity checks may take from several minutes to several hours, depending on the size of the backup(s) and your hardware. For performance, If required to run Integrity check on previous backups, Integrity Check can be enabled to run during scheduled Computer Collections for backups based on the Last sessions to check value supplied by the user using the checkbox: |
Check the Integrity of previously created backups after a scheduled backup
Scheduled Computer Collections with Check the Integrity of previously created backups after a scheduled backup runs and Integrity check on schedule for backups on Local, Remote and Secure Storage locations.
Scheduled Computer Collections with Run an integrity check after creating a backup enabled, and Check the Integrity of previously created backups after a scheduled backup disabled, will have new backups created with their integrity checked
With Run an integrity check after creating a backup disabled and Check the Integrity of previously created backups after a scheduled backup is enabled, integrity is not checked for backups created within the current session. However backups created from a previous backup session(s) will have their Integrity checked.

Example shows backups from the most recent session created without integrity checked.

The backups from time 6:11:15 are checked on the next session. Since Run an integrity check after creating a backup is disabled, Newer backups are also then checked during the following backup session
