Validate On Edit Properties
The Validate on Edit Properties feature enables you to fill automatic values for object type properties and add minimum and/or maximum values for associations while editing object properties.
Hover over 
To fill automatic values for properties and associations, follow these steps:
-
Open the browser and login to erwin Evolve Web Platform.
-
Click a model. For example, EA Foundation – Sample Model.
-
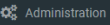
Click Administration.
-
Click Validate on Edit properties.
-
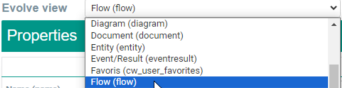
Click the Evolve view drop-down list box and select the object type that you want to auto-populate. For example, Flow (flow).
The properties and associations of the Flow object type appear.

-
Enter appropriate values in the fields. Refer to the following table for field descriptions.
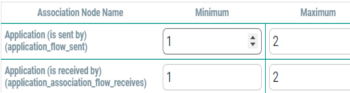
Field Description Additional Information Name (name) Specifies the flow name Category (type) Specifies the flow category Select the required category from the drop-down. Criticality (criticality) Specifies the flow criticality Select the required criticality from the drop-down. Description (description) Specifies the flow description You can fill automatic values and add minimum and/or maximum values for any object type properties and associations. Under the Minimum and Maximum columns, use up or down arrow to set the associations
For example, the following image displays the minimum and maximum values for different association types.
-
Click
to save the configuration.
You will be notified that "Configuration draft has been saved".
-
Click
to publish the configuration.
You will be notified that "Configuration published successfully".

To view automated values, follow these steps:
-
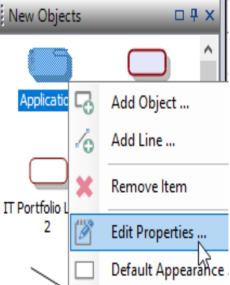
Open an object.
For example, click Information > Flow List. -
Click
to open the required flow list. For example, CI List.
The CI List properties opens.
-
Click
.
-
Click
.
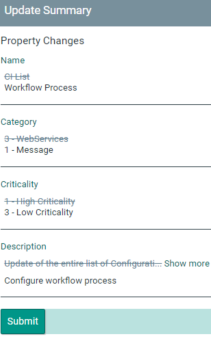
The Update Summary appears in the right pane.
You can now see the automated values under Property Changes.
-
Click Submit.
You will be notified that "Your changes have been saved".
To add associations as per the minimum and/or maximum values you set in the configuration, follow these steps:
-
Under Flow, click Associations.
- Click
.
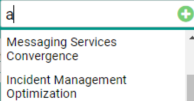
- In the Associate Objects search box, type a keyword.
A list of related search terms appears.
-
Select the required association or click
to create a new association.
-
Click
.
The Update Summary appears in the right pane, and you can now see the association changes.
-
Click Submit.
You will be notified that "Your changes have been saved".
Adding an associate object beyond the maximum value displays a warning in the right pane.
For example, the following image displays a warning when more than two associations are added for the application object type.


Enhanced Custom Display String
The Enhanced Custom Display String feature enables you to add an icon to the custom display string. Clicking this icon opens the object's properties pop-out.
Hover over
 |
Ensure that a diagram pop-out must be added for the object type for which you want to see icons and object 's properties pop-out. |
|---|
To configure the diagram pop-out in erwin Evolve Designer, follow these steps:
-
Start Evolve Designer.
-
Click a model. For example, EA Foundation - Sample Model.
-
Click Site.
-
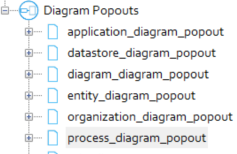
Expand Site > Diagram Popouts.
-
Right-click Diagram Popouts and click Add Diagram Popout for Object Type.
-
Select the required object type for which you want to configure pop-out. For example, Process.
A Diagram Pop-out is created for the Process object type.
-
Click Save.
-
Click Dynamic Site.
You can create a diagram pop-out for any object type to view an icon and object's property pop-out.


To configure the Enhanced Custom Display String feature, follow these steps:
-
Open the browser and login to erwin Evolve Web Platform.
-
Click a model. For example, EA Foundation – Sample Model.
-
Click Administration.
-
Click Enhanced Custom Display String.
-
Turn the Enable Popout ON to enable the pop-out window.
-
Click the Select Icon drop-down list box and select the required icon.
-
Click
to save the configuration.
You will be notified that "Configuration draft has been saved".
-
Click
to publish the configuration.
You will be notified that "Configuration published successfully".


To view an icon and an object's pop-out, follow these steps:
-
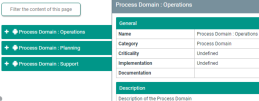
In the left pane, click Business > Process List.
You can now see the android icon added to the object type.
-
Clicking
, opens the pop-out of an object in the right pane.
You can now see the icon and object pop-out in the right pane.

Enhanced Diagram Display
This feature allows you to change the behavior of HTML5 diagrams by deactivating drill-down and selecting a highlighting color.
Hover over
| |
Before configuring the diagram, an index page, z_diagram_template must be added for the object type Diagram to get the diagram template list. |
|---|
To add an index page, follow these steps:
-
Start Evolve Designer.
-
Click a model. For example, EA Foundation - Sample Model.
-
Click Site.
-
Expand Site > Index Pages.
-
Right-click Index Pages and select Add Index Page for Object Page > Diagram.
An index page "index_diagrams" is created for the Diagram object type.
-
Click index_diagrams.
-
In the Page Name box, replace "index_diagrams" with "z_diagram_template".
-
Expand z_diagram_template and click Diagram.
-
In the right pane, under Filter Properties (AND), use the following options:


- Property
- Click the Property drop-down list box and select Template.
- Operation
- Click the Operation drop-down list box and select =.
- Value
- Click the Value drop-down list box and select True value.
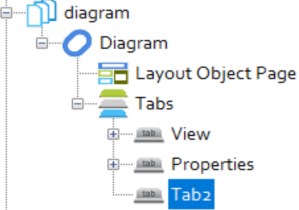
- Expand Object Pages > diagram > Diagram > Tabs.
- Right-click Tabs and click NewTab.
A Tab2 is created.
- Click Tab 2.
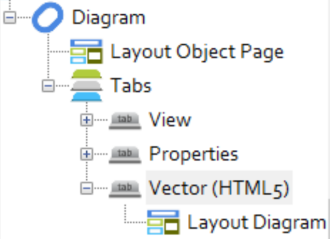
- In the Tab Name box, replace "Tab2" with "Vector (HTML5)".
-
In the left pane, right-click Vector (HTML5), and select Add Layout > Casewise > Diagram.
A Layout Diagram node is created.
- Right-click LayoutDiagram, and select Add Behaviours > Diagram > Vector (HTML5).
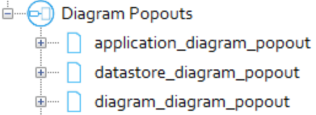
- Right-click Diagram Popouts and select Add Diagram Popout for Object Type > Diagram.
A diagram pop-out "diagram_diagram_popout" is created for the Diagram object type.
- Expand diagram_diagram_popout.
- Right-click Diagram, and select New Property Group > From CM Panel > General.
You can select any property group that you want to display on the object page.


- Click Save.
- Click Dynamic Site.
To configure diagram display, follow these steps:
-
Open the browser and login to erwin Evolve Web Platform.
-
Click a model. For example, EA Foundation – Sample Model.
-
Click Administration.
-
Click Enhanced Diagram Display.
-
Enter appropriate values in the fields. Refer to the following table for field descriptions.
Field Description Additional Information
Open Object Page on DrillDown Switch this option on to open the object's object page instead of exploded diagram list.
Clicking
, opens the object's object page.
Deactivate Where Am I Switch this option on to deactivate icon from the diagram.
Select Template Specifies diagram template Select the required template from the drop-down option. Filter Association Region Specifies the type and count of association.
Switch this option on to view
icon on the diagram.
Note: In the evolve modeler, you can add as many association types as you like and display them in the Filter Association Region.
Clicking types.
Clicking
displays association name.
Clicking
displays the association count.
Popout Switch this option on to view
in the diagram.
Clicking
Diagram Popout to use Specifies diagram popout created in the Evolve Designer
Select the popout from the drop-down option. Enable Highlighting Switch this option on to highlight the objects.
Enables additional highlighting fields.
Also, on the Vector (HTML5) diagram, it enables the focus on and DiagramSearchSearchIcon icons.
Highlight Color Specifies the highlight color.
To change the highlight color, click
and use the color palette to set the color.
Transparency
of unselected objectsUse this option to adjust the transparency (range from 0-1) of unselected objects.
Palette Objectypes Use this option to highlight object types and property types.
-
Click the Palette Objectypes section.
-
Select the Highlight, Steps and Drill Down check boxes of required object and property types.
Steps Use this option to highlight date properties under object type.
Note: Ensure that the date properties are available in the modeler.
-
Click the Steps section.
-
Click the Application section.
-
Click
to add step.
-
In the Step Name box, enter the step name.
-
Click the Start Property drop-down list box and select the required option.
-
Click the End Property drop-down list box and select the required option.
-
Under Color, click
and use the color palette to set a color.
Drill Down Filters Use this option to display message for object and property types.
-
Click the Drill Down Filterssection.
-
Click the Application section.
-
Click the Drill Down Role to not apply list box, and select the required role.
-
In the Message to Display box, enter a message to display in the notification bar.
-
Click
-
Click the Property drop-down list box and select the required option.
-
Click the Operator drop-down list box and select the required option.
-
Use Value or drop-down list to specify the property value.
-


-
Click
to save the configuration.
You will be notified that "Configuration draft has been saved".
-
Click
to publish the configuration.
You will be notified that "Configuration published successfully".
To add date properties for an object type (For example, Application), follow these steps:
-
Start the erwin Evolve Suite.
-
Click Modeler.
-
In the left pane, click Open.
-
Select the Model. For example, EA Foundation - Sample Model.
-
Select the template. For example, Template: Application Architecture.
-
Under palette, right-click Application and click Edit Properties.
Application Palette Properties dialog box opens.
-
Click Add.
The Application Shape Region dialog box opens.
-
Click the Region Type drop-down list box and select the Property Value.
-
Under Content, click the Property Type drop-down list box and select Go Live Date.
-
Click OK.

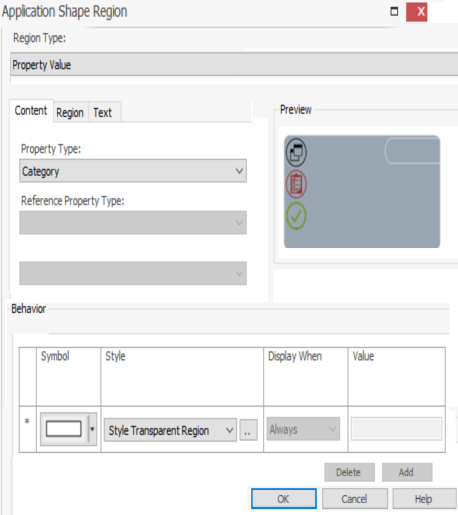


Similarly, you can add one more date property. For example, End of Life.
| |
You must add minimum two date properties and maximum as much you want. |
|---|
-
Click OK.
-
Start Evolve Designer.
-
Click a model. For example, EA Foundation - Sample Model.
-
Click Site.
-
Click Save.
-
Click Dynamic Site.
To view an object in zoom-in mode, follow these steps:
-
In the focus on search box, type a keyword.
A list of related search terms appears.
-
Select the required object. For example, Activity Monitoring.
You can now see the Activity Monitoring appears in zoom-in mode.
To search for an Object Type with highlighted color on the diagram, follow these steps:
-
Click
.
A Search page appears in the right pane.
-
Use the following options:
- Object Type
- Use this option to select the required object type from the drop-down option.
- For example, Application.
Additional options appear based on the Palette Properties in Modeler. For example, the below options appear for Application Object Type.
- Name
- Use this option to search for an object type name that you are looking for on the diagram.
- Category
- Use this option to search an object type based on category.
- Criticality
- Use this option to search an object type based on criticality. Select the required Criticality from the drop-down option.
- Enterprise Standard
- Use this option to search an object type based on Enterprise Standard.
- Contract Type
- Use this option to search an object type based on the Contract type.
- Number of Users
- Use this option to search an object type based on the number of users.
- Date
- Use this option to search an object type based on date properties. To search start and end date, click
, and select the required date.
Duplicate Object
The Duplicate Object feature adds a Duplicate button to object pages, which enables you to duplicate objects directly from erwin Evolve. Based on the configuration you set up, it copies all properties, associations, and association properties of the object page.
Hover over
To configure the Duplicate Object feature, follow these steps:
-
Open the browser and login to erwin Evolve Web Platform.
-
Click a model. For example, EA Foundation – Sample Model.
-
Click Administration.
-
Click Duplicate Object.
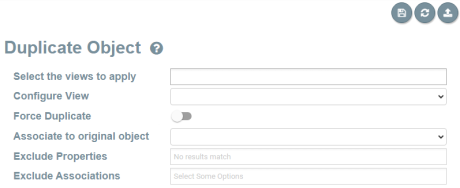
The Duplicate Object screen appears.
-
Enter appropriate values in the fields. Refer to the following table for field descriptions.
Field
Description Additional Information
Select the views to apply Specifies the list of views to which the Duplicate Object button is added Configure View Based on the selected views, specifies the views for which you want to configure object duplication properties Force Duplicate Specifies whether the Duplicate Object button is added for even the objects with any role-based approvals configured in the Model Explorer For objects with role-based approvals configured, by default, the Duplicate Object button is hidden. To display the button, switch the Force Duplicate option On. Associate to original object In case of object with associations, specifies whether the duplicate object must replicate associations to the source object
Exclude Properties Specifies the object properties that should be excluded in the duplicate object Exclude Associations Specifies the object associations that should be excluded in the duplicate object - Click
.
You will be notified that "Configuration draft has been saved". - Click
.
You will be notified that "Configuration published successfully" and the Duplicate Object button is added to the object page. For example, on an application screen.


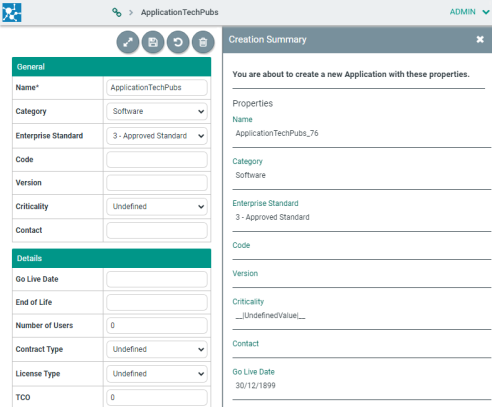
To duplicate objects, follow these steps:
- Open an object.
For example, an application. - Click
.
The Creation Summary screen appears. - Click Submit.
You will be notified that "Your new Application has been created".