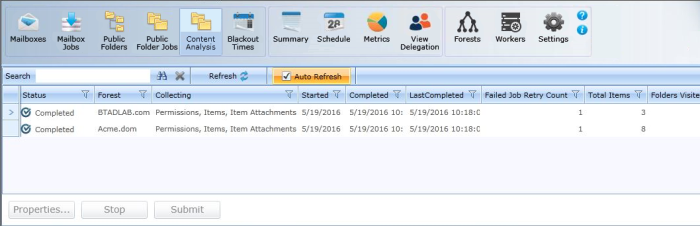
The Public Folder Jobs view lets you manage the sequence of migration requests for the selected migration destination.
|
|
NOTE: Migrator Pro for Exchange logs an error message if a source folder is moved to a new location and the associated target folder already exists. For example, if \folderB is moved to \folderA\folderB in the target, and a different \folderA\folderB already exists: Failed to move folder '\folderB' to '\folderA\folderB' on server 'MyTargetServer1' System.Runtime.InteropServices.COMException (0x80040604): Error in IMAPIFolder.CopyFolder(FOLDER_MOVE): MAPI_E_COLLISION |

Click Public Folder Jobs in the main toolbar. The screen displays a list of folders ready for migration:

This view provides a number of details about the public folders being migrated.
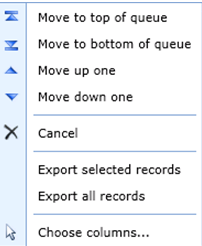
If you want to move one of the public folder migration jobs by one, click Move up one or Move down one, as needed.
If you want to move one of the public folder migration jobs to the top/bottom of the migration queue, right-click on the selected public folder migration job, then click the Move to top of queue or Move to bottom of queue option, as desired.
|
|
NOTE: The above options have no effect on Active or In-Progress migration jobs. |
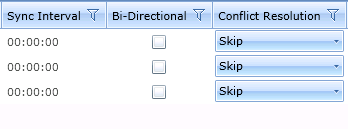
The Sync Interval, Bi-Directional, and Conflict Resolution settings for a job can be changed in the table.
You can also choose to Cancel selected jobs, Export information about selected jobs to a CSV file, and change the columns in the view.
Public Folder Jobs History
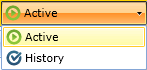
The default view is set to Active; however, when you select the History tab on the Public Folder Jobs screen, the view displays different information as well as migrations that have already completed and are not Submitted, Scheduled or In Progress.
Migrating Public Folders to Exchange Online
Migrator Pro for Exchange can migrate public folders to Exchange Online using either PowerShell or MAPI. The PowerShell option or MAPI option is selected from the Public Folders Migration Mode drop-down list on the General tab of the Office 365 Forest Configuration Settings screen.
To Migrate Public Folders to Exchange Online Using PowerShell
-
Click Public Folders in the main toolbar. The screen displays Source Folders on the left side and Target Folders on the right.
-
Click on the folders you want to send to the migration queue and drag them to the Target Folders pane.
-
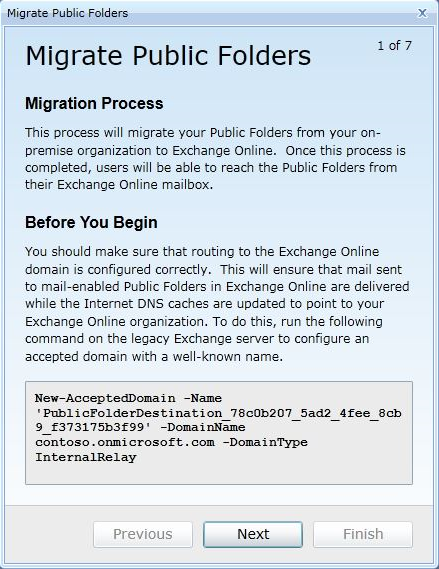
The Migrate Public Folders wizard appears. Follow the instructions on the first screen to ensure that routing to the Exchange Online domain is configured correctly. When finished, click Next.
-
The On-Premise Folders screen appears. Select the folders to migrate and then click Next.
-
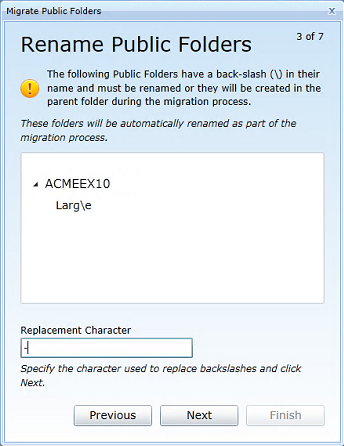
[Conditional Step.] If a backslash character occurs in the filename of any folder to be migrated, this Rename Public Folders screen appears so that the folder(s) can be renamed. Enter a character that Migrator Pro for Exchange should use to replace the backslash character when renaming the folder(s), and click Next.
-
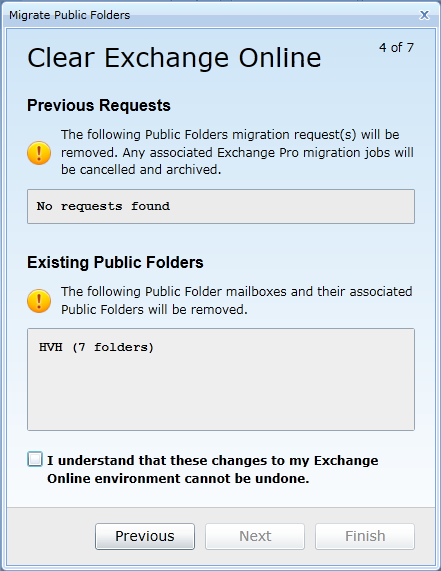
The Clear Exchange Online screen appears. Review the changes and select the I understand checkbox to confirm that you understand the changes to the Exchange Online environment cannot be undone. Click Next.
-
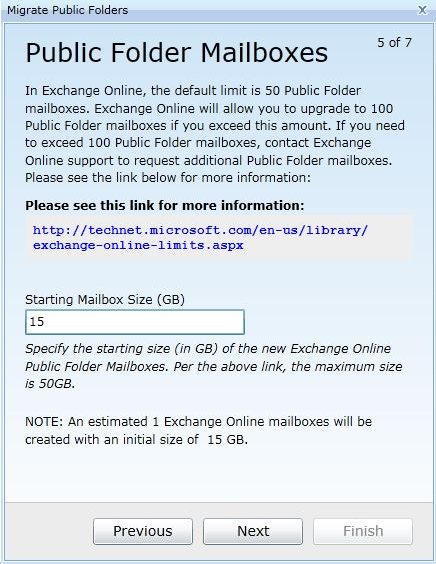
The Public Folder Mailboxes screen appears. Specify the Starting Mailbox Size for the public folder Mailboxes and click Next.
-
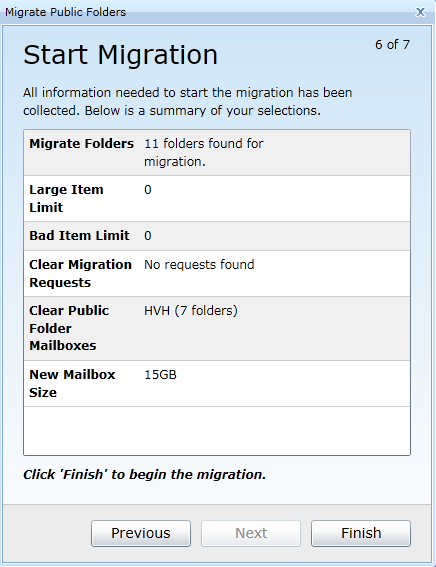
The Start Migration screen appears. Click Finish to begin migration.
-
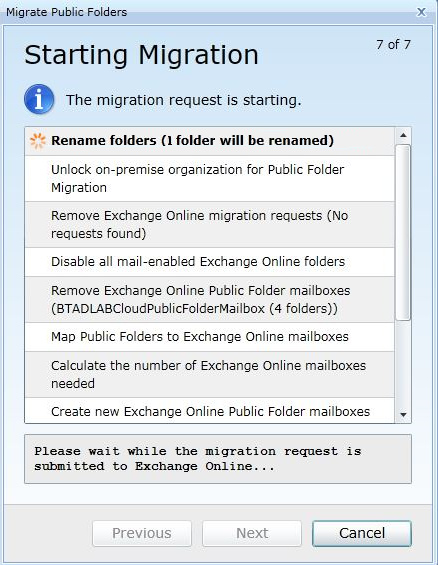
The Starting Migration screen appears. The successful processes are marked with a green checkmark when complete. When complete, Click Next.


|
|
NOTE: The migration will automatically be suspended at 95%. Once suspended, the migration can do the final cutover by resuming the migration. When there is a PowerShell failure and less than 10% of the known public folders for a public folder server are returned, Migrator Pro for Exchange will not mark them all as deleted. A message stating the number of returned folders will appear in the log. |
To Migrate Public Folders to Exchange Online Using MAPI
Click Public Folders in the main toolbar. The screen displays Source Folders on the left side and Target Folders on the right.
Click on the folders you want to send to the migration queue and drag them to the Target Folders pane. Unlike PowerShell, using MAPI allows for public folders to be migrated one at a time.
|
|
NOTE: When using MAPI, public folders can only be migrated to a public folder Mailbox existing on the target Office 365 forest. The MAPI migration mode does not have the ability to create public folder Mailboxes on the target, so the PowerShell migration mode should be used in these scenarios. |
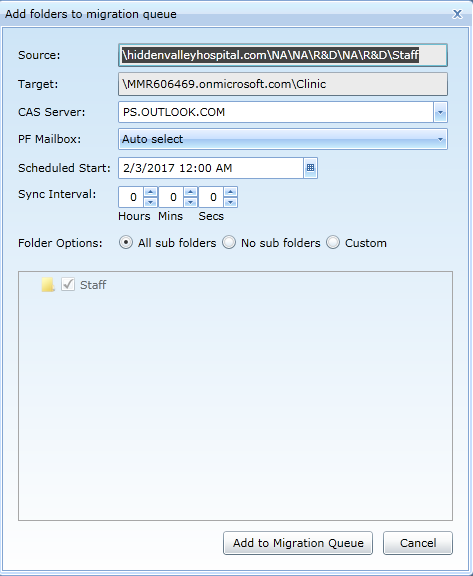
Indicate the settings you want to apply to the job by selecting the options on the screen:
-
Source: The name of the public folder that is being migrated.
-
Target: The destination path of the Microsoft 365 public folder mailbox.
-
CAS Server: Since the destination is an Microsoft 365 tenant, the CAS Server entry should be pointed to the Microsoft 365 remote PowerShell host.
-
PF Mailbox: The public folder mailbox to migrate to in the target. The drop-down list includes all public folder mailboxes available in the target. The default is Auto select, which will be the smallest target PF mailbox.
-
Scheduled Start: Specify the date and time you want the job to start.
-
Sync Interval: Select or enter the interval in minutes at which you want Migrator Pro for Exchange to copy new or changed folders to the target mailbox. Valid values are any value in the range from 0 to 24 hours. Syncs will not continue if a migration error is encountered during a sync. Note also that, while this Sync Interval sets up sync jobs, a sync job will not start to copy new items unless Change Detection is running.
-
Folder options: All sub folders, or No sub folders, or Custom. Note that if Custom is selected, only folders that are selected in the UI will be migrated.
Then click Add to Migration Queue to add the selected folders to the Public Folder Jobs.
The folder will appear in the Target Folders pane.
To Rollback Exchange Online Folders
-
Click Public Folders in the main toolbar. The screen displays Source Folders on the left side and Target Folders on the right.
-
Click on the folders you want to rollback and drag them to the Source Folders pane.
-
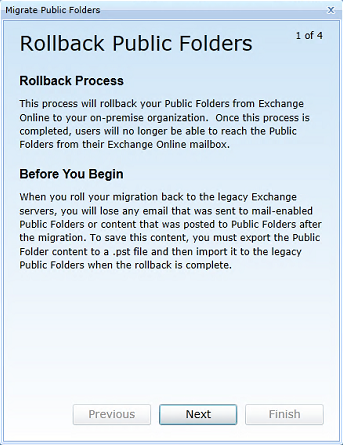
The Rollback Public Folders wizard appears. Follow the instructions on the first screen to ensure that you do not lose any email and content received after migration. When finished, click Next.
-
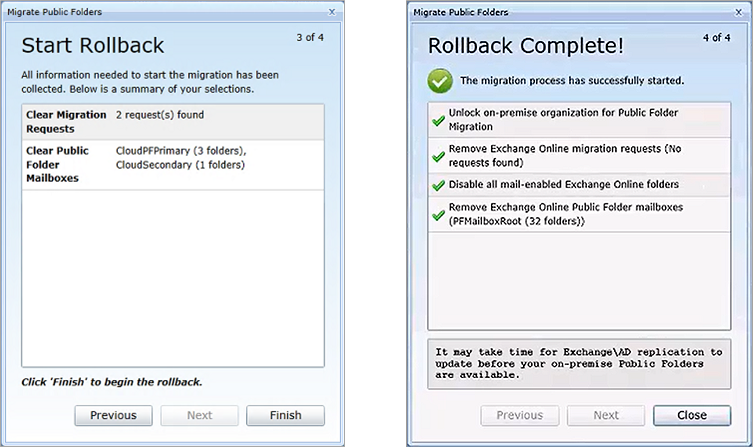
The Clear Exchange Online screen appears. Review the changes and select the check box to confirm that you understand the changes to the Exchange Online environment cannot be undone. Click Next.
-
The Start Rollback screen appears. Click Finish to begin the rollback, and the Rollback Complete! screen appears when the rollback finishes. Click Close to close the window.
Migrating Public Folders to Microsoft 365 Groups
Migrator Pro for Exchange can migrate public folders to Office 365 Groups using the MAPI protocol, but not by PowerShell. The MAPI option is selected from the Public Folders Migration Mode drop-down list on the General tab of the Office 365 Forest Configuration Settings screen.
|
|
|
|
|
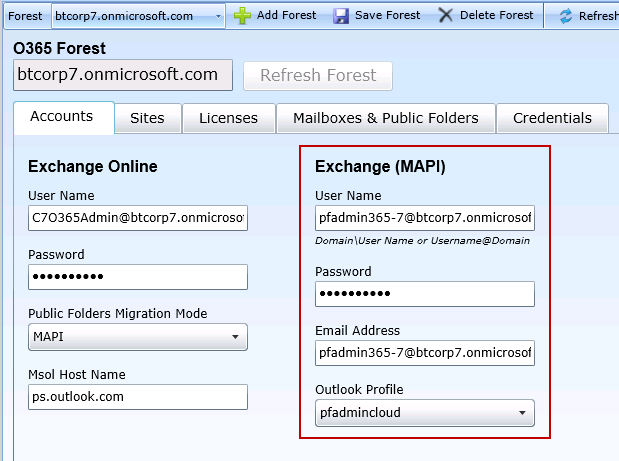
Caution: You must use a cloud mailbox originally created in Microsoft 365 (not a federated account or an account that was migrated) as your MAPI account. Migrator Pro for Exchange will be unable to open the Microsoft 365 Group mailbox if a cloud mailbox is not used. The account must also be a Global Microsoft 365 administrator. This account can be configured in the Exchange (MAPI) section of the General tab of Migrator Pro for Exchange’s Office 365 Forest Configuration Settings screen.
|

To migrate public folders to Microsoft 365 Groups using MAPI:
-
Click Public Folders in the main toolbar. The screen displays Source Folders on the left side and Target Folders on the right.
-
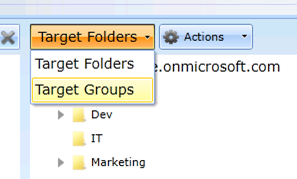
On the right (target) side, select the Target Folders drop-down and select Target Groups:
-
On the left (Source) side, click on the public folders you want to send to the migration queue, and (one at a time) drag them to the Target Folders pane. This approach lets you migrate source public folders one at a time to different Office 365 Groups.
|
|
|
NOTE: You can choose to copy a top-level public folder and all subfolders to a single Office 365 Group. This means (for example) that if you have multiple calendars configured as subfolders, all items contained in the different calendars will be consolidated into the single calendar contained within the target Office 365 Group. With MAPI, public folders can be migrated only to an existing Office 365 Group in the target Office 365 forest. The MAPI migration mode cannot create Office 365 Groups in the target. |
-
Indicate the settings you want to apply to the job by specifying your choices on this screen:

-
Source: The name of the public folder that is being migrated.
-
Target: The name of the Office 365 Group that represents the desired migration endpoint.
-
CAS Server: Since the destination is an Office 365 tenant, the CAS Server entry should be pointed to the Office 365 remote PowerShell host.
-
Scheduled Start: Specify the date and time you want the job to start.
-
Sync Interval: Select or enter the interval in minutes at which you want the program to copy new or changed folders to the target Groups. The valid range is 0 to 24 hours. Syncs will not continue if a migration error is encountered during a sync. Note also that, while this Sync Interval sets up sync jobs, a sync job will not start to copy new items unless Change Detection is running.
-
Folder options: All sub folders, or No sub folders, or Custom. Note that if Custom is selected, only folders that are selected in the UI will be migrated.
-
Click the Add to Migration Queue button to add the selected folders to the Public Folder Jobs.