
Recover document
Email items that are marked for deletion but available in the archive are displayed with blue icons in the search results list. It is possible to recover these documents and view them in Archive Manager for Exchange server and in ArchiveWeb.
To recover document marked for deletion:
1.From the Settings tab ensure that either of the options Search in archived and deleted documents or Search in deleted documents is selected.
2.Right-click the selected item in the search results list view and select Recover document option from the context menu.
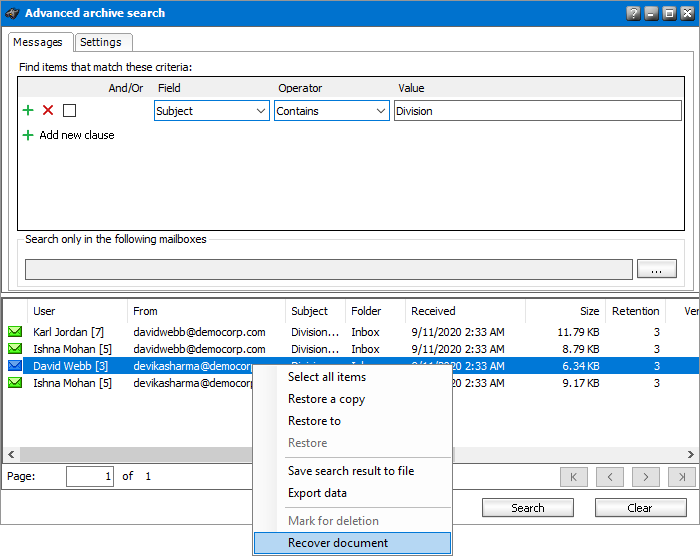
3.As a result the deletion mark will be removed and the item will be again displayed on the Archive tab in the Archive view as a lost item. It will be also be accessible in ArchiveWeb.
Appendix
·How to create a customized HTML shortcut template
How to create a customized HTML shortcut template
On the Shortcut tab of the Archive Manager for Exchange (Tools/Options/Archive settings/Shortcut tab) you can configure Archive Manager for Exchange to create HTML shortcuts for archived emails. The appearance of the archived email in the Outlook Preview pane depends on the template which you choose on that Shortcut tab. Besides the default template for the shortcuts you can create your own templates satisfying your criteria and thus modify the design of the Outlook preview pane for archived emails.
To create your own template:
1.Go to <installdir>\ Metalogix\MAM4Exchange\Tools\Templates.
2.In the Template directory create a new folder. Its name will be the name of your new template displayed on the Tools\ Options\ Archive settings\ Shortcut tab of Archive Manager for Exchange (in our example the name of the template is Beautiful).
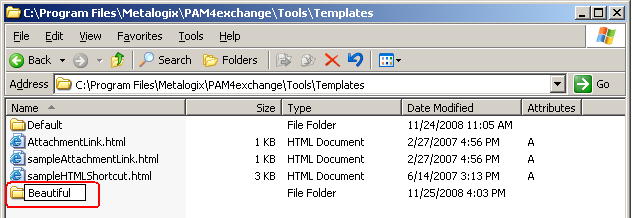
3.Copy the sampleHTMLShortcut.html file to the new template folder (in our case to Beautiful). Or copy the html file from the Default folder, if the sample is not available.
4.Rename the sampleHTMLShortcut.html to HTMLShortcut.html.
5.Now you can modify the HTMLShortcut.html file in the new folder to create your template. To do so, open the file in Notepad and edit the HTML code.
Important variables:
%ATTACHMENTS% - email attachments
%BUTTONS% - buttons
%BODY% - message body
%PROPERTIES% - message specific properties needed for Macintosh clients
The original HTML:
<!DOCTYPE html PUBLIC "-//W3C//DTD XHTML 1.0 Strict//EN" "http://www.w3.org/TR/xhtml1/DTD/xhtml1-strict.dtd">
<html xmlns="http://www.w3.org/1999/xhtml">
<head>
<meta http-equiv="content-type" content="text/html; charset=utf-8"/>
<title>
</title>
<style type="text/css">
<!--
body {
margin: 0;
text-align: center;
padding-top: 10px;
}
td.hlavicka {
display: block;
height: 20px;
color: white;
background-color: #6699FF;
font-family: arial;
font-size: 14px;
text-align:left;
}
td.hlavicka span {
font-weight: bold;
padding-left: 5px;
}
td.buttons {
vertical-align: bottom;
text-align: right;
padding-right: 10px;
padding-bottom: 10px;
}
td.buttons a {
color: #FFFFFF;
background-color: #6699FF;
font-family: arial;
font-size: 11px;
padding: 5px;
border: 1px solid #333366;
font-weight: bold;
text-decoration: none;
margin-left: 3px;
}
td.buttons a:hover {
font-size: 12px;
font-weight: bold;
}
td.prilohy {
background-color: white;
font-family: arial;
font-size: 12px;
padding: 5px 5px 5px 5px;
text-align:left;
}
td.prilohy a {
color: black;
margin-right: 15px;
margin-top: 15px;
font-style: normal;
}
td.prilohy a:hover {
text-align: center;
font-weight: bold;
}
td.ciara {
background-color: #333366;
width: 100%;
}
td.text {
display: float;
color: #2a2a2a;
text-align: center;
background-color: white;
font-family: arial;
font-size: 12px;
padding: 5px;
text-align:left;
}
td.stred {
border: 1px solid #333366;
}
td.pata {
display: block;
width: 99.9%;
height: 15px;
background-color: #6699CC;
padding-right: 0;
}
-->
</style>
</head>
<body>
<table width="100%" border="0" cellspacing="0" cellpadding="0">
<tr>
<td bgcolor="white" class="stred" height="100%" >
<table width="100%" border="0" height="10" cellspacing="0" cellpadding="0">
<tr>
<td height="100%" class="hlavicka"> <span>This message was archived</span></td>
</tr>
</table>
<table width="100%" border="0" height="10" cellspacing="0" cellpadding="0">
<tr>
<td height="100%" class="prilohy">%ATTACHMENTS%</td>
<td height="100%" class="buttons" nowrap>%BUTTONS%</td>
</tr>
</table>
<table width="100%" border="0" height="2" cellspacing="0" cellpadding="0">
<tr>
<td bgcolor="#a0c3c9" width="100%" height="2px"></td>
</tr>
</table>
<table width="100%" border="0" height="10" cellspacing="0" cellpadding="0">
<tr>
<td height="100%" class="text">
<pre WRAP="hard">%BODY%</pre>
</td>
</tr>
</table>
<table width="100%" border="0" height="10" cellspacing="0" cellpadding="0">
<tr>
<td height="100%" class="pata"><b></b></td>
</tr>
</table>
</td>
</tr>
</table>
</body>
</html>
|
|
|
|
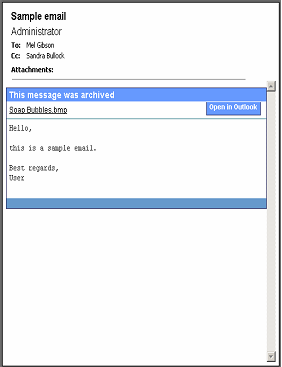
Default HTML shortcut in the preview pane |
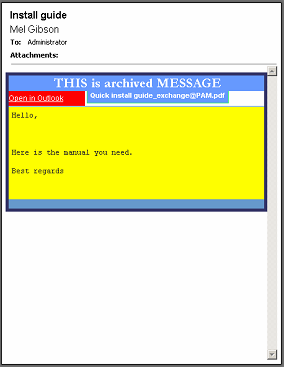
Example of customized HTML shortcut |
Registering Metalogix in Azure AD for EWS
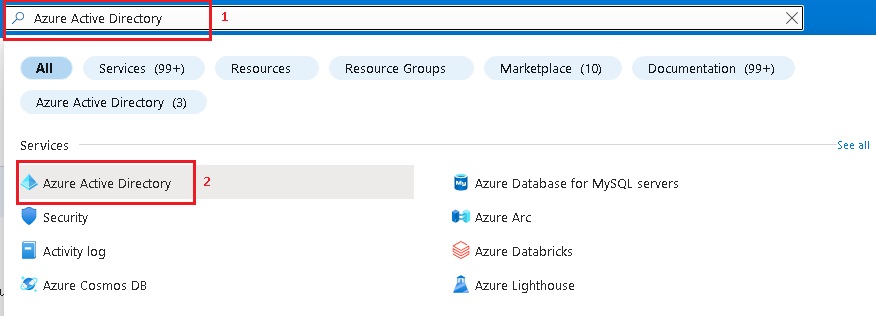
1.Open https://portal.azure.com/ and login as administrator.
2.Write Azure Active Directory (1) in the search panel and then click Azure Active Directory (2) in Services.
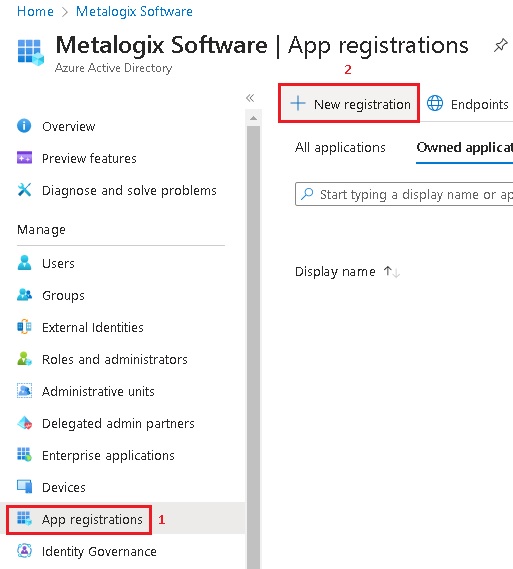
3.From the left panel click App registrations (1) and then click New registration (2).
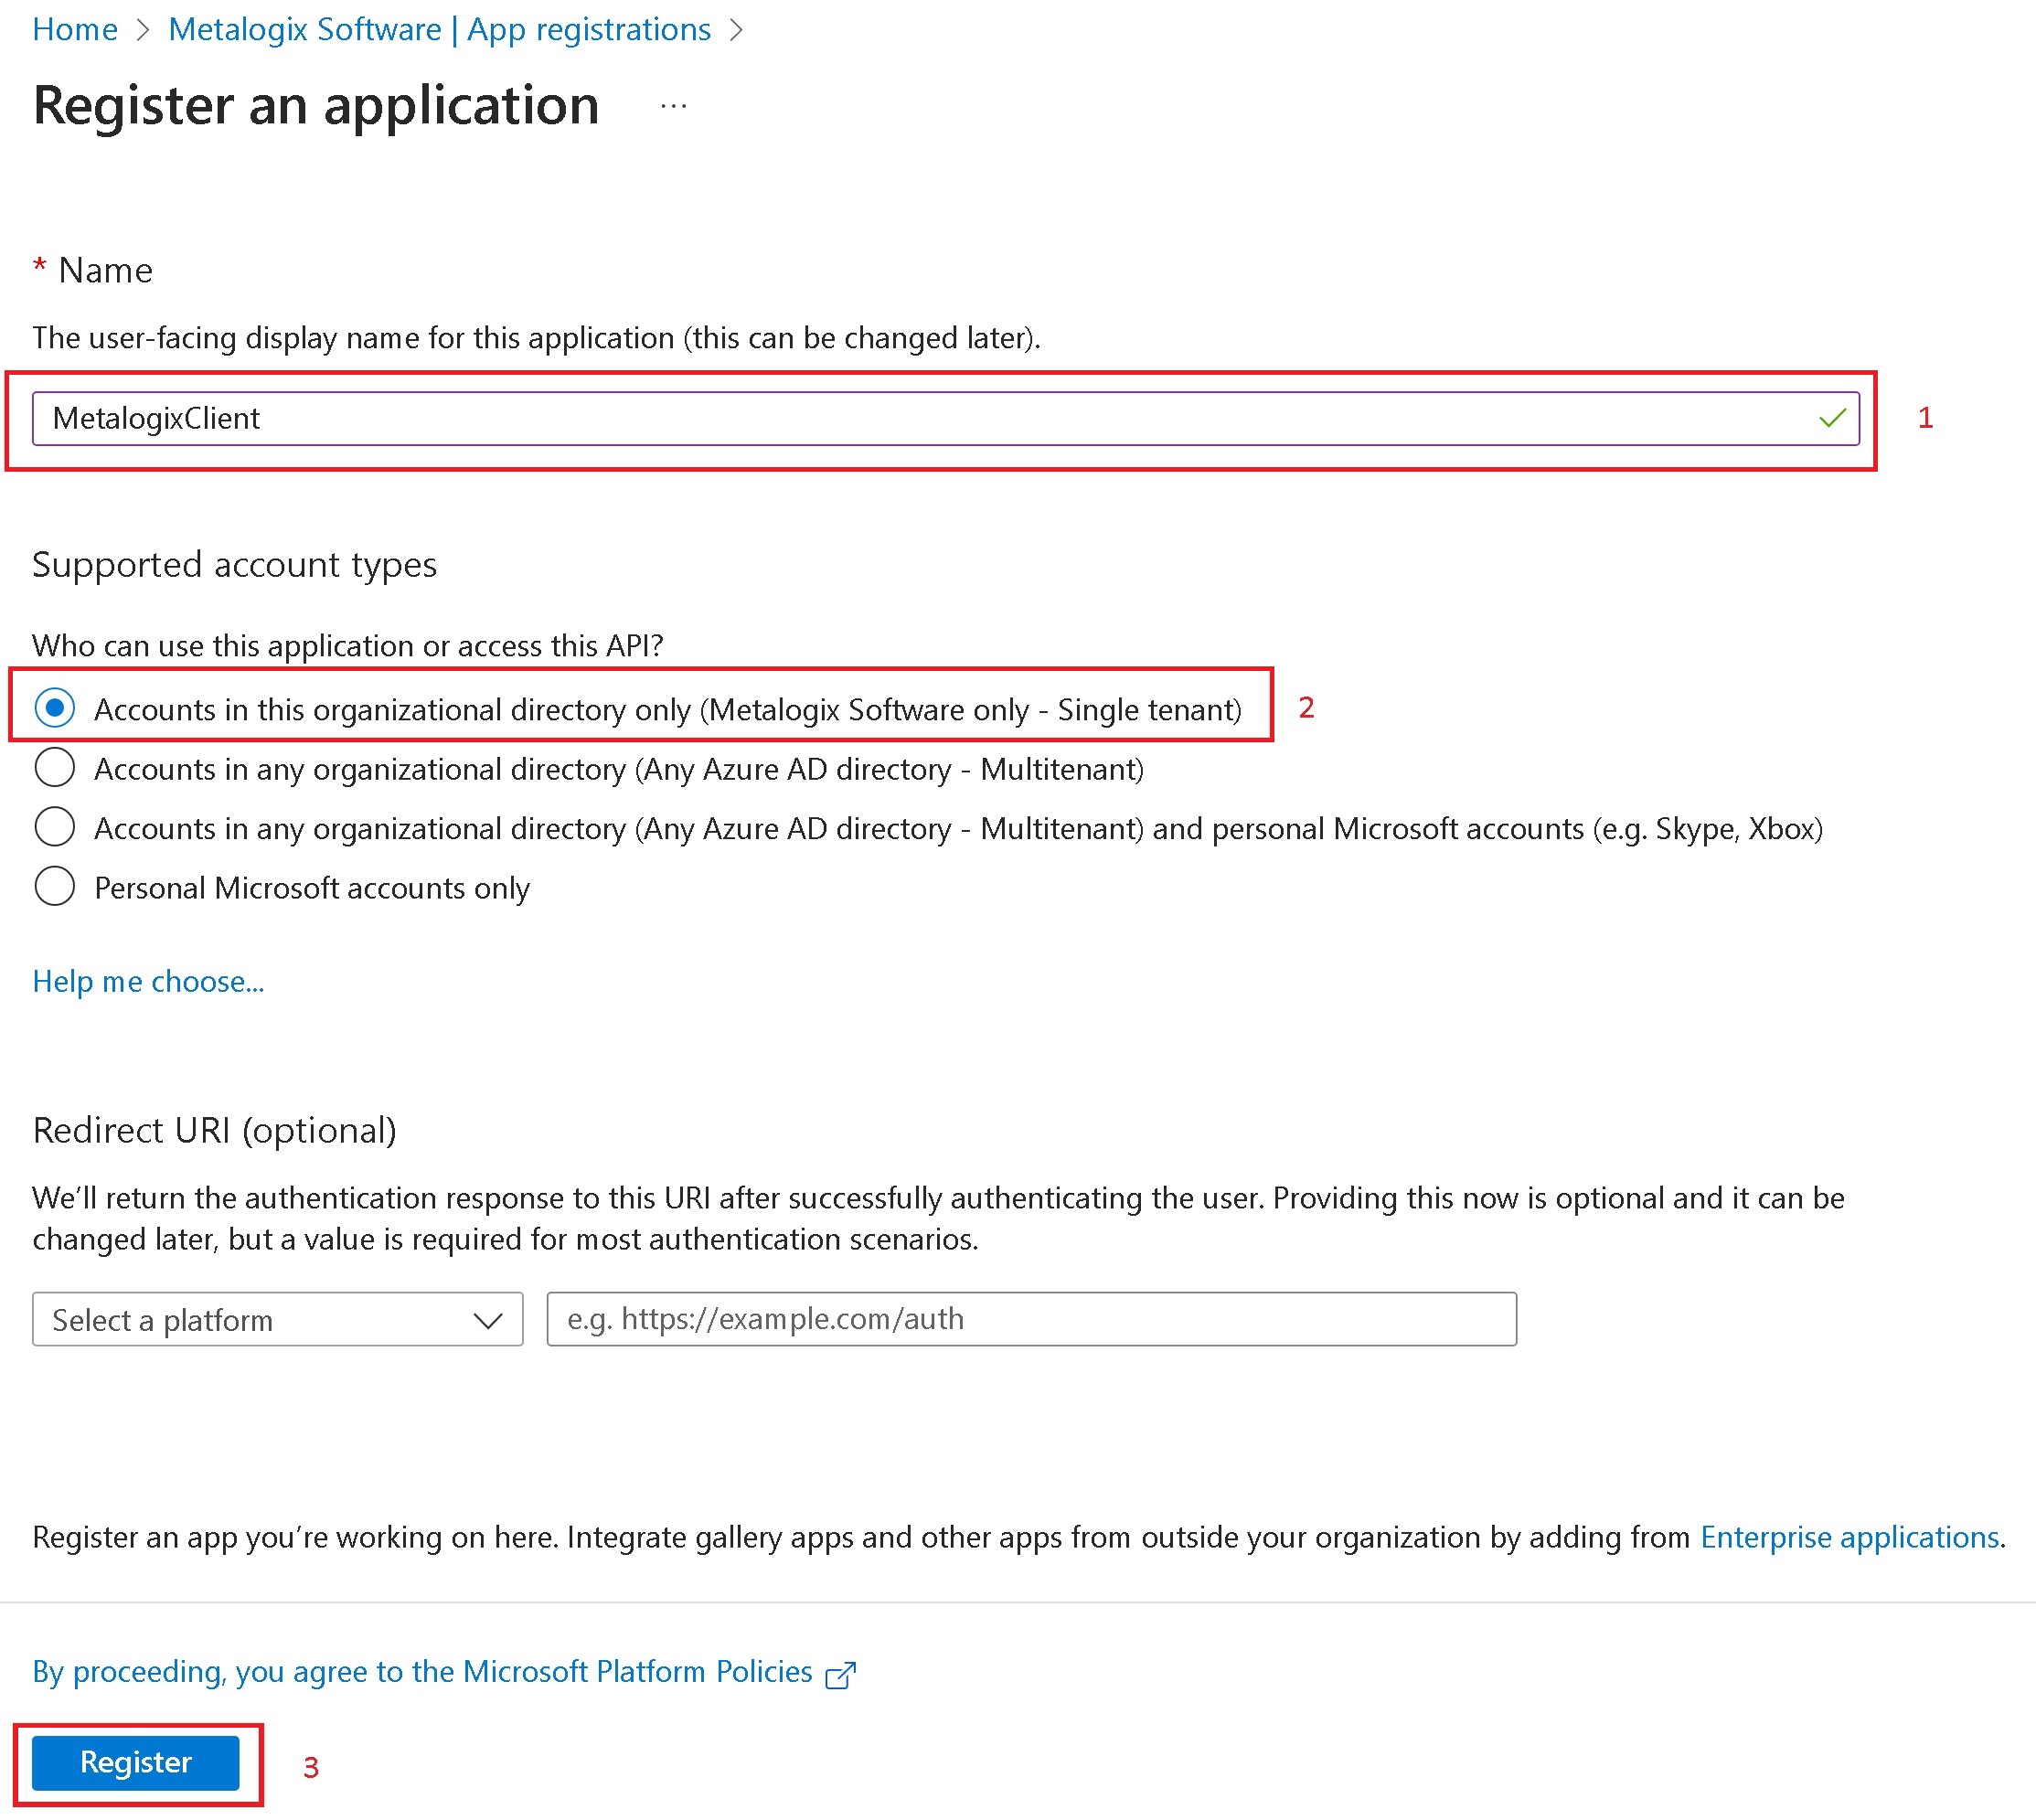
4.Fill in the name. For example, MetalogixClient (1). From the Supported account types section select Accounts in this organizational directory only (2). Then click Register (3).
5.Your client is created and you can see the client properties.
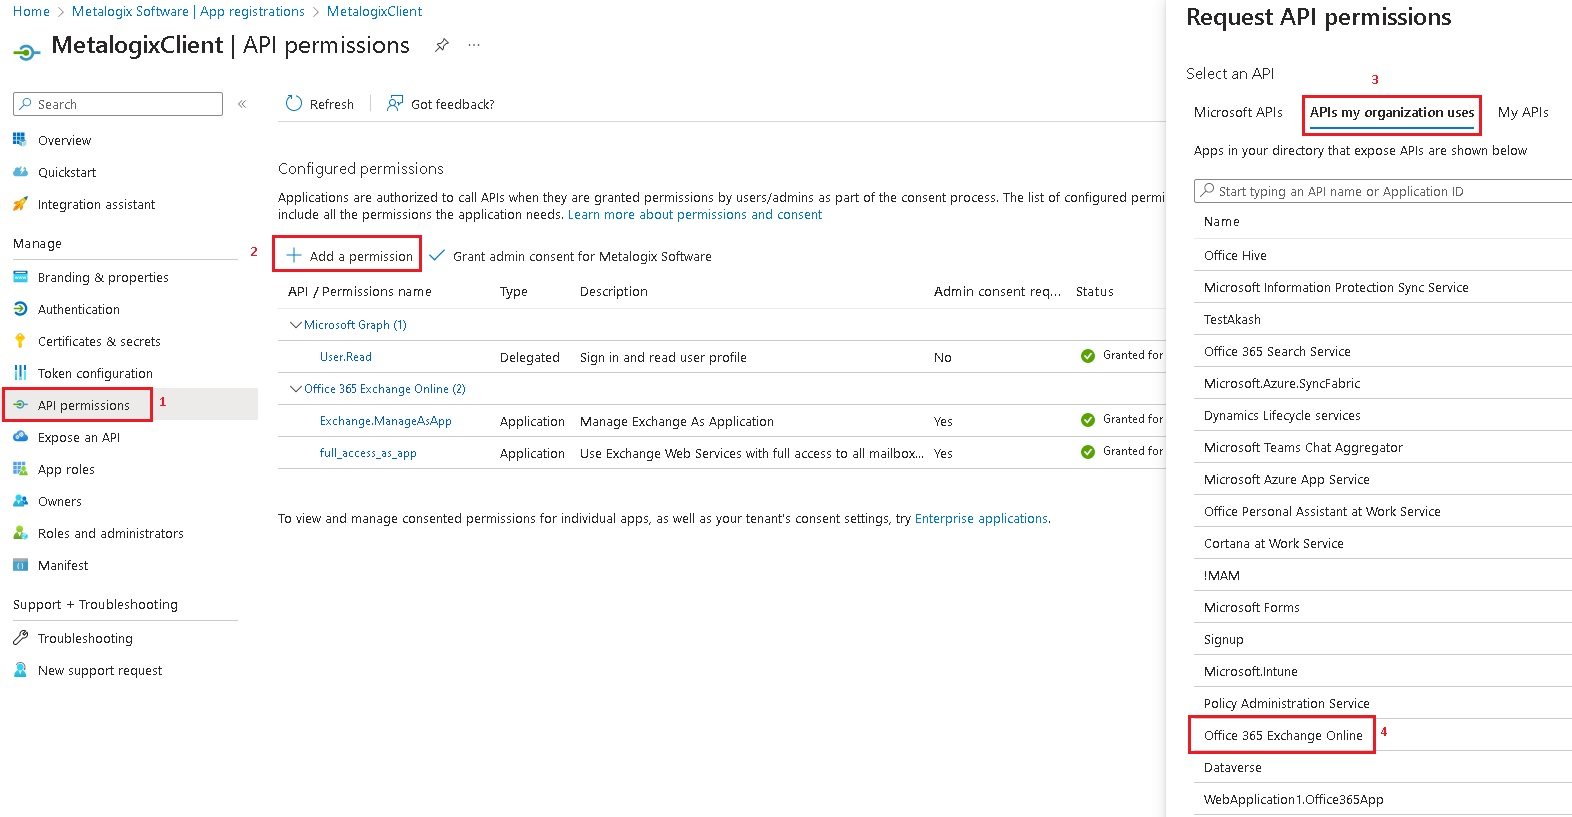
6.Click API permissions (1). Then click Add a permission (2) to open the Request API permissions window. Click APIs my organization uses (3) and select Office 365 Exchange Online (4).
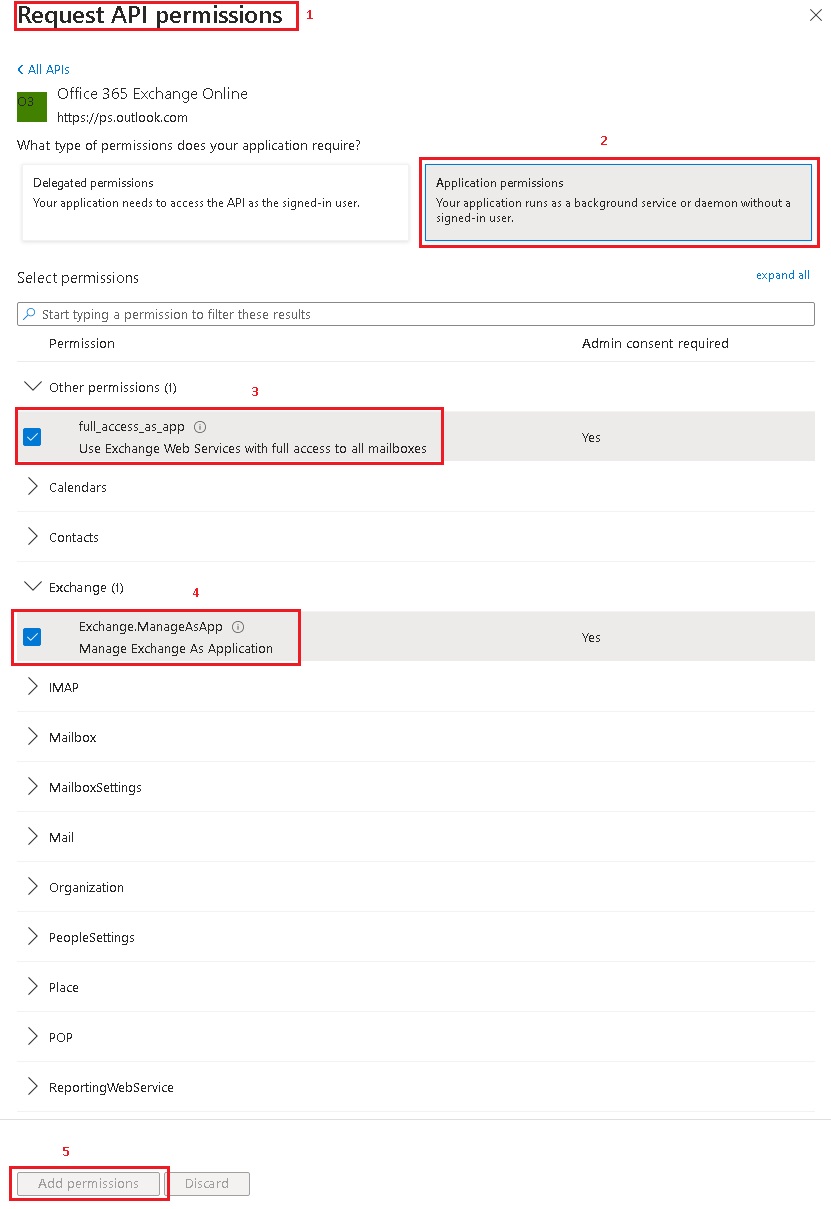
7.In the Request API permissions (1) page, select Application permissions (2) and add full_access_as_app (3) and Exchange.ManageAsApp (4). Click Add permission (5) to confirm your selections.
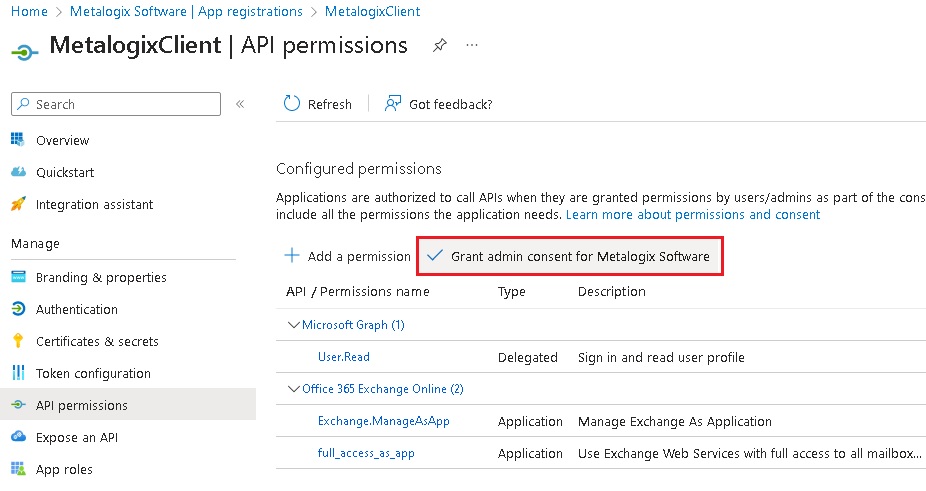
8.Click Grant admin consent for Metalogix Software.
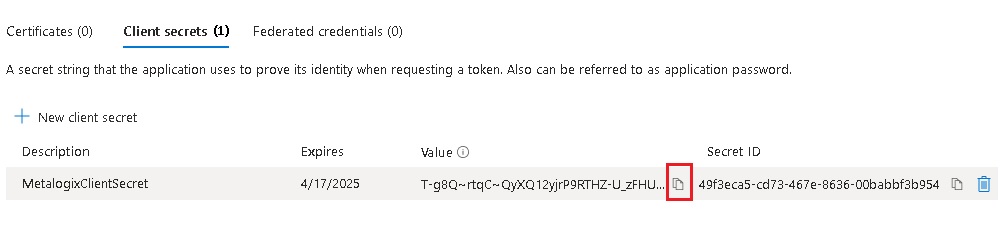
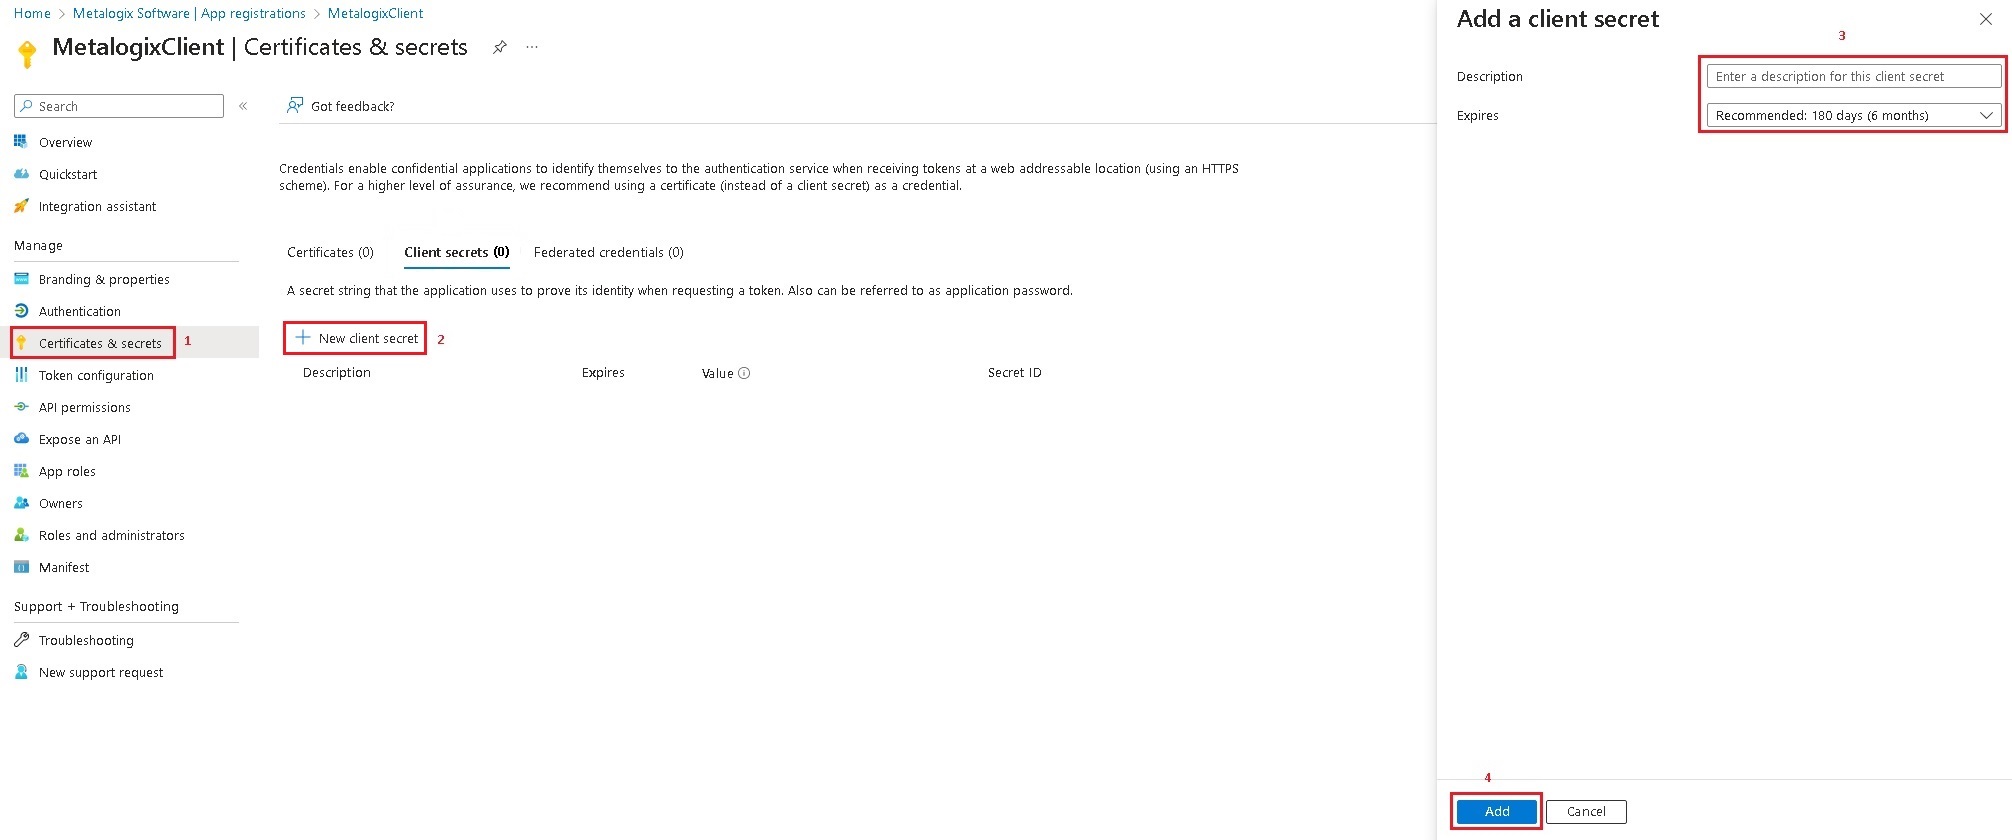
9.From the left panel, click Certificates & secret (1). Click New client secret (2) and fill in the options in the Add a client secret panel (3). Then change Expires to 24 months and click Add (4) to confirm.
10.Save the Value (Client Secret) and Secret ID (Client ID) to a safe place. If the client secret is lost you must create new one. Azure will not display it again.
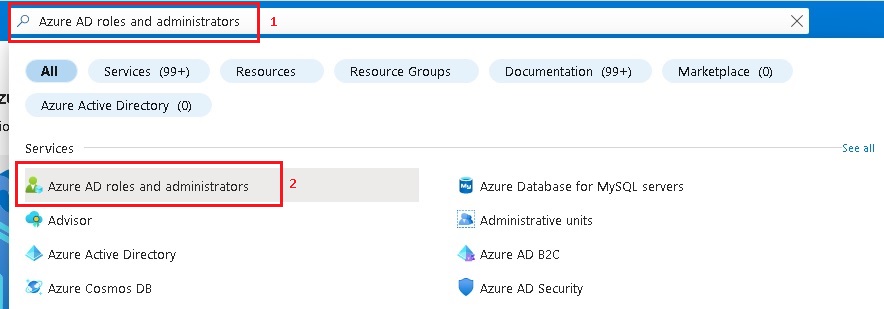
11.Before you start using the application you must add a role for Exchange Administrator. Enter Azure AD roles and administrators (1) in the search field to search and then click Azure AD roles and administrators (2) in Services section.
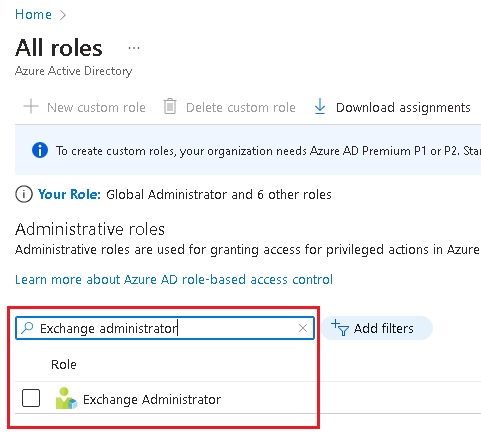
12.Find the Exchange administrator role and double click it.
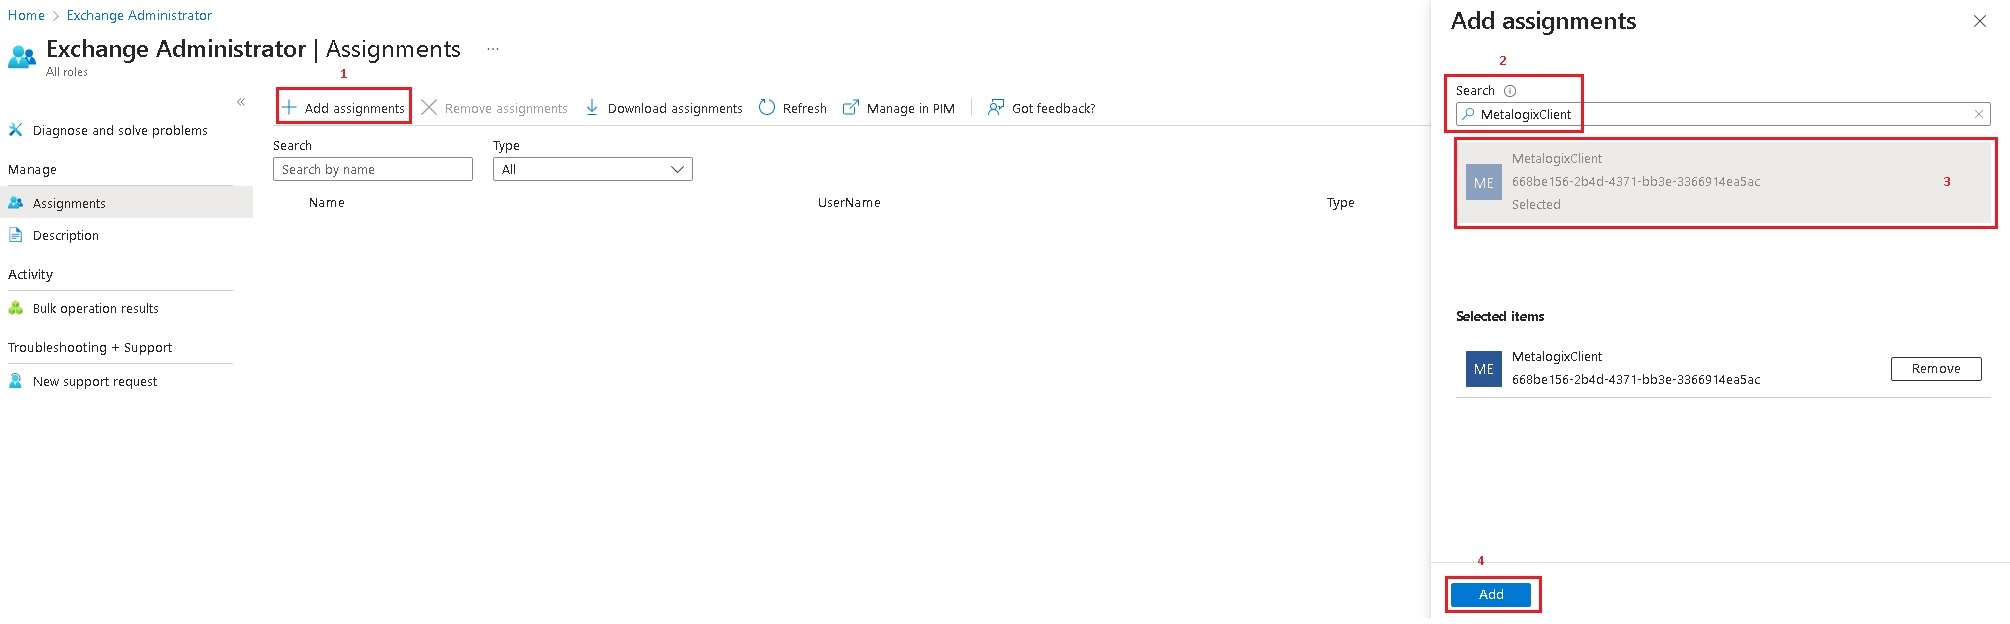
13.Click Add assignments (1). In the Add assignments panel search for MetalogixClient (2). Select MetalogixClient from the search result (3) and click Add (4).
14.Now you can open the Archive Manager for Exchange application and import Exchange Online server from Azure AD with your Exchange Online administrator email, Client ID and Client secret.