You can use this tab to make choices for scanning of malware or server maintenance during recovery. RMAD does not scan and remediate with this feature. The feature pauses the recovery during Directory Services Restore mode (DSRM) before the domain controller is restarted into normal mode allowing users to perform maintenance and run their own scans using third party tools and/or remediate if malware found.
The choices are:
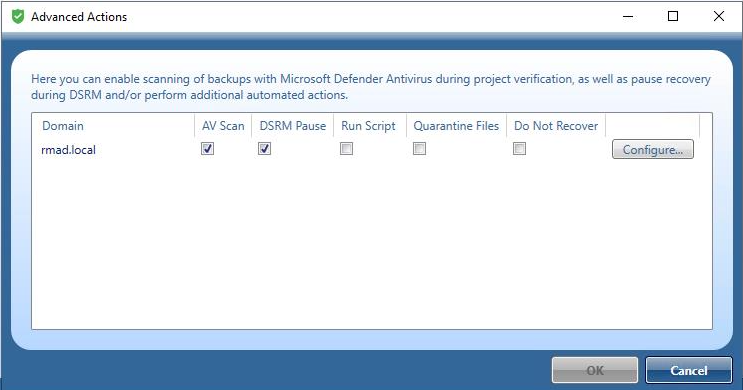
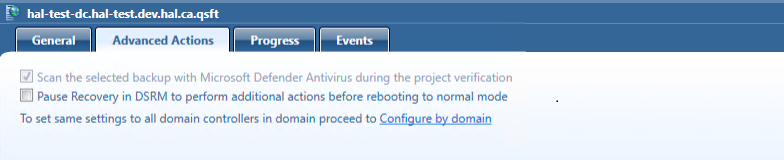
Scan the selected backup with Microsoft Defender Antivirus during the project verification.
Pause recovery in DSRM to perform additional actions before booting to normal mode.
During the pause you have an option to run a script and quarantine files.
Pause recovery in DSRM to perform additional actions before booting to normal mode can be enabled for specific domain controllers by selecting the option from the Advanced Action tab from each domain controller in the project, or for all domain controllers in the entire domain/forest.
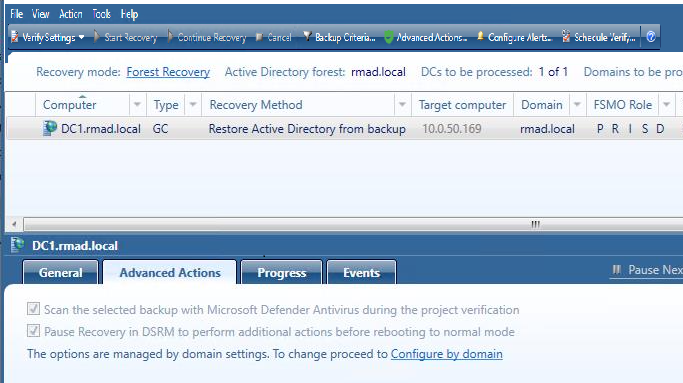
To select all of the domain controllers in a domain or forest to be paused during recovery in DSRM mode, select Configure by domain and select a domain or multiple domains within the forest.
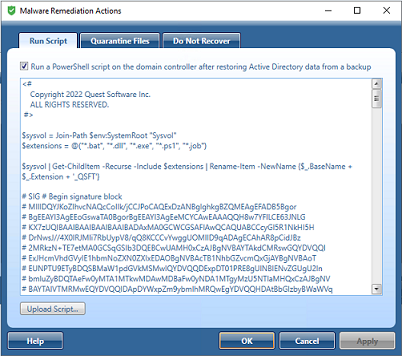
Run Script
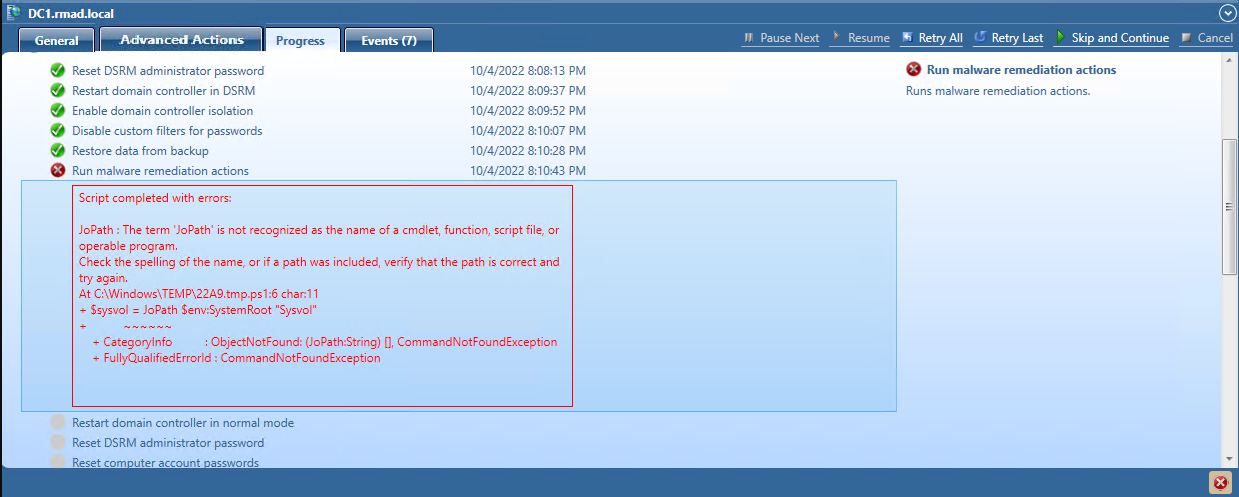
In addition to pausing, you can run a Powershell script on the domain controller after restoring Active Directory data from a backup. The script, for example, could be used to inspect SYSVOL, looking for any file extension that is executable (.exe, .dll, .bat, .cmd, .ps1, etc.), and then renaming by adding an extension that is not executable. The script can be used to perform any tasks on the domain controller after it is recovered from the backup.
A sample script can be found in C:\Program Files\Quest\Recovery Manager for Active Directory Forest Edition called MalwareRemediation.ps1
Quarantine Files
You can also quarantine files on the domain controller after restoring Active Directory data from a backup.
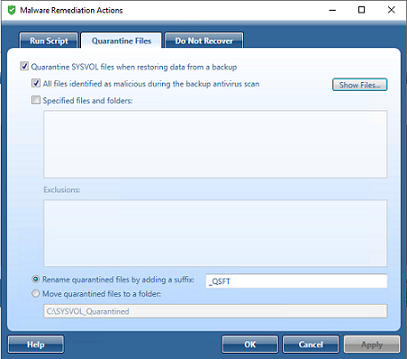
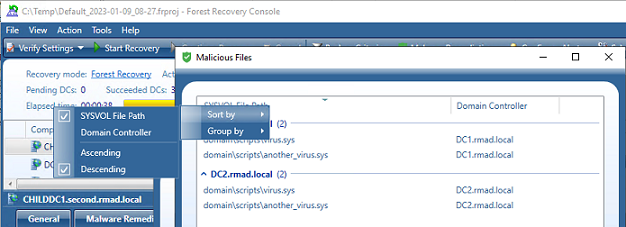
Click on the Show Files button to see a list of malicious files that will be automatically included in the quarantine rules (for both Quarantine Files and Do Not Recover tabs).
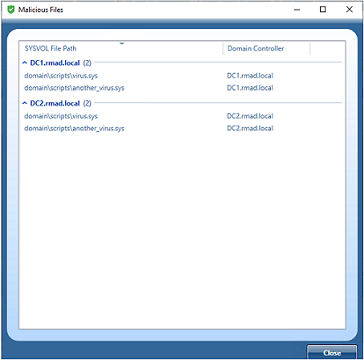
Malicious files are shown for each backup selected for a domain controller, and the list can be grouped and/or sorted by SYSVOL File Path and Domain Controller. A list of the files is also included in the Forest Recovery Report, click View | Report….
SYSVOL_Quarantined is created with the file detected as malicious by the antivirus.
In PowerShell, quarantine rules can be configured as follows:
$quarantineRule = (Get-RMADFEDomain -Domain "rmad.local").QuarantineSysvolFiles
$quarantineRule.IsEnabled = $true
$quarantineRule.MaliciousFiles = $false
$quarantineRule.SpecifiedFiles = $true
$quarantineRule.Filters = @("*.exe")
$quarantineRule.Exclusions = @("*\scripts\config\setup\*")
$quarantineRule.RenameFiles = $true
$quarantineRule.RenameSuffix = "_INFECTED"
$quarantineRule.MoveFiles = $false
Set-RMADFEDomain -Domain "rmad.local" -QuarantineSysvolFiles $quarantineRule
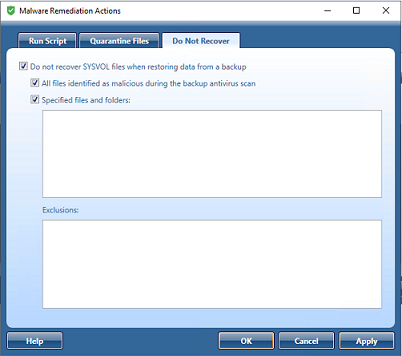
Do Not Recover
You can specify specific files from being restored from a backup.
When a domain is selected the Pause recovery in DSRM to perform additional actions before booting to normal mode is no longer available on each domain controller for the selected domain, and The option is managed by domain settings is displayed.
| NOTE |
When the Pause recovery in DSRM option is managed by domain settings, it applies to all domain controllers in the project for the selected domain. When enabled for entire domain, you can not individually enable the pause recovery in DSRM option for specific domain controllers. To do so, within Configure by Domain, unselect the domain(s). After a domain is unselected, within the project select each Domain Controller the pause is required for. From the Advanced Actions tab, select to enable Pause recovery in DSRM to perform additional actions before booting to normal mode. |
To Resume recovery when paused, select all or individual domain controllers in the recovery project. There are two choices which can be made:
 Resume All DCs which allows the resume function of all Domain Controllers in the recovery.
 Resume Selected DCs which will only allow the resume for the selected Domain Controllers.
Otherwise the Resume button will be unavailable.
You can use this tab to view progress of the recovery stages and steps applicable to the domain controller selected in the list. To view more information about a recovery step on this tab, point to that step, and then point to the question mark displayed next to it.
You can copy the information displayed on the Progress tab to the Clipboard and then paste it to another application (for example, a Microsoft Office Word file). To do so, point to the Progress tab, and then click the Copy button in the upper right corner of the tab. This copies all the information displayed on the Progress tab, including the current status of each recovery stage and step and any error messages displayed on the tab.
When a script is run, the results are displayed in the Progress Tab under the Run Advanced Actions process, for any errors encountered.
When a backup is created, a checksum is calculated for the backup file and saved in the backup file when the backup is registered. An integrity check is performed on the backup during the progress and any issues are displayed as seen below.
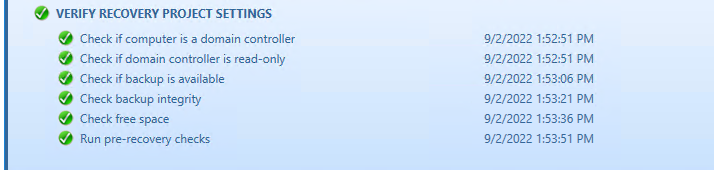
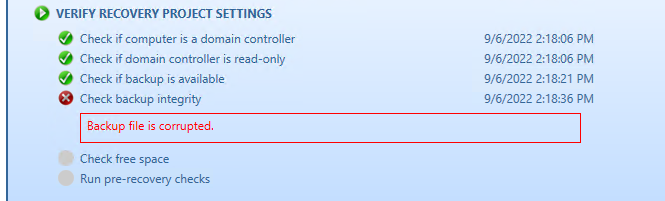

The following statuses can be displayed after running the integrity check:
| Status | Description |
|---|---|
| Passed | The newly calculated checksum value matches the previously calculated checksum stored in the backup file. |
| Unknown | The integrity check was not performed. |
| Running | The integrity check is in progress. |
| Failed | The backup is not accessible (wrong credentials) or may have been moved from the path. |
| No Checksum | The previously calculated checksum could not be read. This could be due to the backup being created by a previous version of the product. The backup also may have been damaged in such a way that the checksum was also affected. |
| Corrupted | The newly calculated checksum value does not match the previously calculated checksum stored in the backup file. |
You can use this tab to view recovery events related to the entire Active Directory® forest, specific domain controllers, or both these categories of recovery events.
On this tab, you can use the following elements:
Show - Select a category of recovery events to view:
Forest-wide events. Shows recovery events related to the entire Active Directory® forest.
Events for selected DCs. Shows recovery events related to the domain controllers selected in the list.
All events. Shows forest-wide events and events related to the domain controllers selected in the list.
Copy - Copies events in the list to Clipboard.
Save - Allows you to export events in the list to one of the following formats:
Text (Tab delimited) (*.txt)
CSV (Comma delimited) (*.csv)
You can change a number of advanced settings of the Forest Recovery Console. To do so, you need to modify the FRConsoleSettings.xml file that stores these advanced settings. You can find this file in the Recovery Manager for Active Directory (RMAD) installation folder (by default, this is %ProgramFiles%\Quest\Recovery Manager for Active Directory Forest Edition).
The changes you make in the FRConsoleSettings.xml file become effective right after you save the file. You do not need to restart the Forest Recovery Console.
The FRConsoleSettings.xml file includes the following XML elements you can modify:
Enables or disables skipping the files that are identical on the domain controller and in the backup during restore operations. This element can take one of the following values:
TRUE. Enables skipping the files.
FALSE. Disables skipping the files.
Sets the length (in characters) for the passwords automatically generated by RMAD.
Allows you to specify what symbols you want to use in the passwords automatically generated by RMAD.
This element can take the following values:
Latin. Specifies to use English letters.
Number. Specifies to use Arabic numerals.
Upper. Specifies to use uppercase English letters.
Lower. Specifies to use lowercase English letters.
All. Specifies to use all of the above-listed characters.
You can specify multiple values in this element. When specifying multiple values, use a pipe (|) as a separator.
Example:
Latin | Number | Upper | Lower
Specifies the maximum age (in days) of the backups to be displayed on the GUI. Backups whose age exceeds the specified value will not be displayed.
Enables or disables the Recovery Persistence feature. This element can take one of the following values:
TRUE. Enables the Recovery Persistence feature.
FALSE. Disables the Recovery Persistence feature.
Sets the maximum number of days between the updates of a recovery project. When the specified value is exceeded for a project, the Forest Recovery Console displays a warning.
Sets a timeout for the DNS server search operation performed during a forest or domain recovery. Use the format hh:mm:ss.
Specifies the default location on the Forest Recovery Console computer for storing diagnostic data gathered with the Diagnostic Data Collector.
Sets the global catalog partition occupancy level value to be used when advertising a rebuilt GC fast.
This element can take one of the following values:
0. No occupancy requirement.
1. At least one read-only partition in site added by Knowledge Consistency Checker.
2. At least one partition in site fully synchronized.
3. All read-only partitions in site added by Knowledge Consistency Checker, at least one synchronized.
4. All partitions in site fully synchronized.
5. All read-only partitions in forest added by the Knowledge Consistency Checker, at least one synchronized.
6. All partitions in forest fully synchronized.
If this parameter is set to FALSE, the Adjust to Active Directory changes operation will not call the "Remove lingering objects" command of the Repadmin tool.
If this parameter is set to FALSE, the Adjust to Active Directory changes operation will not call the "Unhost/Rehost" commands of the Repadmin tool.
Specifies the default location for storing custom drivers (for bare metal recovery only).
Specifies the port used by Quest Recovery Environment http service (for bare metal recovery only).
Limits the number of automatically selected DNS servers for domain controller DNS client settings.
Specifies the value by which to raise the number of available RID pools.
If necessary, you can revert to the default values in the FRConsoleSettings.xml file.
Specifies the port used by the web server handling Recovery Media Images. Images are consumed by HPE® iLO management software to perform automatic server boots. By default, the port is set to 8080.
Delete the FRConsoleSettings.xml file.
Restart the Forest Recovery Console on the computer on which you deleted the file in step 1.
Recovery Manager for Active Directory recreates the FRConsoleSettings.xml file and assigns default values to the elements in the file.
