
Prerequisite
The Kubernetes configuration file named KubeConfig is a standard configuration of Kubernetes and is required for Kubernetes agents to access the cluster. Foglight for Container Management verifies and supports the local Kubernetes and the following Cloud Kubernetes Service Providers. Based upon your environment, select either of approaches to get your KubeConfig file:
If you build a Kubernetes cluster locally, find this KubeConfig file under the /etc/kubernetes/admin.kubeconfig on your master node.
Before generating the Kubernetes credentials, record the following information:
Download the Azure Command Line Interface and install it in your local platform, and then follow steps below to generate your Kubernetes credential:
|
1 |
Run the command az login. |
|
2 |
Run the command: az account set --subscription <azure subscription number> |
|
3 |
Run the command: az aks get-credentials --resource-group <azure resource group name> --name <azure cluster name> |
|
4 |
Find the Kubernetes configuration file under <USER_HOME>/.kube/config on your local platform. |
Follow the Amazon EKS offical guide Getting Started with Amazon EKS. Follow the guide and complete Create a kubeconfig for Amazon EKS. in the end of the guide.
Download the Google Cloud Client tool and install it in your local platform, and then follow steps below to generate your Kubernetes credential:
|
a |
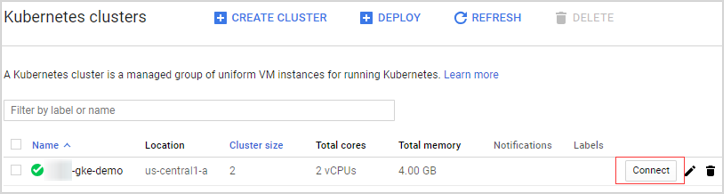
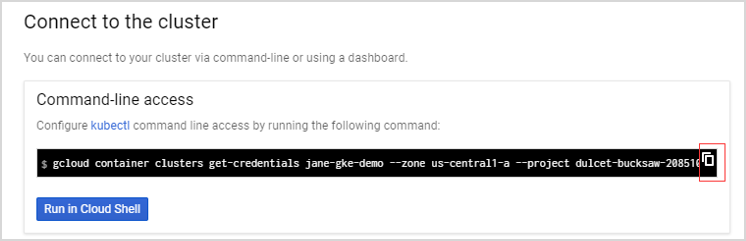
Log into your Kubernetes cluster, click Connect next to your cluster name. |
|
c |
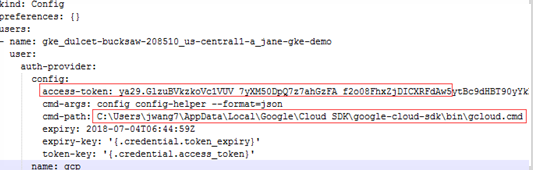
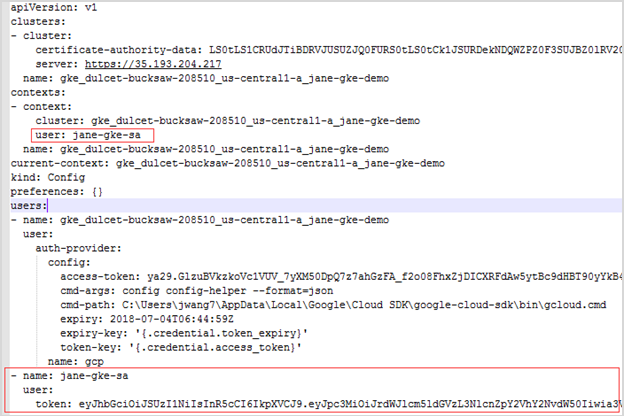
Find the intermediate Kubernetes configuration file under <USER_HOME>/.kube/config on your local platform. The following is the example of this intermediate Kubernetes configuration file. |
|
NOTE: This Kubernetes configuration file cannot be used as the agent credential because the token in this file will get expired soon and “cmd-path” of the token directs to your local platform. |
|
d |
Open Google Cloud Client tool and run the following commands to create a Kubernetes service account that grants with the cluster-admin role and the access to your Google Kubernetes Engine (GKE) cluster. |
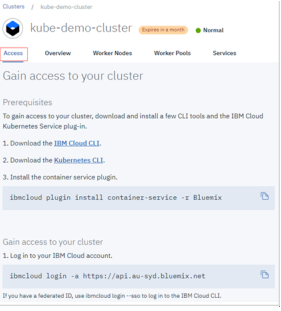
If you have created your cluster on IBM Cloud Kubernetes Service, get the access from the console as described on the cluster’s Access view. You will get a .pem file and a .yml file after you performing the steps.
|
1 |
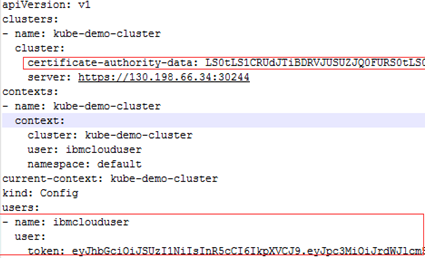
Run the command kubectl config view -minify=true -flatten -o json. You will get an output similar as below, then record the <certificate authority data> for later use. |

|
2 |
Run the command kubectl create serviceaccount <service account>. |
|
3 |
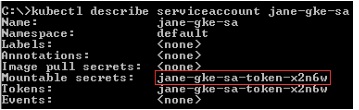
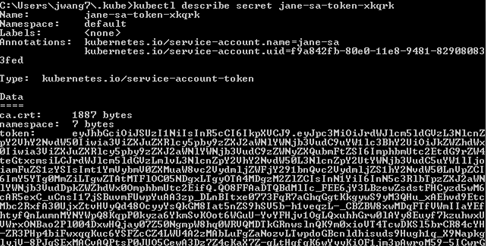
Run the command kubectl describe serviceaccount <service account>. You will get a response similar as below, then record <service account secret> (in this sample, it is jane-sa-token-xkqrk) for later use. |

|
4 |
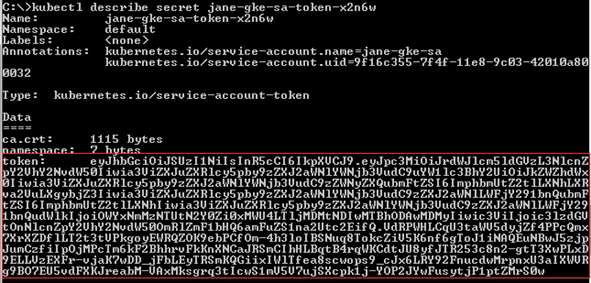
Run the command kubectl describe secret <service account secret>. You will get a response similar as below, then record <service account token> for later use. |
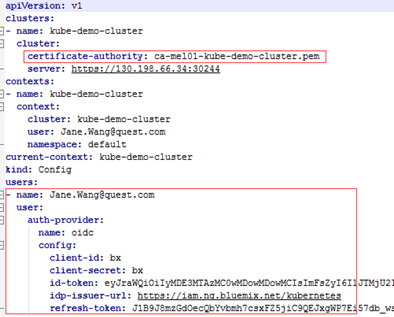
If you could access the /etc/origin/master/admin.kubeconfig on the master node, download this file which can be used as the Kubernetes Agent credential.
If you could not access the /etc/origin/master/admin.kubeconfig on the master node, follow instructions below to generate a permanent credential file.
Download the Openshift Command Line Interface and install it in your local platform, and then follow steps below to generate your Kubernetes credential:
|
1 |
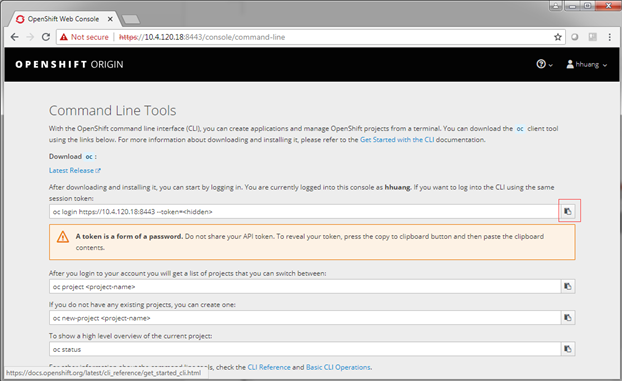
After logging into Openshift, click Command Line Tools on the upper right. |
|
2 |
Click the button next to the Session token field, copy the command, and then paste it in your local Command Line Tool. Make sure to find the intermediate Kubernetes configuration file under <USER_HOME>/.kube/config on your local platform. |
|
3 |
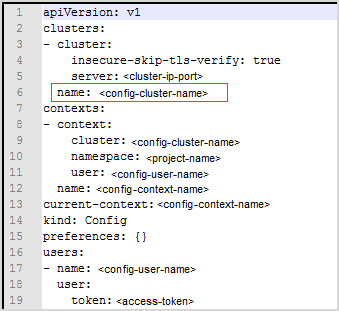
On your local platform, browse to open this configuration file. You may see the context similar to the following. Record <config-cluster-name> for later use. |
|
2 |
The token generated in step 1 will be expired after 4 hours, however Foglight for Container Management needs a permanent Kubernetes credential. So you need to create a service account with “cluster-admin” role, and then get the authorization code (not expired) of this service account to generate our permanent Kubernetes credential. |
|
1 |
|
2 |
kubectl get serviceaccounts
|
3 |
Run the command oc serviceaccounts get-token <service-account-name>. Then you will get a token <service-account-token> like below. Record this token for later use. |
|
4 |
Run the following command to grant your service account with the “cluster-admin” privilege: kubectl create clusterrolebinding <cluster-role-binding-name> --clusterrole=cluster-admin --serviceaccount=default:<service-account-name>. |
|
3 |
Generate a permanent Kubernetes configuration file and save it under <USER_HOME>/.kube/config file/credential. |
There are various approaches to enable Heapster on your Kubernetes cluster. Visit Heapster official website to determine the approach that you are going to deploy your Heapster service, or you can follow instructions in https://github.com/foglight/container to deploy your service.
Some of the cloud platform Kubernetes service has enabled Heapster service for the cluster. If you have connected to the cluster, run the following command to check: kubectl cluster-info
Kubernetes Agent
The Kubernetes configuration file named KubeConfig is a standard configuration of Kubernetes and is required for Kubernetes agents to access the cluster. Foglight for Container Management verifies and supports the local Kubernetes and the following Cloud Kubernetes Service Providers. Based upon your environment, select either of approaches to get your KubeConfig file:
If you build a Kubernetes cluster locally, find this KubeConfig file under the /etc/kubernetes/admin.kubeconfig on your master node.
Before generating the Kubernetes credentials, record the following information:
Download the Azure Command Line Interface and install it in your local platform, and then follow steps below to generate your Kubernetes credential:
|
1 |
Run the command az login. |
|
2 |
Run the command: az account set --subscription <azure subscription number> |
|
3 |
Run the command: az aks get-credentials --resource-group <azure resource group name> --name <azure cluster name> |
|
4 |
Find the Kubernetes configuration file under <USER_HOME>/.kube/config on your local platform. |
Follow the Amazon EKS offical guide Getting Started with Amazon EKS. Follow the guide and complete Create a kubeconfig for Amazon EKS. in the end of the guide.
Download the Google Cloud Client tool and install it in your local platform, and then follow steps below to generate your Kubernetes credential:
|
a |
Log into your Kubernetes cluster, click Connect next to your cluster name. |
|
c |
Find the intermediate Kubernetes configuration file under <USER_HOME>/.kube/config on your local platform. The following is the example of this intermediate Kubernetes configuration file. |
|
NOTE: This Kubernetes configuration file cannot be used as the agent credential because the token in this file will get expired soon and “cmd-path” of the token directs to your local platform. |
|
d |
Open Google Cloud Client tool and run the following commands to create a Kubernetes service account that grants with the cluster-admin role and the access to your Google Kubernetes Engine (GKE) cluster. |
If you have created your cluster on IBM Cloud Kubernetes Service, get the access from the console as described on the cluster’s Access view. You will get a .pem file and a .yml file after you performing the steps.
|
1 |
Run the command kubectl config view -minify=true -flatten -o json. You will get an output similar as below, then record the <certificate authority data> for later use. |
|
2 |
Run the command kubectl create serviceaccount <service account>. |
|
3 |
Run the command kubectl describe serviceaccount <service account>. You will get a response similar as below, then record <service account secret> (in this sample, it is jane-sa-token-xkqrk) for later use. |
|
4 |
Run the command kubectl describe secret <service account secret>. You will get a response similar as below, then record <service account token> for later use. |
If you could access the /etc/origin/master/admin.kubeconfig on the master node, download this file which can be used as the Kubernetes Agent credential.
If you could not access the /etc/origin/master/admin.kubeconfig on the master node, follow instructions below to generate a permanent credential file.
Download the Openshift Command Line Interface and install it in your local platform, and then follow steps below to generate your Kubernetes credential:
|
1 |
After logging into Openshift, click Command Line Tools on the upper right. |
|
2 |
Click the button next to the Session token field, copy the command, and then paste it in your local Command Line Tool. Make sure to find the intermediate Kubernetes configuration file under <USER_HOME>/.kube/config on your local platform. |
|
3 |
On your local platform, browse to open this configuration file. You may see the context similar to the following. Record <config-cluster-name> for later use. |
|
2 |
The token generated in step 1 will be expired after 4 hours, however Foglight for Container Management needs a permanent Kubernetes credential. So you need to create a service account with “cluster-admin” role, and then get the authorization code (not expired) of this service account to generate our permanent Kubernetes credential. |
|
1 |
|
2 |
kubectl get serviceaccounts
|
3 |
Run the command oc serviceaccounts get-token <service-account-name>. Then you will get a token <service-account-token> like below. Record this token for later use. |
|
4 |
Run the following command to grant your service account with the “cluster-admin” privilege: kubectl create clusterrolebinding <cluster-role-binding-name> --clusterrole=cluster-admin --serviceaccount=default:<service-account-name>. |
|
3 |
Generate a permanent Kubernetes configuration file and save it under <USER_HOME>/.kube/config file/credential. |
There are various approaches to enable Heapster on your Kubernetes cluster. Visit Heapster official website to determine the approach that you are going to deploy your Heapster service, or you can follow instructions in https://github.com/foglight/container to deploy your service.
Some of the cloud platform Kubernetes service has enabled Heapster service for the cluster. If you have connected to the cluster, run the following command to check: kubectl cluster-info
Docker Swarm Agent
If TLS enabled to secure Docker Remote API, then complete the following guide to get the credentials for Docker Swarm Agent for the docker host. Otherwise, continue with Enabling Docker Remote API for monitored docker host
Refer to the official guide to generate the keys. Be aware that, during generating the keys, the Foglight Agent Manager host address should be in the allow access list.
Docker Swarm Agent needs following credentials, you can get them when you finish the official guide.
Change ExecStart in docker service startup script as below.
If TLS enabled, complete Preparing Docker Swarm Agent credentials first, then you will get the ca.pem, server-cert.pem and server-key.pem mentioned in the official guide.
When complete Preparing Docker Swarm Agent credentials , following credentials should be generated.
On the Administration > Credentials > Manage Credentials dashboard, click Add, and then select Docker CA Public Key or Docker Client Public Key or Docker Client Private Key to upload related credentials. Take Docker CA Public Key as an example.
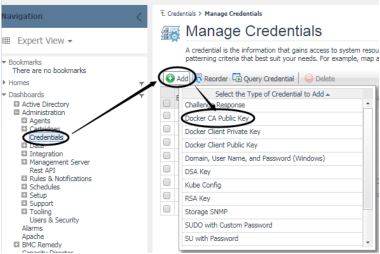
In the Add a New “Docker CA Public Key” Credential dialog box, specify the following values:
|
• |
|
• |
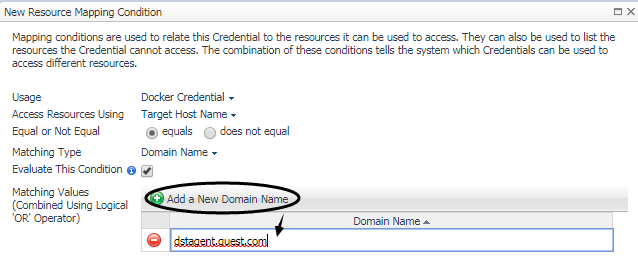
Resource Mapping: Click Add. In the New Resource Mapping Condition dialog box, choose Target Host Name or Target Host Address for the monitored docker host. |


Then Docker CA Public Key has been uploaded and mapped to the docker host. To monitor this docker host, Docker Client Public Key and Docker Client Private Key also need to be uploaded following the above steps.
Creating and Activating Agent
Foglight for Container Management supports Kubernetes Agent and Docker Swarm Agent.