
Variables
Global variables can be defined and be used across multiple scripts when defining Custom Actions. For example, a global variable to add the current date can be added to multiple scripts. Global variables will appear when selecting a starter script when creating a Custom Action if the "Requires Global Variables" option is selected.
To add a Global Variable:
- Click the Add button.
-
Enter values in the following fields:
- Variable Name (Required): Enter a name for the global variable. The name must contain alphanumeric characters and underscores only.
- Variable Value (Required): The value of the global variable. Check the Encrypted box to encrypt the value in the database and hide the variable value in the interface.
- Click the Save button.
Actions
Custom Actions and Tasks
New Custom Actions that appear in the Actions menu can be created on the Actions screen. Actions are a sequence of Tasks to complete a process.
The Actions screen will allow you to create a new Custom Actions that can be performed against Accounts, Computers or File Shares. Existing or new tasks can be added to a the desired Custom Action and then ordered as necessary to complete the custom process.
It is important to note that System actions and tasks can only be viewed or copied, they are not editable.
Adding or copying aN Action
To add or copy an action: Below the table, click New or select an existing Custom Action and click Copy. Check Show System to view and select any existing Systemactions.
- Action Name (Required): Enter a name for the Custom Action. The Action Name must be unique.
- Description: Enter a description for the action.
- Action Display Name: Enter the name that appears in the Actions menu.
- Action Target: Select one of the options from the drop-down list.
- Computer: The Action will appear in the Actions menu on the Computers screen.
- File Share: The Action will appear in the Actions menu on the File share screen.
- User: The action will appear in the Actions menu on the Users screen.
- Contact: The action will appear in the Actions menu on the Contacts screen.
- Resource Mailbox: The action will appear in the Actions menu on the Resources screen.
- Group: The action will appear in the Actions menu on the Groups screen.
- Admin Agent: The action will appear in the Actions menu on the Admin Agents screen.
- Action Type: Select one of the options from the drop-down list. The Action Type determines what validations are applicable to the job, and which status columns are updated when the job runs. For example, a Custom Action with the ReACL type, will have the same validations as the System ReACL action.
- Other (default): An action not related to any System action. No predefined validations are applicable. By default, new Actions are assigned as type Other.
- Discovery: Gathers properties from the computer.
- ReACL: Updates computer domain user profiles for use by the matching target user after cutover.
- ReACLRollback: Rolls back all changes made by the ReACLShare process.
- ReACLShare: Updates the File Share’s domain user profiles for use by the matching target user after cutover.
- ReACLRollbackShare: Rolls back all changes made by the ReACL process.
- Cutover: Moves a computer from the source domain to the new target domain.
- Cleanup: Removes the Source SIDs after the Cutover process completes.
- CleanupShare: Removes the Source SIDs after the Cutover process completes.
- ExplicitRollback: Rejoins a computer back to the source domain.
- UploadLogs: Uploads log files from the Migrator Pro for Active Directory Agent to the Migrator Pro for Active Directory Server using Microsoft BITS.
- Menu Selection Type: This option is not editable. System types are read-only. User types can be edited.
Adding or copying a Task
To add or copy a task: Below the Tasks table, click New or select an existing task and click Copy. Check Show System to view and select an existing Systemtask.
- Task Name (Required): Enter a name for the task. The Task Name cannot begin with "BT-" which is used to identify system tasks.
-
Task Type (Required): Select one of the options from the drop-down list.
- PowerShell Script: Allows you to define a PowerShell script for the process on the Command and Rollback screens. Global Variables can be added and used in the script.
- Command Line: Allows you to define a Command Line command for the process on the Command and Rollback screen. Global Variables can be added and used in the command line.
- Download File: Downloads a file to the predefined Downloads folder.
- Description: Enter a description for the menu action.
- General : Mark or unmark the following checkboxes and enter the following options if adding or copying a PowerShell script or Command Line command:
- Automatic Rollback: if checked, automatic rollback is added to the task.
- Requires Cutover Credentials: if checked, the PowerShell script or Command Line command includes the $CutoverCredentials_XXXXX parameters.
- Requires Network Profile: if checked, the PowerShell script or Command Line command includes the $NetworkProfile_XXXXX parameters.
- Requires Migration Options: if checked, the PowerShell script or Command Line command includes the $MigrationOption_XXXXX parameters.
- Requires Global Variables: if checked, the PowerShell script or Command Line command includes the Global Variables.
- Requires Offline Domain Join: if checked, PowerShell script or Command Line command includes the Offline Domain Join parameters.
- Run On Admin Agent: if checked, the PowerShell script or Command Line command can only be used on Admin Agents computers.
- Timeout (Seconds): For PowerShell script or Command Line command, enter the number of seconds the process will be attempted before timing out.
- Retry Count: For the PowerShell script or Command Line command, enter the number of times the process will be retried.
- Update Interval (Seconds): For PowerShell script or Command Line command, enter the number of seconds between process runs.
- Script: Enter a PowerShell script or Command Line command. If creating a PowerShell script, click Starter Script to populate the entry box with the basic framework of a script. Enter or edit the Command Line command or PowerShell script. Text is required. The return value of the script or command will determine success or failure.
- Rollback: Enter a PowerShell script or Command Line command to run in case of failure/Rollback. Ideally this would undo the effects of the above script. If creating a PowerShell script, click Starter Script to populate the entry box with the basic framework of a script. Enter or edit the Command Line command or PowerShell script. Text is required. The return value of the script of command will determine success or failure.
- Download: Enter the following options if adding or copying a Download File task. When a new download job is created for a managed workstation, the specified file that is stored on the Migrator Pro for Active Directory Server (by deafault: c:\Program files\Binary Tree\ADPro\Downloads\) will be downloaded to c:\Program files\Binary Tree\ADPro Agent\Downloads\ on the workstation’s local disk.
- File Name (required): The file name. Based on the File Location for Download Jobs used during installation The File Name cannot contain invalid filepath characters and cannot use the following reserved file names: map.usr, map.gg, and ReACL-config.json.
- Target Location: The Target Location of the download job. The Target Location cannot contain invalid filepath characters and cannot use the following reserved file names: map.usr, map.gg, ReACL-config.json. A Target Location is required if the File Name contains environment variables.
- Retry Count: For PowerShell script or Command Line commands, enter the number of times the process will be retried.
- Update Interval (Seconds): For PowerShell scripts or Command Line commands, enter the number of seconds between process runs.
- Timeout (Seconds): For PowerShell scripts or Command Line commands, enter the number of seconds the process will be attempted before timing out.
The local download folder on an Migrator Pro for Active Directory managed machine will be secured with permissions only for the BUILTIN\Administrators group.
 |
If rights other than BUILTIN\Administrators are required then the administrator will need to make a change on the local downloads folder (c:\Program files\Binary Tree\ADPro Agent\Downloads\) on the Agent machine. |
Adding Tasks to Actions
To add a Task to an Action: Select a Task in the Tasks table, select an Action in the Select Action drop-down menu and click the Add To button.
Under a given Action the Tasks are listed in the order in which they will be executed. Drag and drop tasks to reorder them. Tasks can be viewed, copied, or removed by selecting the tasks and clicking the appropriate button.
Tasks marked as "Run On Admin Agent" can be added to Computer, User, Room, Contact, or Group Object Type menu selections (File Share is not supported). Tasks designed to run on computers or File shares can be added to Computer or File Share Object Type Actions only.
Activating Actions
Only Actions marked as Active will appear in the Actions menus. Select an Action in the table and click the Disable or Enable button to change the active status of the Action. Inactive actions can be displayed in the table by clicking the Show Disabled button. You may want to create a new action, enable it, and then disable the corresponding System action.
Custom Action Example
Scenario: The administrator wants to download the Get-DiskSpace.ps1 file on selected workstations.
Steps:
- Copy the Get-DiskSpace.ps1 file into the file location for download jobs selected during the installation of Migrator Pro for Active Directory, c:\Program files\Binary Tree\ADPro\Downloads\ by default.
- On the Actions screen, click the New button under the Actions table.
-
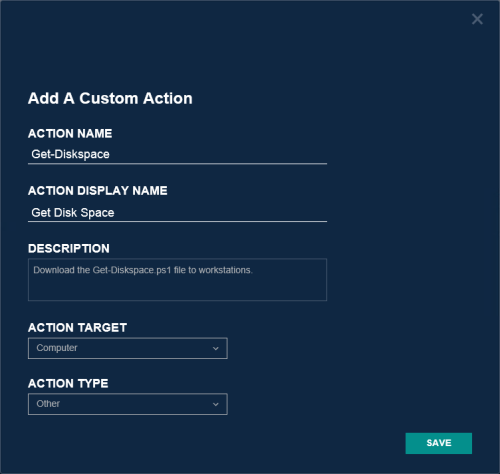
Add a Custom Action named "Get-Diskspace". The Action Display Name is how the option will appear in the Actions menu. Select the "Computer" Action Target so the menu option will appear in the Actions menu on the Computer Actions screen.
- Click the New button under the Tasks table.
-
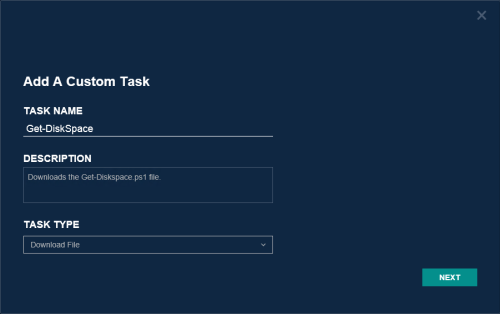
Select the "Download File" Task Type and enter the File Name. The full path to the file should not be entered.
-
Select the task, select "Get-Diskspace" from the Select Action drop-down menu and click the Add To button.
Ensure the Action is active. The action can be expanded to view the associated Task.
- On the Computer Actions screen, select the computers and then select the new "Get Disk Space" option from the Actions menu. When the new download job is run successfully against a machine, the Get-DiskSpace.ps1 file will reside locally on disk at c:\Program files (x86)\Binary Tree\ADPro Agent\Downloads.


Reports
The Migration Reports screen allows you to view reports for the current AD migration, devices, migration groups, and users. Reports are available only if the Reporting feature was installed and configured.
Dashboard
The Dashboard report is a high level status report of the current AD Migration.
To view the Dashboard Report:
-
Select Dashboard from the drop-down list.
- To filter the report to display a specific Migration Wave, select an option from the Select Migration Group (Migration Wave) drop-down list and click the View Report button. If no Migration Groups have been created, the only option available is ALL which displays all objects.
The report displays the following data:
- User Preparation Status - Displays the number of Users prepared and not prepared for migration.
- User Migration Status - Displays the number of Users migrated and not migrated.
- Device Preparation Status - Displays the number of Computers prepared and not prepared for cutover.
- Device Cutover Status - Displays the number of Computers that have completed cutover and have not completed cutover.
- Devices that Failed to Cutover - Displays the number of Computers that failed cutover and completed cutover.
- User Profiles to Devices Relationship - Displays the Users that have logged onto each computer.
Device Detail Report
The Device Detail Report is a detailed report of computer information.
To view the Device Detail Report:
-
Select Device Detail Report from the drop-down list.
- To filter the report to display a specific record, select an option from one or more drop-down lists and click the View Report button.
The report displays the following data for each Computer:
- Migration Group - The Migration Group (Migration Wave) name if assigned.
- Name - The sAMAccountName attribute of the source Computer.
- Device Not Checking In - Is the Computer failing to check in with the server.
- Source DN - The distinguished name attribute of the source Computer.
- Registered - Is the Computer registered with the server.
- Discovery - The status of the Discovery process.
- ReACL - The status of the ReACL process.
- Cutover - The status of the Cutover process.
- Cleanup - The status of the Cleanup process.
- Prepared for Migration - This column is checked if the Computer has successfully started the Cutover process.
- Last Contact - The time and date of the last contact between the Agent and the Migrator Pro for Active Directory Server.
| |
This report includes an extra blank page that can be ignored. |
Devices that Failed to Cutover
The Devices ailed to Cutover report is a report displaying computers that did not successfully complete the Cutover process.
To view the Devices that Failed to Cutover Report:
-
Select Devices that Failed to Cutover from the drop-down list.
- To filter the report to display a specific Migration Wave, select an option from the Migration Group drop-down list and click the View Report button. If no Migration Groups have been created, the only option available is ALL which displays all Computers.
The report displays the following data for each Computer:
- Device Name - The sAMAccountName attribute of the source Computer.
- Migration Status - The status of the migration.
- Last Job Message - The last job status.
Migration Group Status
The Migration Group Status report displays metrics information about all migration objects.
To view the Migration Group Status Report:
-
Select Migration Group Status from the drop-down list.
- To filter the report to display a specific Migration Wave, select an option from the Migration Group drop-down list and click the View Report button. If no Migration Groups have been created, the only option available is ALL which displays all objects.
User Status Report
The User Status Report is a detailed report of User information.
To view the User Status Report:
-
Select User Status Report from the drop-down list.
- To filter the report to display a specific record, select an option from one or more drop-down lists and click the View Report button.
The report displays the following data for each User:
- Migration Group - The Migration Group name.
- Display Name - The display name attribute of the source user account.
- Source User ID - The User ID of the source user account.
- Target User ID - The User ID of the target user account.
- Source DN - The distinguished name attribute of the source user account.
- Target DN - The distinguished name attribute of the target user account.
- Source UAC - Indicates if the user account is enabled in the source.
- Target UAC - Indicates if the user account is enabled in the target.
- Migrated - This column shows any users that have been manually tagged with the Migrated status. This is an optional tag for tracking purposes and does not necessarily represent a successful user migration.
- Prepared for Migration - A value of True verifies that the user has been synchronized with the target.
- Ready to Sync - User has been marked as Ready-to-Sync.
- Failed to Sync - If the Ready-to-Sync value is True, AND Failed to Sync value is True, this means that the synchronization has actually failed. Examine the log for details. If the Ready-to-Sync value is False, and Failed to Sync is a value of True, this means that synchronization has not yet been attempted for this User.
- Status Message - The last status. No message is displayed if Failed to Sync is False.
- Migration Group ID - The ID of the Migration Group.
User Profile to Device Relationship Report
The User Profile to Device Relationship Report is a report showing the users that have logged onto each computer.
To view the User Profile to Device Relationship Report:
-
Select User Profile to Device Relationship from the drop-down list.
- To filter the report to display a specific Migration Group (Migration Wave), select an option from the Migration Group drop-down list and click the View Report button. If no Migration Groups have been created, the only option available is ALL which displays all computers.
The report displays the following data for each User:
- Device Name - The name of the Computer which this User has logged into.
- sAMAccountName - The sAMAccountName of the User.
- First Name - The first name of the source User.
- Last Name - The last name of the source User.
- Profile Last Used - The last date the profile was used.
Report Options
Report options are available above the displayed report.
- Paging - Click the First Page, Previous Page, Next Page, and Last Page arrows to page through a multi-page report.
- Refresh - Click the Refresh icon to update the data in the report. This option is also available in the right-click menu while hovering over the report.
- Zoom - Click the drop-down list and select a zoom option. This option is also available in the right-click menu while hovering over the report.
- Export - Click the Export icon to select a format to export. This option is also available in the right-click menu while hovering over the report.
- Print - Click the Print icon to open printing options. This option is also available in the right-click menu while hovering over the report.
- Find / Next - Enter a value to search for in the report and click Find. Click Next to find the next instance of the value.