For more information on this topic, please see the KACE-SMA Course 2 Installing the KACE SMA Agent-Web-based Training.
NOTE: This manual process is no longer required due to the availability of the GPO Tool for KACE SMA Agent Deployment. For more information, see KB133776. The below steps are only useful if your KACE SMA version is on 6.4 or older. A step by step guide on how to use the GPO tool can be found in article 217592 for versions 7.0 and newer or by viewing the KACE-SMA training course listed above.
Step 1: Modify the Agent so that it can be deployed silently via GPO
v6.0 and below: Download the Agent MSI from the Samba share on the K1000
v6.2 and above: Download the Agent MSI from the update agents page in your K1000 UI, and skip modification, as the zip file will contain a modified MSI.
1. In a file manager browse to \\k1000hostname\client\agent_provisioning\windows_platform and copy the Agent to the local machine.
2. Rename the agent (6.x in our example) from ampagent-6.x.xxxxx-x86.msi to include your host name. e.g.ampagent-6.x.xxxxx-x86_k1000hostname.company.com.msi
For older agent versions with a known issues regarding language, Modify MSI so it installs with correct language via GPO. This is not required for current versions of the agent. Skip the following steps unless you determine a need:
3. Download the .vbs script attached to the bottom of this article
4. Next you can create a Batch file or run the this command from a command line (cmd):
· cscript setlang.vbs "C:\pathtoampagent\ampagent-6.x.xxxxx-x86_k1000hostname.company.com.msi" 1033
· 1033 is the locale number, letting the MSI know to go to En-US in this example (see below for other languages).
5. 5. After running the command, the .vbs script will modify the .msi file and is ready to be used in Software Deployment GPO.
NOTE: If you need to install in other languages/regions the following are available:
Step 2: Creating the Group Policy
This describes how to use Group Policy to distribute the KACE K1000 Agent to client computers using the "Assigning Software" method.
Definition: Assigning Software: You assign a program distribution to a computers. When you assign the program to a computer, it is installed when the computer starts.
Create a Distribution Point; The agent install must be installed in the Computer Configuration/ To publish or assign a computer program, you must create a distribution point on the publishing server:
1. Log on to the server computer as an administrator.
2. Create a shared network folder where you will put the Microsoft Windows Installer package (.msi file) that you want to distribute.
· NOTE: Make sure to use a share that everyone can access. For example, it's not suggested to place the .msi on the NETLOGON share as not every user can reach that share, and will cause your upgrade to fail in the future.
· Note: This location should be a permanently accessible share. The installer is an MSI. To uninstall/upgrade software, the MSI needs access to the current and previous installer. If it is not accessible, msiexec will not uninstall. This also means you should leave older versions of MSI's in this distribution share when updating your GPO with a new agent.
3. Set permissions on the share to allow access to the distribution package.
4. Copy the updated modified MSI install package from the steps above to the distribution point.
Use Group Policy Management Console to create the policy
1. Start the Group Policy Management Console. To do this, click Start, point to Administrative Tools, and then click Group Policy Management Console
2. In the tree, expand your forest; locate your domain and find the Group Policy Objects section
3. In the right-hand pane where the Group Policy Objects are listed, right-click and choose new.
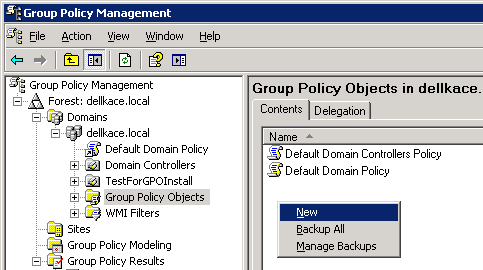
4. Enter the Name for the Policy, in our case – KACE K1000 Agent.
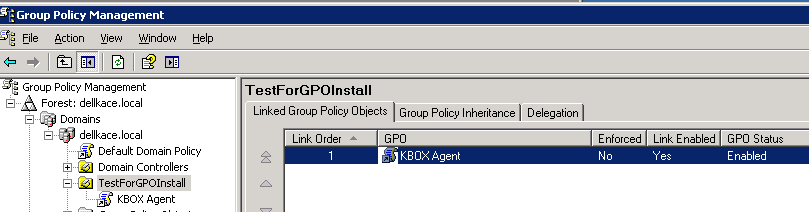
5. Click and Drag the newly created object onto the OU you want to deploy it to. In this example we are using an OU called TestForGPOInstall.
Assign a Packageusing Group Policy Management Console
1. 1. Find your group policy object called KACE K1000Agent. Right-click on it and choose Edit.
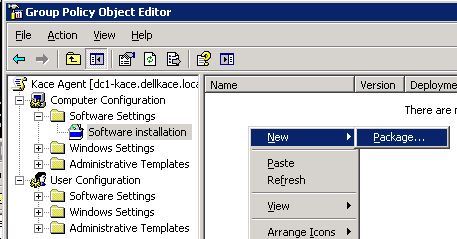
2. The Group Policy Object Editor will open
3. Under Computer Configuration, expand Software Settings.
4. Right-click Software installation, point to New, and then click Package
5. In the Open dialog box, type the full Universal Naming Convention (UNC) path of the shared installer package that you want. For example, \\fileserver\share\ampagent-6.x.xxxxx-x86_k1hostname.company.com.msi
Warning! Do not use the Browse button to access the location. Make sure that you use the full UNC path to the shared installer package.
6. Click Open.
7. Click Assigned, and then click OK. The package is listed in the right pane of the Group Policy window.
8. Close the Group Policy snap-in.
·
Initiate Installation on the PC
The next time the PC restarts it will install. To ensure it is working in a test environment:
1. Go to your test PC and login as an administrator
2. Open the "Run" dialogue and type gpupdate /force . You should see something like this:

3. Press Y to restart. When the machine comes back online it should be installed.
· Troubleshooting
If the agent does not install, you can use the Group Policy Management Console to troubleshoot easily.
1. Start the Group Policy Management Console. To do this, click Start, point to Administrative Tools, and then click Group Policy Management Console
2. Find the Group Policy Results section.
3. Right-click on it and choose Group Policy Results Wizard
4. Create a new report based only on the test PC.
5. Here are some examples of what you might find:
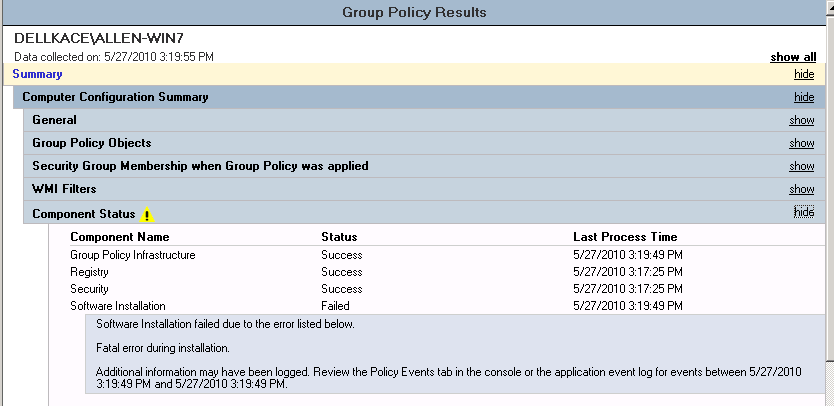
Problem 1: Component Status shows and attempt to install but received: Fatal Error during installation
Solution: You did not prepare the MSI as described in the first steps of this article.
Screenshot Example:
Problem 2: GPO Results state the file source cannot be located.
Solution: Ensure that the shared folder properties, where the Agent MSI is located, has both domain\Domain Users and domain\Domain Computers with full control included. The typical error here is when configuring the shared folder, only domain\Domain Users will be included by default..
Screenshot example: Screenshot is the same as listed in Problem 1 except with the error message "The installation source for this product is not available.
Problem 3: Agent fails to upgrade due to failure to remove the old agent.
Solution: This is most commonly caused by the removal of the MSI used to install the agent. The K1000 agent upgrade utilizes the original installer during the removal process of the old agent. Example: If upgrading to 6.0 and placing the installer on a network share, the old 5.5 agent MSI should be left in place until all upgrades to 6.0 have succeeded.
Problem 4: In the report section for Denied GPOs you find your Group Policy Object and the reason denied is Empty.
Solution: The PC was not able to locate the msi file due to permissions, it is missing or the object was not assigned a package.
Screenshot example:

