-
标题
How to link a SQL Server database to a Git repository -
解决办法
Applies to
ApexSQL Source ControlSummary
This article describes how to link a database to a Git repository on various offerings of Git including Git on a local file system, online Git repositories as well as Git hosted on Team Foundation Server. In addition, Git repository can be accessed using the SSH protocol which is also supported and will be covered.Note: SQL Server management Studio 2016 and SQL Server 2016 will be used since the version of SQL Server/SSMS is not relevant in this case.
Description
To link a database, follow the steps described in How to link a database to source control article, since these are common steps that should be performed no matter which source control system is used.
In this article, the focus will be on specific configuration that is required for linking a database to a Git repository.
As the first step when linking a database, it is important that the Git item is selected in the Connection type step of the source control wizard:
Quick tip:
Even if the Git repository is hosted on Team Foundation Server, the Git option must be selected from the drop down list, when linking a database to a Git repository.
If the Git is selected in the first step, the System login step (the final step of the Source control wizard) is as follows:
Git with file protocol (local Git repository)
It is a common practice for users to have a local repository on a machine that is either a blank repository initialized using any Git client, or a cloned version of the existing remote repository.
Quick tip:
No matter if a repository on a local file system is initialized in a blank folder, or it represents a clone of the existing remote repository, linking a database goes in the same way.
For the purpose of the article, we’ll use GitBash as a Git command line client, but any other Git client could be used, as well.
Initialized Git repository
To initialize the repository, we’ll create an empty folder called GitLocal, start GitBash and make the path to the GitLocal folder as current. Once this is set, the following command is executed in Git Bash:
$ git init ---bare
Quick tip:
Initializing a bare repository is mandatory when linking a database to a local Git repository.
Now, we can use the initialized repository in the Source control wizard, specifically in the System login step, just by pasting the path of the previously created folder in the Repository field. Before that, username and password should be specified (if necessary) in the appropriate fields:
Before pasting the repository path, it is mandatory to specify the file:\\\ part in the Repository field. This is used by the add-in as a verification mechanism that the local repository is used.
Quick tip:
When working with the local folder, username and password are not mandatory. To avoid specifying username and password, specify file:\\\ in front of the local repository path.
When specifying the file:\\\ part in the Repository field, the System login step is as follows:
As soon as the file:\\\ part is recognized by the add-in, Username and Password fields will be greyed out, meaning that there is no need to specify these when linking a database to a local repository.
Quick tip:
When username and password are mandatory for any reason (folder is on a location that is password protected), these must be specified first, before adding the file:\\\ part to the Repository field and the actual folder path .
Cloning existing repository
To clone the existing remote repository, the following command should be used, assuming that the remote repository exists and that it is accessible:
$ git clone https://TestRepo@bitbucket.org/TestRepo/gitlocaltest.git
This will clone the existing gitlocaltest repository to the current folder path, so it can be specified in the Repository field:
Quick tip:
It is mandatory that when linking a database to an existing repository, a separate (blank) project inside the repository is used.
When specifying the local repository, a separate projects can be created for each linked database (which is necessary in most of the cases, except when working with similar databases (similar or identical database structure) that require a common Git project in order to be in sync).
Quick tip:
Creating and deleting new projects directly from the Source control wizard is available regardless of the used protocol (file, HTTP(S) or SSH), unless such restriction is not introduced on the Git server directly.
To manage projects inside the Git repository (no matter if it is an empty or it contains existing projects), use the Browse button to review the current repository structure:
New and Delete buttons can be used to create new projects or delete existing ones, respectively.
Once the project is set, clicking the Finish button results in loading the Action center tab and showing scripts for all previously selected objects to be initially committed.
Quick tip:
When local repository is used changes will be committed to a local repository only and not on a remote one, no matter if the repository is cloned or initialized.
Git with HTTP(S) protocol
This is probably the most used option when working with Git. There are variety of cloud based services that offer free or paid Git repository hosting and that are easy to register and initially set. In this article we’ll use Bitbucket.org as the Git hosting provider. When a new repository is created (in this case, we have created a repository called gitlocaltest), the URL given will be as follows:
https://SQLDev@bitbucket.org/SQLDev/gitlocaltest.git
When using the cloud based Git repository, credentials are in most cases the same as the one used to log in to the cloud based portal and access the User profile information and manage Git projects.
Quick tip:
Login credentials (email and password) for cloud based Git repository should be used. In some cases, username instead of an email address could be specified. Email should work in any way, unless it is explicitly required that a username must be specified instead.
The System login step will be as follows:
In the same way as explained for the local Git repository, projects inside the remote repository can be managed (create, delete).
Quick tip:
To avoid specifying a password each time the add-in communicates with the repository, check the Store encrypted password option, to save the encrypted password locally.
Git with SSH protocol
In order to link a database using the SSH protocol, a necessary pre-requisite is to:
- generate SSH key pair (private and public keys) on a local machine, using any of the SSH clients
- Add public key to a Git server side
Since GitBash can be used for generating the SSH key pair, we’ll use it in the following example.
Generating SSH key pair
To generate SSH key par, execute the following command in GitBash:
$ ssh-keygen -t rsa -C"ApexSQl@central.com"
The output is as follows:
Generating public/private rsa key pair.
Enter file in which to save the key (/c/Users/ApexSQL/.ssh/id_rsa):Click the Enter key, to confirm that the key pair will be created in the users’ folder, specifically in the .ssh folder.
Quick tip:
It is mandatory to keep the default location for the key pair, since the add-in works as expected when the default location for the key pair is selected. Otherwise, an error appears when linking a database.
In the next step, a passphrase is required:
Enter passphrase (empty for no passphrase):
Once the passphrase is specified, the same one needs to be confirmed, as the next step is:
Enter same passphrase again:
After confirming the passphrase, the result is as follows:
Your identification has been saved in /c/Users/ApexSQL/.ssh/id_rsa.
Your public key has been saved in /c/Users/ApexSQL/.ssh/id_rsa.pub.Quick tip:
Make sure that the passphrase meets the requirements (it is strong enough) so it could not be used by other person.
Copying public key
As noted above, a public key has been saved on a local machine and it needs to be added to a Git server, in order for the server (in this case Bitbucket.org) to establish a connection with a local machine. To copy the public key, navigate to the default location where it is created previously, and open a file in any text editor:
Quick tip:
In case you cannot find the .ssh folder, make sure that hidden folders are shown, as it may be hidden in some situations.
Once opened, copy the entire content of the file to clipboard:
Quick tip:
Be careful when copying the public key. A recommendation is to use CTRL +A keyboard shortcut, to make sure the public key is properly selected/copied.
To copy public key using the command line, one of the following methods (commands) can be used:
For Windows Command Line, type the following:
%userprofile%\.ssh\id_rsa.pub | clip
For Git Bash on Windows / Windows PowerShell, type the following:
cat ~/.ssh/id_rsa.pub | clip
Using any of the given methods, public key will be copied and stored in clipboard.
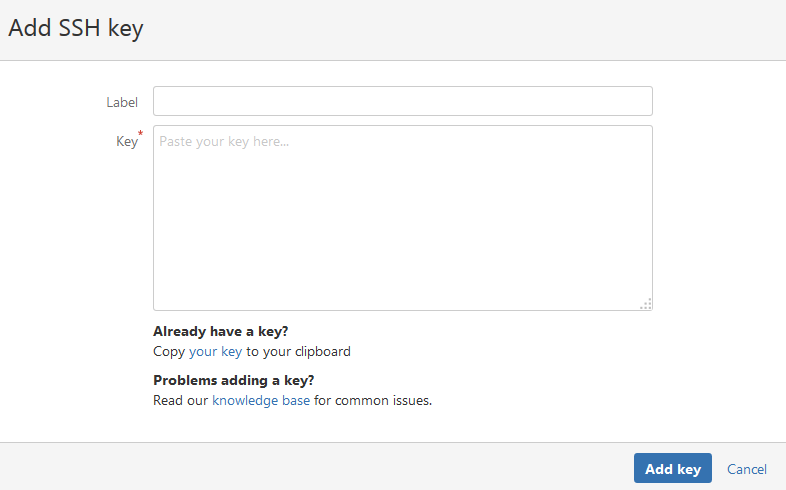
To add the SSH public key to the Git server side (in this case to Bitbucket.org), navigate to the Settings page, choose the Access keys tab and click the Add key button:
Paste the public key in the appropriate field and click the Add key button:
For more information about how to add a public key to a Git server that is not cloud based, check the Setting up Git on the server side article.
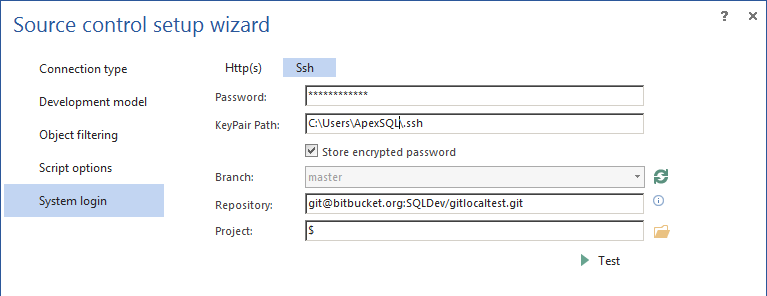
After the public key is added to a Git server side, a database can be linked. To link a database, switch from the HTTP tab to the SSH tab in the System login step of the wizard:
In the Password field specify the passphrase that was used when the SSH key pair was generated. Make sure that the Key pair path field contains a default location to the .ssh folder, where the private key is stored.
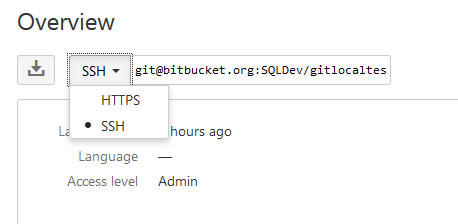
As an argument for the Repository field, use the SSH URL provided by the cloud service:
Quick tip:
The format of the HTTP repository URL is different comparing to the SSH repository URL, so make sure that the correct one is specified in the Repository field.
Once the requested information is provided in the System login step, a database can be linked by clicking the Finish button.
Git hosted on Team Foundation Server
When a Git repository is hosted on Team Foundation Server (aka TFS) it can be used in the same way as explained above for HTTP(S) and SSH. Once the Git repository is created, for HTTP(S) use it with the account credentials combination for the TFS account, and in case of SSH connection, add the public key in the same way as for any other Git cloud based service and use the passphrase in the System login step of the source control wizard.
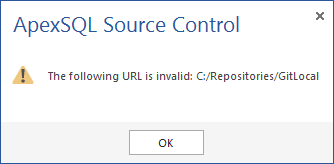
Q: What will happen if I don’t specify the file:\\\ when using the local repository?
A: Since this is a mandatory part, the add-in gives the following error:
Q: How can I use a new password to link a database that is already linked using the old password?
A: If the password that is used to access the repository and linking a database is changed, just re-link a database and in the System login step provide a new password or a passphrase for SSH connection.
Q: What if the passphrase is not specified when the SSH key pair is generated?
A: The add-in reports an error that the password is not valid. To fix this, generate a new key pair with the passphrase.
Q: Can I use other clients to generate the SSH key pair?
A: Yes, any client that can create a key pair in the .ssh folder can be used. You can find additional information in the How to link a database to a Git repository using the SSH protocol article.
Q: How can I start using SSH in a repository where I am currently using HTTPS?
A: Unlink a database from the HTTP(S) repository, make sure that the public key is added for the SSH repository and link a database using the given passphrase, along with the SSH repository URL.