Follow these instructions to install Toad IBM DB2 z/OS Components on your IBM DB2 subsystem:
Note: Toad for z/OS IBM DB2 Components version number has been updated to 7.4 to reflect changes connected with the installation wizard. If you have version 7.2 previously installed on you z/OS subsystems you can carry on using them and do not need to re-install.
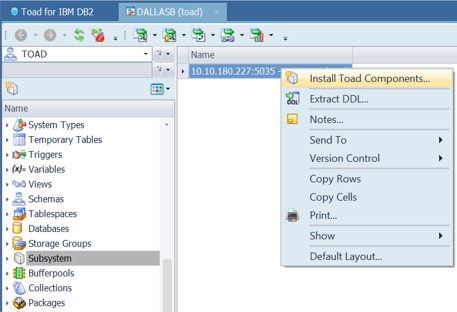
Complete the Specify the z/OS DB2 Subsystem page. Identify the subsystem on which you are installing the z/OS components. Review the following for additional information:
|
Field |
Description |
|
Subsystem ID |
Enter the SSID for the DB2 subsystem on which you are installing the z/OS components. This should be the actual SSID, not an alias, for the subsystem. |
| User ID | Enter your User ID. |
| Password | Enter your password. |
|
DB2 exit library |
Enter the fully qualified name of the DB2 exit library. |
|
DB2 load library |
Enter the fully qualified name of the DB2 load library. |
Complete the Specify Workload Manager (WLM) Environments for Toad page.
Provide the names of the single-tasking and the multi-tasking WLM application environments used by IBM DB2 stored procedures and functions (These procedures and functions, in turn, are used by Toad for DB2). You can enter up to 32 characters for application environment names.
Notes:
Complete the Provide Parameters for Creating the Toad Database page. Enter the following information to create the database required by the z/OS components. This database is created in the subsystem where you are installing the z/OS components.
Note: This database must be reserved for exclusive use by Toad DB2 products, such as Toad for IBM DB2.
|
Field |
Description |
|
Subsystem |
(Read-only) The SSID for the DB2 subsystem on which you are installing the z/OS components. |
|
Storage group |
Enter the name of the storage group for the database objects. |
|
Tablespace bufferpool |
Enter the name of the bufferpool for tablespaces in the database. |
|
Index bufferpool |
Enter the name of the bufferpool for the indexes in the database. |
|
DB2 CLI collection ID |
Specify the identifier of the collection used when the DB2 installation job DSNTIJCL was run. If you do not know this collection ID, consult your systems programmer. |
|
DB2 CLI plan name |
Specify the name of the plan used when the DB2 installation job DSNTIJCL was run. If you do not know the plan name, consult your systems programmer. |
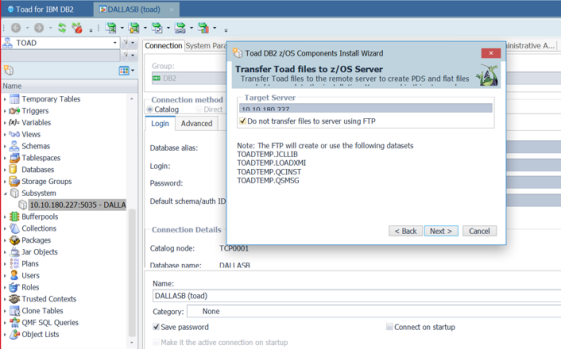
Complete the Transfer Toad Files to the z/OS Server page. Enter the IP address of the Target Server and click Next.
Note:
|
Field |
Description |
|
FTP Connection |
Select the FTP connection from the list. |
|
Server address |
Enter the IP address to which the files are transferred. |
| Server port | Enter the server port. |
|
Username |
Enter the mainframe user ID under which FTP transfers the files from the local directory on the Toad client machine to the temporary location on the mainframe. |
|
Password |
Enter the password associated with this user ID. |
|
FTP files to the mainframe |
Select this option to have the wizard installation process transfer the files from the temporary local directory on the Toad client machine to the temporary mainframe location. (The temporary mainframe location is identified by the high-level qualifier you specified for temporary datasets.) Note: The installation process uses the default Windows FTP program. |
|
Do not FTP files to the mainframe |
Select this option if you intend to manually transfer the files from the temporary local directory on the Toad client machine to the temporary location on the mainframe. |
README file contains instructions for the additional tasks that must be performed on the mainframe to complete the z/OS components installation.
README file contains instructions for the additional tasks you must perform on the mainframe to complete the z/OS components installation.
The wizard performs its tasks:
The README file containing the instructions needed to complete the installation on the mainframe is displayed. (If you did not specify to view the README file, locate the file in the subsystem _ID directory in the location you specified for Temporary Local Directory or in the Plugins\DB2\ZOS directory at your Toad for DB2 installation location.)
README file to complete the installation on the mainframe.
Plugins\DB2\ZOS directory at your Toad for IBM DB2 installation location and specific files stored at the temporary local location specified for Temporary local directory. See Manual Transfer of the z/OS Component Installation Files for more information. After the files are transferred, you are directed to perform the tasks described in the README to complete the installation on the mainframe.
The Toad IBM DB2 z/OS Components Installation wizard uses the default Windows FTP program to transfer the z/OS components installation files automatically from your Toad client machine to temporary datasets on the mainframe. However, you might need to transfer these files yourself for various reasons, such as:
The process of manually transferring the z/OS components installation files from the Toad client machine to the mainframe involves two main tasks:
IND$FILE transfer To transfer the z/OS components installation files manually
Using ISPF option 3.2, allocate the following datasets on the mainframe, where temphlq is the temporary high-level qualifier for the datasets:
|
Dataset |
Type |
Allocation Specifications |
|
temphlq.LOADXMI |
Sequential |
recfm=fb,recsize=80,blksize=3120,space=(cyl,(25,15)) |
|
temphlq.QCINST |
Sequential |
recfm=fb,recsize=80,blksize=3120,space=(trk,(10,5)) |
|
temphlq.JCLLIB |
PDS |
recfm=fb,recsize=80,blksize=3120,space=(trk,(10,10,5)) |
|
temphlq.QSMSG |
Sequential |
recfm=vb,recsize=1028,blksize=6144,space=(trk,(10,10)) |
Note:temphlq.JCLLIB must be a partitioned dataset.
Use IND$FILE in binary mode to transfer the fileQuestDB2product_install\plugins\db2\zos\loadlib.xmi to temphlq.LOADXMI.
Note: The QuestDB2product_install value is the directory where the Toad for DB2 client (or another Toad IBM DB2 product) is installed on your Windows machine. The temphlq value is the high-level qualifier for the temporary mainframe datasets you allocated. References to these variables are also found in steps that follow.
IND$FILE in ASCII mode to transfer the file QuestDB2product_install\plugins\db2\zos\qs.msg to temphlq.QSMSG.
Use IND$FILE in ASCII mode to transfer the following files from temp_local_directory\subsystem_id on your Toad client machine to the appropriate members of temphlq.JCLLIB.
Note:temp_local_directory is the value you provided for Temporary local directory in the wizard to identify the temporary staging location for certain customized installation files on the Windows machine. The subsystem_id value is the SSID you specified in the wizard to identify the IBM DB2 subsystem on which you installing the z/OS components. The temphlq is the high-level qualifier for the temporary mainframe datasets you allocated. References to these variables are also found in steps that follow.
|
Windows File Name |
Dataset Member Name |
|
QPDSNAT |
temphlq.JCLLIB(QPDSNAT) |
|
QCIVP |
temphlq.JCLLIB(QCIVP) |
|
single_tasking_WLM_environment_name |
temphlq.JCLLIB(single_tasking_WLM_environment_name) |
|
multi-tasking WLM environment_name |
temphlq.JCLLIB(multi-tasking WLM environment_name) |
Note:single_tasking_WLM_environment_name and multi_tasking_ environment_name are the names of the WLM environments you specified in the wizard.
IND$FILE in ASCII mode to transfer the file temp_local_directory\subsystem_id\QCINST to temphlq.QCINST.
temphlq.QCINST. Use the instructions explained in the README file (located in temp_local_directory\subsystem_id or in QuestDB2product_install\plugins\db2\zos) to complete the installation process.
The Toad IBM DB2 z/OS Components installation creates the following objects on the mainframe.
The Toad IBM DB2 z/OS Components installation creates the following objects on the mainframe.
The z/OS components installation creates the following mainframe objects on your z/OS system. You need these objects to enable full Toad for IBM DB2 functionality for your IBM DB2 subsystem.
Note: The permhlq value is the high-level qualifier for the permanent datasets created by the installation.
|
Object |
Location on the Mainframe |
|
Single-task WLM procedure |
SYSTEM.PROCLIB |
|
Multi-task WLM procedure |
SYSTEM.PROCLIB |
|
QPDSNAT procedure |
SYSTEM.PROCLIB |
|
Quest message file |
permhlq.QSMSG |
|
Quest load library |
permhlq.LOADLIB |
The installation process creates the following IBM DB2 for z/OS objects:
|
Object Type |
Object Name |
|
Database |
QCDB |
|
Tablespace |
QCBLUEPT, QCJFITS, QCTEMPLT, QCUTLIN, QCUTLOUT |
|
Table |
QUEST.QCBLUEPT_REPO030, QUEST.QCBLUEPT_STMT030, QUEST.QCJFI300_INPUT, QUEST.QCJFI300_OUTPUT, QUEST.QCTEMPLATE_REPO200, QUEST.QCUTL200_OUTPUT, QUEST.QCUTL200_TEMPLATES |
|
Index |
QUEST.QCBLUEPT_REPO030, QUEST.QCBLUEPT_STMT030, QUEST. QCTEMPLATE_REPO200 |
|
Function |
QUEST.QC200CHECKPDS, QUEST.QC200COMMAND, QUEST.QC200DSVOLSTATS, QUEST.QC200GETVOLUMEINFO, QUEST.QC200LISTMEMBER, QUEST.QC200STOGROUPVOLS, QUEST.QC200SUBSYSINFO, QUEST.QC200ZPARM, QUEST.QCVER, QUEST.QC200DSNCOMMAND, QUEST.QC202DSVOLSTATS, QUEST.QCAUTH, QUEST.QC204DSVOLSTATS |
|
Procedure |
QUEST.QC200EXECUTE_UTIL, QUEST.QC200SQLMSG, QUEST.QC300JFI, QUEST.QC450RETHLQ |
|
Global Temp Table |
QUEST.QC_UTILOBJ |
|
Schema |
QUEST |
This appendix describes how to customize the installation verification program QCIVP.
This appendix describes how to customize the installation verification program QCIVP.
After the Toad IBM DB2 z/OS Components Installation wizard finishes its tasks, you must perform additional tasks on the mainframe to complete the installation. The last of these mainframe tasks is to run QCIVP, a mainframe installation verification program. QCIVP verifies that the IBM DB2 CLI has been installed and bound. It also runs a sample of the components’s procedures and functions and then writes the output to the QSPRINT message file.
The dataset member permhlq.JCLLIB(QCIVP) contains the JCL for running QCIVP. This dataset is created during the z/OS components installation process you perform on the mainframe.
The instructions for running QCIVP, as well as for performing all other tasks required to complete the installation on the mainframe, are found in the README file for the Toad IBM DB2 z/OS Components installation. This README file is found in either location:
Plugins\DB2\ZOS directory under your Toad for DB2 installation directory. Before running QCIVP, you might need to edit the program it if any of the following situations is valid:
QCIVP is running so that a series of trace messages are written to a user-supplied file for every call to a CLI function for that job.
DSNHDECP member in the library), the default subsystem ID in DSNHDECP matches one of the subsystem IDs, but not the others. You need a mechanism for providing the correct IBM DB2 subsystem ID for connection to the subsystems whose IDs do not match the default SSID in DSNHDECP. You can accomplish this by coding a DSNAOINI override in QCIVP. Use the appropriate procedure to edit QCIVP:
Use the following procedure to edit QCIVP to enable application tracing for the duration of the QCIVP job.
Note: Enabling tracing for QCIVP does not affect the long-term results obtained from the WLM procedures.
To enable application tracing
permhlq.JCLLIB(QCIVP) in an ISPF EDIT session (where permhlq is the high-level qualifier for the permanent location where the z/OS component was installed).
Type NUM OFF at the EDIT session command line to turn off sequence numbering.
Note: If you fail to turn sequence numbering off, errors can occur. Be aware that you might need to turn sequence numbering off each time you edit QCIVP.
Add the following cards to QCIVP:
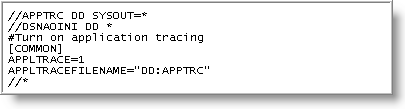
QCIVP.
permhlq.JCLLIB(QCIVP) in another ISPF EDIT session. There should be no sequence numbers in columns 73-80 for lines appearing between //DSNAOINI and the //* line.
FIND X ‘AD’ ALL in the command line, and press Enter.
FIND command locates all the left brackets.
FIND X ‘BD’ ALL in the command line, and press Enter.
FIND command locates all right brackets.
FIND failed to located even one bracket, type HEX ON in the command line, press Enter, and then make the appropriate edits in HEX mode.QCIVP. Use the following procedure to edit QCIVP to disable application tracing for the duration of the QCIVP job.
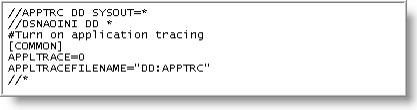
To disable application tracing
permhlq.JCLLIB(QCIVP) in an ISPF EDIT session (where permhlq is the high-level qualifier for the permanent location where the z/OS component was installed).
Type NUM OFF at the EDIT session command line to turn off sequence numbering.
Note: If you fail to turn sequence numbering off, errors can occur. Be aware that you might need to turn sequence numbering off each time you edit QCIVP.
QCIVP.
permhlq.JCLLIB(QCIVP) in another ISPF EDIT session. There should be no sequence numbers in columns 73-80 for lines appearing between //DSNAOINI and the //* line.
FIND X ‘AD’ ALL in the command line, and press Enter.
FIND command locates all the left brackets.
FIND X ‘BD’ ALL in the command line, and press Enter.
FIND command locates all right brackets.
FIND failed to located even one bracket, type HEX ON in the command line, press Enter, and then make the appropriate edits in HEX mode.QCIVP. Use the following procedure both to enable application tracing and to change the IBM DB2 SSID from the default value in the DSNHDECP to the actual IBM DB2 SSID for the subsystem on which you are installing the z/OS components.
To enable application tracing and change the default IBM DB2 SSID
permhlq.JCLLIB(QCIVP) in an ISPF EDIT session (where permhlq is the high-level qualifier for the permanent location where the z/OS component was installed).
Type NUM OFF at the EDIT session command line to turn off sequence numbering.
Note: If you fail to turn sequence numbering off, errors can occur. Be aware that you might need to turn sequence numbering off each time you edit QCIVP.

QCIVP.
permhlq.JCLLIB(QCIVP) in another ISPF EDIT session. There should be no sequence numbers in columns 73-80 for lines appearing between //DSNAOINI and the //* line.
FIND X ‘AD’ ALL in the command line, and press Enter.
FIND command locates all the left brackets.
FIND X ‘BD’ ALL in the command line, and press Enter.
FIND command locates all right brackets.
FIND failed to located even one bracket, type HEX ON in the command line, press Enter, and then make the appropriate edits in HEX mode.QCIVP. Use the following procedure to change the IBM DB2 SSID from the default value in the DSNHDECP to the actual IBM DB2 SSID for your subsystem without enabling application tracing.
To change the default DB2 SSID without enabling application tracing
permhlq.JCLLIB(QCIVP) in an ISPF EDIT session (where permhlq is the high-level qualifier for the permanent location where the z/OS component was installed).
Type NUM OFF at the EDIT session command line to turn off sequence numbering.
Note: If you fail to turn sequence numbering off, errors can occur. Be aware that you might need to turn sequence numbering off each time you edit QCIVP.

QCIVP.
permhlq.JCLLIB(QCIVP) in another ISPF EDIT session. There should be no sequence numbers in columns 73-80 for lines appearing between //DSNAOINI and the //* line.
FIND X ‘AD’ ALL in the command line, and press Enter.
FIND command locates all the left brackets.
FIND X ‘BD’ ALL in the command line, and press Enter.
FIND command locates all right brackets.
FIND failed to located even one bracket, type HEX ON in the command line, press Enter, and then make the appropriate edits in HEX mode.QCIVP. 