|
IMPORTANT: To make a copy of a database using the Full File and Filegroup Backup method (available only for VDI), it must be restored to a different SQL Server® Instance. When renaming a database during a VSS-based restore, the database files must also be relocated to an alternate directory. If the database files are not relocated to an alternate directory, the restore fails. This failure is because VSS does not let you rename the database without moving the data and log files to a different directory. When relocating data and log files for VSS-based restores, you can relocate the data files to one directory and the log files to a separate directory if both directories are different than the original. |
|
1 |
In the Navigation pane, click Create Restore Job, select Plug‑in for SQL Server from the Plugin Type list, select the applicable saveset, and click Next. |
|
2 |
|
3 |
In the Rename/Relocate dialog box, enter the applicable information: |
|
• |
Rename: Enter the new name. |
|
• |
Relocate: Enter the new path. |
|
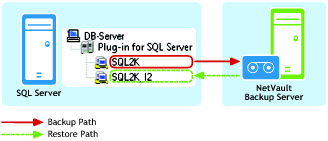
IMPORTANT: If you intend to restore a database to an alternate instance that resides on the same server and the original database still exists, you must use the Rename/Relocate option described previously in Renaming or relocating a database. Use this option to rename or move the datafiles to ensure that they do not overwrite or conflict with the same files in the original database. |
|
• |
Same version of SQL Server: Both the source instance from which the data was backed up and the target instance to which the data is to be restored must be running the same version of SQL Server. |
|
• |
Instance configured for access: The instance to which the database is to be restored must be accessible to the plug-in. To set up the instance for access, see Configuring authentication details. |
|
1 |
In the Navigation pane, click Create Restore Job, select Plug‑in for SQL Server from the Plugin Type list, select the applicable saveset, and click Next. |
|
2 |
On the Create Selection Set page, click Edit Plugin Options, and configure the restore options by following the instructions outlined in Restoring data from online VDI backups. |
|
3 |
In addition, set the Target Instance parameter. |
|
4 |
|
• |
Same version of SQL Server installed: The SQL Server version must be the same as the version running on the existing database server. |
|
• |
NetVault Backup software and the Plug‑in for SQL Server installed: The same version of NetVault Backup software and the plug-in must be installed and configured on the new restore target. |
|
• |
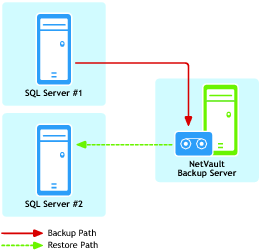
Client added to the NetVault Backup Server: The target machine must be added to the NetVault Backup Server by using the Manage Clients page of the NetVault Backup WebUI. |
|
• |
Instance of SQL Server must exist on the new restore target: An instance of SQL Server must exist on the new restore target. This instance serves as the target of the relocation restore. Not only must this instance be properly set up and configured in SQL Server, it must also be accessible to the plug-in on the new restore target. To set up the instance for access, see Configuring authentication details. |
|
IMPORTANT: In a disaster recovery scenario, use this procedure to restore the master and the msdb database backups. After restoring the master database, restart the server. Restore and recover each individual database. |
|
1 |
|
IMPORTANT: When you perform a restore to an alternate server, you cannot modify the name or destination of the restored master database. The master database is restored to the location of the current master database in the target for the restore. |
|
2 |
After restoring the master database, restart the server. |
|
a |
In the Navigation pane, click Create Restore Job, select Plug‑in for SQL Server from the Plugin Type list, select the applicable saveset, and click Next. |
|
b |
On the Create Selection Set page, click Edit Plugin Options, and configure the restore options by following the instructions outlined in Restoring data from online VDI backups. |
|
c |
In addition, set the Target Instance parameter. |
|
NOTE: If you are restoring the default SQL Server® Instance to the alternate server, you can enter the name of the destination server (for example, MSSQLSERVER) for the Target Instance. |
|
d |
|
e |
In Job Name, specify a name for the job if you do not want to use the default setting. |
|
f |
In the Target Client list, select the new restore target. |
|
g |
Use the Schedule, Source Options, and Advanced Options lists to configure any additional required options. |
|
h |
|
NetVault Backup 10.x uses a PostgreSQL database. If the PostgreSQL database does not start, NetVault Backup cannot start. To correct this issue, delete the “postmaster.pid” file from the location referenced in the log and restart the NetVault Backup Server. For more information, see https://support.quest.com/netvault-backup/kb/122475. | ||
|
Login failed for user <userName>. |
||
|
Open the Manage Devices page, select the backup media, and click Scan. NetVault Backup stores index information for backup jobs in two locations: in the NetVault Database and on the media targeted by the backup. Performing this scan adds the index information to the NetVault Database. To verify that the information was added, open the Manage Job Definitions page, and locate the specific job. If you can run the job now, the scan process has corrected the problem.
| ||
