|
1 |
On the navigation panel, click Homes > Databases. |
|
2 |
Click Monitor > SQL Server in the upper left corner of the Databases View. |
|
a |
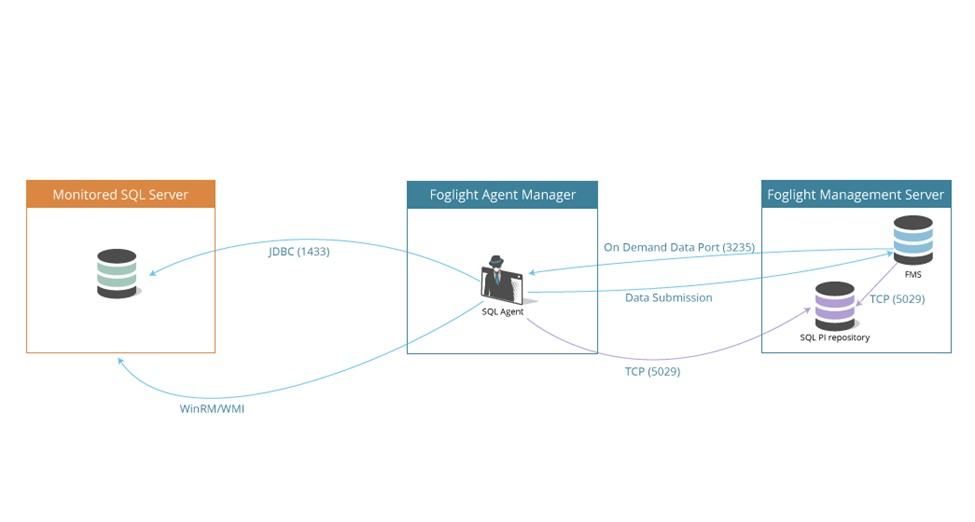
Click the Monitoring agent will run from host <agent manager> link located in the bottom left corner of the dialog box. |
|
• |
Port — Optional. This field can be left empty, unless the TCP/IP connection port is not the default port: 1443. |
|
• |
Essential — Store and display only critical or fatal alarms. |
|
• |
Normal — Store and display most alarms — essential and best practices; only critical and fatal statistical alarms. |
|
• |
Tuning — Store and display all SQL Server alarms sent to Foglight. |
|
• |
Performance — Store and display only availability and SQL PI related alarms. |
|
7 |
Optional — In the Monitoring Extensions pane, click the SQL PI monitoring extension. You are prompted to choose the Agent Manager on which the SQL PI repository is installed. |
|
8 |
Optional — In the Monitoring Extensions pane, click the Operating System link. |
|
9 |
Optional — In the Monitoring Extensions pane, click Collect VM statistics. |
|
10 |
Click Monitor. |
|
11 |
When the installation completes successfully, the Monitoring Initialized Successfully dialog box appears. Click Add another Database or Finish to exit. |
|
1 |
In the upper left corner of the Databases View, click Monitor > SQL Server. |
|
2 |
Click the Use this option to discover your SQL-Server instances link. The Select an Agent Manager dialog box appears. |
|
4 |
Click Add instances and select one of the following methods for adding instances: |
|
5 |
|
7 |
Click Set credentials to provide the instances' log in credentials and monitoring configuration. |
|
8 |
Follow the steps described in Installing and Monitoring a Single SQL Server Instance, starting with Step 4 to enter the monitoring credentials and enable the monitoring extensions for this instance. |
|
NOTE: To use stored credentials when enabling the Operating System monitoring extension, click the Operating System > Select from stored credentials link to open the Stored Credentials dialog box. Here you can review the log in credentials and authentication methods used for logging in to Foglight. Foglight stores encrypted credentials in lockboxes, which may be password-protected for added security. Database agents store all user log in credentials in a default lockbox called DB-Agent Lockbox. If credentials have already been entered in another lockbox, use the Lockbox list to select from that lockbox. |
|
9 |
Click Monitor |
|
• |
If the message is Insufficient database privileges, this issue can be resolved using the Insufficient Database Privileges dialog box that appears. For details, go to Step 10. |
|
• |
For all other messages, the Database Connection Failed dialog box appears. For details, go to Step 11. |
|
10 |
Click the text Insufficient Database Privileges. |
|
a |
Click Show details to view the error’s description. |
|
b |
Click Set credentials to display the dialog box used for entering the credentials, and enter the required changes. |
|
1 |
Click Add instances. |
|
2 |
Click Add manually. |
|
4 |
Click Finish. |
