|
1 |
On the navigation panel, under Dashboards, choose Administration > Cartridges > Cartridge Inventory. |
|
2 |
On the Cartridge Inventory dashboard, click Install Cartridge. |

|
3 |
In the Install Cartridge dialog box, click Browse and navigate to the Virtual-HyperV-5_7_0.car file that you want to install. |
|
4 |
Ensure that the Enable on install check box is selected. |
|
5 |
Click Install Cartridge. |
|
6 |
|
7 |

|
2 |

|
3 |
On the Agent Status dashboard, click the Deploy Agent Package button in the lower-left corner. |


|
5 |
In the Deploy Agent Package wizard, on the Agent Packages page, select the HyperVAgent and SCVMM packages, and click Next. |

|
6 |
In the Deploy Agent Package wizard, on the Summary page, verify that the host name and package are correct, and click Finish. |
|
• |
Hyper-V Agents collect information from monitored Hyper-V servers. A Hyper-V server is a physical component required to begin building a virtual infrastructure. Hyper-V servers provide hypervisor-based architecture for controlling and managing resources for the virtual machines that run on it. |
|
• |
SCVMM Agents collect information from Virtual Machine Managers (VMM). A VMM allows you to manage host, networking and storage resources when creating and deploying virtual machines to virtual clouds. |
|
2 |
|
3 |
On the Hyper-V Environment dashboard that appears in the display area, open the Administration tab. |

|
4 |
On the Administration tab, under Agents, open the Hyper-V Agents or the SCVMM Agents tab, as required. |
|
5 |


|
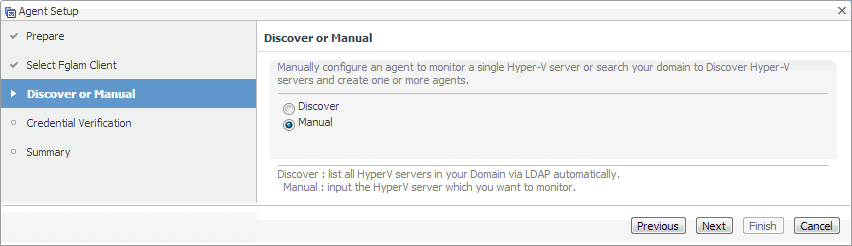
8 |
Hyper-V Agents only. On the Discover or Manual page that appears, you can indicate if you want to manually specify the Hyper-V Server that you want to monitor, or to choose between the servers running in a given domain. |
|
a |
Discovering Hyper-V Servers only. On the Enter Domain Credentials page that appears, specify the information needed to search for the running Hyper-V Servers. |

|
• |
Domain: Type the fully qualified name of a domain to search for the Hyper-V Server. For example, myDomain.com. |
|
• |
User: Type the user name to be used by the agent to be used to query Active Directory on the selected domain using the syntax Domain\UserName. For example, myDomain\myUserName. |
|
• |
Password: Type the password associated with the above user name. |


|
d |
|
b |
Manually specifying a Hyper-V Server only. On the Manual Agent Properties page that appears, specify the information needed to search for the running Hyper-V servers. |

|
c |
On the Credential Verification page that appears, review the existing set of credentials. If the wizard determines that the selected Agent Manager has any credentials configured for the host on which the Hyper-V Server is running, they appear listed on this page. |
|
9 |
SCVMM Agents only. On the Input Agent Properties page that appears, type the name of the SCVMM server, and click Next. |

|
10 |
On the Credentials Verification page, select one of the following options: |
|
• |
Do not configure a credential: Select this option if you want to configure the credential for this resource at a later time. Click Next and continue with Step 13. |
|
• |
Add host(s) to a new credential: Select this option if you want to add the host to a new credential. This option is suitable if none of the existing credentials have the connection details needed to access the new host. Click Next and continue with Step 11. |
|
• |
Add host(s) to an existing credential: Select this option if you want to add the host to an existing credential. This option is suitable if an existing credential has the security data needed to access the new host, but you need to edit its resource mappings to include this host. Click Next and continue with Step 12. |

|
a |
On the Credential Type page that appears, select the credential type from the available options. |

|
b |
Click Next. |

|
c |

|
d |
On the Credential Name and Lockbox page, provide a name to uniquely identify the credential, and select a lockbox in which you want to keep the credential. A lockbox can be used to group credentials for access and/or security. In smaller Foglight installations, using the default System lockbox should be sufficient. |

|
e |
On the Resource Mapping page, indicate which hosts you want to associate with this credential. Click Next. |

|
f |
Optional—On the Policies page, define one or more policies for this credential. A policy defines the number of times a credential can be used, the number of allowed authentication failures, the time range during which the credential is valid, or the length of time the credential data can be cached on the client. For example, you can specify the number of times the credential can be used, or the time period during which it can be used. For complete information about the available credential policies, see the Administration and Configuration Help. |

|
a |
On the Credential page that appears, select an existing credential to contain this host. |

|
b |
Click Next. |

|
c |
On the Resource Mapping page, indicate which hosts you want to associate with this credential. You can either select the host that you are about to start monitoring, all monitored hosts, or hosts whose name contains a specific text string. |
|
13 |
On the Summary page that appears, review the information provided about the host and the monitoring agent. |
|
14 |
Click Finish. |
|
a |
Select an agent and click Edit Properties. |

|
c |
Open the Credentials tab, and review the available credentials. |

|
18 |
Click Refresh. |

|
1 |
Log in to the Foglight™ browser interface. |
|
2 |
|
3 |
On the Agent Status dashboard, click Create Agent. |


|
5 |
|
• |
To have Foglight assign a generic name, ensure that Generic Name is selected. |
|
• |
To use a specific agent name, select Specify Name, and in the Name box that appears, type the agent name. |
|
7 |
Click Next. |
|
8 |
In the Create Agent wizard, on the Summary page, verify that the host name and agent name are correct, and click Finish. |
|
a |
On the Agent Status dashboard, select the newly created Hyper-V or SCVMM agent instance, click Edit, and chose Edit Properties from the menu that appears. |

|
b |
Click Modify the private properties for this agent. |
|
d |
